AV technicians sit at the heart of every successful digital display project, translating complex technical requirements into seamless visual experiences that audiences remember. As indoor LED screens become the standard for corporate lobbies, retail environments, control rooms, and entertainment venues, the pressure to deliver flawless installations has never been greater. Yet optimizing these systems demands far more than simply hanging a panel on a wall.
From selecting the right pixel pitch for a given viewing distance to navigating the nuances of curved display alignment, technicians face a layered set of challenges at every project stage. Features like front IP65 protection add durability in demanding indoor environments, while advanced calibration tools can make or break image quality. Beyond the physical installation, fast and reliable service access determines how quickly teams can resolve issues and keep displays running at peak performance. This guide walks through the essential strategies AV technicians need to plan, install, configure, and maintain indoor LED screens with confidence — covering the technical details and practical decisions that separate a good deployment from a truly optimized one.
Understanding Indoor LED Screen Technology and Essential LED Display Features
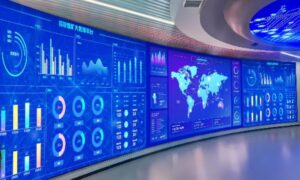
Indoor LED screens have evolved from niche installations into the display technology of choice across corporate, retail, hospitality, and entertainment environments. Their ability to deliver high brightness, scalable resolution, and seamless tiling makes them uniquely suited to demanding visual applications. For AV technicians, understanding the foundational technology isn’t just academic — it directly shapes every decision made during planning, installation, and long-term management. Knowing which LED display features matter for a specific environment separates technicians who deliver outstanding results from those who simply get the job done.
Core Components and Functionality of Indoor LED Screens
At the heart of every indoor LED screen are three performance variables that technicians must evaluate before specifying any system: pixel pitch, brightness, and resolution. Pixel pitch — the distance in millimeters between the centers of adjacent LED clusters — determines how close viewers can stand before individual pixels become visible. A tighter pitch like 1.5mm suits conference rooms and control centers where viewers sit close to the display, while a 3mm or 4mm pitch works well in larger lobbies or auditoriums. Brightness, measured in nits, must be balanced against ambient lighting conditions; an overly bright display in a dim room creates eye fatigue, while an underpowered screen in a sunlit atrium looks washed out. Resolution follows directly from pitch and panel count, and technicians must verify that the signal source can output content at the native resolution of the assembled screen to avoid scaling artifacts that degrade image quality.
Evaluating Special Features: Front IP65 and Curved Displays
Beyond core specifications, certain LED display features can dramatically extend a system’s lifespan and visual impact. Front IP65 protection — a rating indicating complete dust resistance and protection against low-pressure water jets — is increasingly relevant even in indoor environments. Kitchens, manufacturing floors, gyms, and transit hubs all expose screens to moisture, cleaning agents, and airborne particulates that degrade unprotected panels over time. A front IP65-rated screen allows staff to wipe the surface directly without risking internal component damage. Curved displays introduce a different advantage: they wrap the image around the viewer’s natural field of vision, creating immersive experiences in retail showcases, broadcast studios, and entertainment venues. However, they require precise mechanical alignment and content formatting adjustments to prevent geometric distortion across the curve.
Step-by-Step Guide to Installing and Configuring Indoor LED Screens
A successful indoor LED screen installation rarely comes down to a single decision — it’s the accumulation of careful choices made at every stage. Technicians who follow a disciplined process from site assessment through final testing consistently deliver better results with fewer callbacks and less rework. The following steps address the practical realities of deploying standard flat panels and more specialized configurations like curved and front IP65-rated displays.
Pre-Installation Assessment and Site Preparation
Before a single panel arrives on-site, technicians should conduct a thorough site survey covering four critical areas: structural load capacity, power availability, ambient lighting, and signal routing. Confirm that walls, rigging points, or floor mounts can support the combined weight of all panels plus hardware. Verify that dedicated power circuits meet the screen’s peak draw requirements — undersized circuits cause flickering and premature component failure. Map signal cable paths from source to display, keeping video runs within manufacturer-specified lengths to avoid degradation. For environments where front IP65 screens will be installed, note any drainage patterns, cleaning routines, or HVAC discharge points that could direct moisture toward the display face.
Mounting, Assembly, and Cable Management
Flat panel arrays require precise leveling from the first cabinet — any misalignment compounds across subsequent panels, creating visible seams. Use a laser level throughout the build rather than relying solely on a spirit level. For curved installations, follow the manufacturer’s radius specifications exactly; forcing panels into a tighter arc than designed stresses cabinet connectors and distorts the display surface. Route power and data cables through dedicated conduit where possible, keeping signal cables separated from power lines to prevent interference. Label every cable at both ends before final dressing — this investment saves significant time during troubleshooting. Secure all connectors fully and strain-relieve cables so vibration or accidental contact cannot cause intermittent disconnections.
Configuration, Calibration, and Testing
Once physically assembled, connect the display controller and configure input resolution to match the screen’s native pixel count exactly. Use the manufacturer’s calibration software to equalize brightness and color uniformity across all cabinets — factory calibration data loaded via SD card or network provides a reliable baseline, but on-site fine-tuning accounts for real-world ambient conditions. Platforms like Chipshow LED provide calibration workflows that streamline this process, helping technicians achieve consistent uniformity across multi-cabinet arrays more efficiently. Run a full-screen white field, then a black field, to identify any dead pixels or brightness irregularities before the client sees the display. Test every input source, verify audio-video sync if applicable, and cycle through scheduled content to confirm the display management system operates correctly under normal operating conditions.
Optimizing Performance with Advanced Features: Front IP65 and Curved Displays
Installing a display with advanced features is only half the equation — knowing how to leverage those features throughout the system’s lifecycle is what separates a competent deployment from a truly optimized one. Front IP65-rated screens and curved displays each introduce distinct operational advantages, but they also demand specific handling during installation and ongoing use to deliver on their promise.
Implementing Front IP65 for Long-Term Reliability
Front IP65 protection pays dividends in environments that standard screens simply cannot tolerate. Fitness centers, commercial kitchens, transit terminals, and manufacturing facilities all subject displays to regular moisture exposure, airborne grease, or chemical cleaning agents. In these settings, specifying an IP65-rated front surface isn’t a luxury — it’s a maintenance strategy. During installation, technicians should verify that the rear of the cabinet still receives adequate ventilation, since IP65 ratings typically apply to the display face rather than the full enclosure. Seal any wall penetrations where cables enter to prevent moisture from migrating behind the panel. For routine cleaning, staff can safely use damp cloths or mild cleaning solutions directly on the screen surface without risking internal damage, which extends service intervals and reduces the likelihood of premature component failure caused by contaminant ingress.
Maximizing Impact with Curved Display Installations
Curved displays create a sense of envelopment that flat arrays cannot replicate, but realizing that impact requires careful attention to both geometry and content. During design, confirm that the specified radius matches the intended viewing distance — a curve optimized for a 3-meter viewing position will feel distorted at 1.5 meters. Align each cabinet to the manufacturer’s arc template rather than estimating by eye, and use a radius jig or curved reference rail to maintain consistency across the full span. Once the display is assembled, content must be pre-formatted or processed through the controller’s geometry correction tools to compensate for the perspective shift introduced by the curve. Test with high-contrast imagery — straight horizontal lines and grid patterns reveal misalignment or content distortion immediately, allowing technicians to make corrections before final handover.
Ensuring Reliability with Fast Service and Troubleshooting Strategies
Even the most carefully installed LED screen will eventually encounter an issue — and when it does, the speed of resolution directly affects client satisfaction and the technician’s reputation. Building a reliable service framework before problems arise is as important as the installation itself.
Accessing and Utilizing Fast Service Networks
Before a project closes, technicians should confirm that the manufacturer or distributor offers responsive technical support — ideally with regional service centers, dedicated phone lines, and documented response time commitments. Review warranty terms carefully: understand which components are covered, whether on-site labor is included, and what the replacement process looks like for critical parts like power supplies or receiving cards. For high-stakes environments such as control rooms or retail flagship stores, negotiate an on-call support agreement that guarantees same-day or next-day response. Manufacturers such as Chipshow LED maintain dedicated service networks that can be particularly valuable when rapid parts replacement is critical to minimizing downtime. Keeping a small inventory of spare modules, cables, and power supplies on-site eliminates the most common cause of extended downtime — waiting for parts to ship.
Common Troubleshooting Scenarios and Quick Fixes
Display flickering typically points to three culprits: an unstable power supply, a loose data cable connection, or a refresh rate mismatch between the controller and the receiving cards. Check power output voltage first, reseat all data connectors, then verify that the controller’s refresh rate setting matches the panel specification. Connectivity problems — where sections of the display go dark — usually trace back to a failed receiving card or a damaged signal cable between cabinets; swapping in a spare card confirms the diagnosis within minutes. Calibration errors that cause color banding or brightness inconsistencies across panels are best resolved by reloading the factory calibration file and re-running the uniformity correction tool, ensuring all cabinets share a common baseline before fine-tuning output settings.
Best Practices for Maintenance and Long-Term Optimization
Sustaining peak performance from an indoor LED screen requires the same discipline after installation as during it. Establish a routine maintenance schedule that includes monthly visual inspections for dead pixels, physical damage, or loose cabinet connections, alongside quarterly cleaning of ventilation pathways to prevent heat buildup that degrades LED lifespan. For front IP65-rated screens, schedule surface cleaning on a frequency appropriate to the environment — weekly in kitchens or gyms, monthly in corporate lobbies. Keep the display management software and firmware updated; manufacturers regularly release patches that improve stability, color processing, and compatibility with new signal sources. Set up remote monitoring where the system supports it, so brightness drift, temperature anomalies, or receiving card errors trigger alerts before they become visible failures. Log every service event, replacement, and configuration change in a maintenance record tied to the specific installation — this history proves invaluable when diagnosing recurring issues or planning future upgrades. Consistent documentation and proactive monitoring transform reactive repair cycles into predictable, manageable maintenance routines that protect both the display investment and the technician’s reputation.
Building a Foundation for Flawless LED Display Deployments
Optimizing indoor LED screen installations demands technical precision at every stage — from understanding how pixel pitch and brightness interact with a specific environment, to aligning curved panels with geometric accuracy, to building a service framework that minimizes downtime when issues arise. AV technicians who master these layers consistently deliver displays that perform reliably long after the installation team has left the site.
The key takeaways are straightforward: match display specifications to the viewing environment before specifying any hardware, leverage advanced features like front IP65 protection and curved configurations where they genuinely serve the application, and treat calibration and documentation as non-negotiable steps rather than optional finishing touches. Pairing a disciplined installation process with proactive maintenance routines and access to fast, responsive service support transforms a one-time deployment into a long-term asset for the client.
As indoor LED technology continues to evolve — with tighter pixel pitches, smarter control systems, and increasingly durable panel designs — technicians who stay current with these advancements will be best positioned to take on more complex projects and deliver outcomes that stand apart. The investment in technical knowledge pays dividends not just in display performance, but in the professional reputation that follows every successful installation.