A video with unnecessary silent sections can increase the file size and result in awkward parts. Silence detection is a technology that detects the silent sections in audio or video recordings and helps the editor remove them with ease. Besides saving time, this utility also excludes the manual efforts of going through the entire video in search of silence.
Modern silence detection tools use audio analysis to detect gaps, trim dead air, and streamline post-production workflows. To help filmmakers refine their content, this article is a detailed guide to Wondershare Filmora’s silence detection utility.
Part 1. What Is Silence Detection in Video Editing?
Silence detection is an AI-powered editing feature that automatically identifies and removes silent parts in audio or video to improve pacing and reduce editing time. The following section is a more elaborate discussion on the technology:
How Silence Detection Speeds Up Editing
Go through the points below and explore how audio silence detection speeds up editing:
- Automatic Detection: This technology automatically identifies and removes the quietness in videos without needing a manual review.
- Faster Video Trimming: It removes dead air quickly to create smoother and shorter content.
- Improved Workflow Efficiency: Streamlines post-production by automating repetitive editing tasks.
- Better Content Pacing: Audio silence detection lets creators maintain engaging audio and video flow for viewers and listeners.
Difference Between Manual Cutting and AI Detection
For starters, it is important to understand the difference between manual cutting and AI detection of unwanted parts. The following table helps ease the understanding:
| Aspect | Manual Cutting | AI Silence Detection |
| Editing Speed | Slow, manual review | Instant detection |
| Accuracy | Depends on the editor | Consistent AI-based detection |
| Effort Required | High | Low |
| Result Quality | Variable | Stable and repeatable |
Part 2. Why Filmora Is the Easiest Way to Cut Silent Moments
Filmora offers an AI-powered silence detection feature that reduces manual input. With an easy interface and quick applications, this tool emerges as a viable option for beginners as well. The Filmora silence detection feature has 2 navigation pathways to facilitate the editors with silence detection at any time of the editing process.
Users looking for customized results can use the advanced settings to set the detection parameters as needed. Furthermore, it also offers a waveform analysis that helps prevent editors from accidentally cutting spoken words.
Key Features
- Batch Silence Removal: Filmora enhances the user’s work efficiency by letting them remove silence from multiple clips at a time.
- Timeline Export: Once the silent parts have been removed from the video, users can export it to the timeline for further editing.
- AI Analysis: Editors do not have to review the video manually, as AI analyzes the quietness.
- Customization Options: Filmora offers silence-detection settings to prevent useful parts of the video from being detected as silence.
Part 3. How to Use Silence Detection in Wondershare Filmora
Wondershare Filmora’s silence detection feature offers both automatic detection and manual control. It enables users to set a threshold for silence to remove just the parts that are above a certain level of volume and duration. The following section covers the settings one can consider before AI analysis of their video:
- Duration Settings: Users can define how long a silent segment must be before it is detected.
- Volume Threshold Adjustments: Set the minimum sound level considered silence to avoid deleting important parts.
- Softening Buffer: Adds a small time cushion before and after detected silence to avoid abrupt cuts.
A Guide to Using Wondershare Filmora for AI Silence Detection
The Silence Detection feature can be accessed through multiple pathways in Filmora. The following steps include a guide to the most practical way to remove silent parts of a video:
Step 1. Start a New Project on Filmora
First, select the “New Project” button and import a video using the designated button in the following interface.
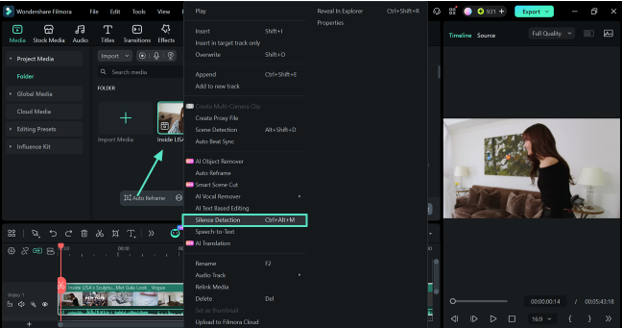
Step 2. Access the Silence Detection Feature
Now, right-click on the video thumbnail in the media window and select the “Silence Detection” feature from the pop-up menu. This feature can also be accessed from the Toolbox in the main interface or the “Ctrl+Alt+M” hotkey.
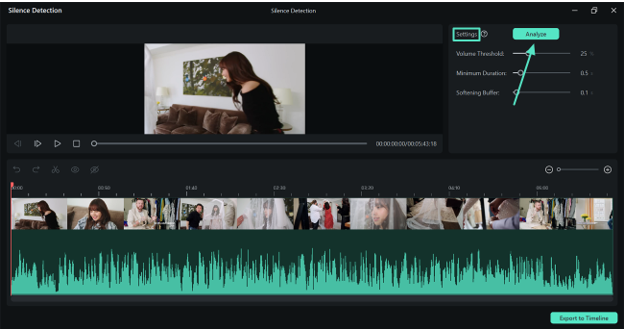
Step 3. Let the AI Analyze the Silence
As the next window opens, use the “Settings” sliders to customize the silence analysis and click the “Analyze” button to initiate the process.
Step 4. Remove Silent Parts and Export to the Timeline
Once the silent parts have been detected in the timeline at the bottom, click on them and use the “Split Marker” to remove them. Lastly, click the “Export to Timeline” button at the bottom right to make further edits to the footage.
Conclusion
Conclusively, having silent parts in a video can make the video unprofessional and unnecessarily long. This article explored the concept of AI silence detection and demonstrated it using Filmora for the purpose. This tool offers various customization settings to help a user set a silence detection threshold. All in all, Filmora can be used for automated deletion of quiet parts without manual efforts.
Note to Reader: This section is an independent editorial assessment based on publicly available product information and comparative analysis. It does not reflect the official views or positions of any publisher, software company, or media organization.
Read More From Techbullion