Do you need to store equipment in a shipping container? Then you know how hard it is. That metal roof gets really hot in the summer. When it rains hard, condensation drips all over the place. Adding a proper shipping container roof can solve both issues and turn a basic steel box into a more functional workspace or storage facility.
This guide will introduce you to various roof types for shipping containers, materials, and installation techniques, covering all key aspects to help you plan your shipping container roof project with greater confidence and reduce costs.
Is a Shipping Container Roof Right for You?
Not all containers need to have a roof added. However, in certain special cases, installing a shipping container roof can make a significant difference in the effect. If items prone to moisture, such as machinery, feed, and documents, are stored inside for a long time, the ordinary corrugated steel cover offers little insulation. It is difficult to address the moisture problem fully.
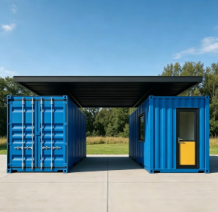
Adding a roof structure will create an air gap that can dramatically reduce heat transfer and moisture buildup inside the container. If you want to increase available space, shipping container roofing is also an effective option. Put two containers next to each other and close the top space. And just like that, you have a covered work space. It’s ideal for a workshop, vehicle shelter, or cargo handling.
Common Types of Container Roof Designs
No single type of roof is suitable for all containers. Which design is best depends on your local climate, the number of containers you have, and how you want to use the space. Now, I will give you a detailed analysis of the most reliable schemes for practical application:
- Flat Roof: Flat roofs are the easiest and cheapest choice. They are usually mounted directly on the container at an angle of less than 10°. Since the slope is so low, flat roofs drain more slowly. They work best where you don’t have to worry about heavy rain.
- Sloped Roof:The monopitch roof is minimalist and very contemporary. It is an uncomplicated yet efficient way of draining water. It is easy to install and built for all weather. This is the top pick for single containers or lean-to arrangements.
- Gable Roof:The gable roof is a traditional double-pitch roof with a peak in the centre and a smaller pitch on the edges to enable good two-sided rain runoff. A gable roof is to fit two containers side by side. Its symmetrical structure can evenly distribute the load, and it is also applicable when multiple containers are combined in a layout.
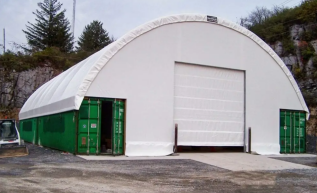
- Arch Roof: The arched roof or dome roof is not a roof structure formed by the joining of roof ridges, but rather a direct arch spanning from one container to another. The structure is highly efficient, with natural dispersion of wind and snow loads. No additional columns are required inside.
When the span exceeds 10 meters, it is more economical and requires less steel than gable roofs. Although the initial cost is slightly higher than the basic pointed roof, the spacious interior space and excellent wind resistance make it more cost-effective in large projects. The circular buildings we commonly see adopt this design, which can be installed directly on top of the container to create a roofed storage or work area.
If you are considering a shipping container dome roof like this for a wide-span application, a hoop building design is typically the most structurally sound and space-efficient option available.
What Materials Might You Need When Building One?
Before placing an order to purchase materials, make sure you fully understand the function and significance of the materials for each component. This will definitely help you avoid a lot of trouble.
Selecting materials is never a straightforward decision. It is necessary to guarantee the roof’s durability and ensure easier assembly and maintenance without any issues. The following are methods for selecting materials when building shipping container roofing.
- Structural Frame:Timber and steel are the most widely used. Timber is easy to work with and makes for a good DIY building material. Steel is strong and can be used for durable applications. Both can be attached to containers with clamps. The best option will depend on the weather conditions in your area and your loading requirements.
- Roofing Panels:Shipping container roofing solutions are mainly divided into three main categories based on functional requirements: corten steel, tarpaulin, and sandwich panels.
Corten steel is the standard option for steel roofs. They are engineered for structural integrity and lasting permanence, making them ideal for storing materials over time.
Tarpaulin roofs are an effective expansion option with the use of PVC/PE fabric and steel or aluminum alloy frames. These provide cheap, naturally lit, column-free environments that are best for temporary workshops.
Sandwich panels are tailored for functional changes. They have integrated insulation, which provides enhanced thermal and sound protection, and they are often used in modular offices and accommodation.
- Other Materials:
Fasteners: When fastening shipping container roof panels, use 304 or 316 stainless steel fasteners. Carbon steel fasteners with hot-dip galvanising or Dacromet coating treatment can also be applied. Popular types of fasteners are blind rivets, high-strength bolts, and self-tapping screws. These materials are tested for strength and provide excellent rust protection. These bolts and screws are rustproof and are tested for strength. Caulk all seams and laps thoroughly to form an airproof seal. This blocks moisture. Your container stays dry and secure. It stands strong in any weather.
Water Proofing & Drainage: If the shipping container will be subjected to the long-term outside environment. Use EPDM or TPO membranes as the prime watertight layer. Apply a urethane endcap to all fastener penetrations and joints for the best seal. A powder coat finish on the aluminium ensures a long service life. This additional action drains water off your roof, reduces rust, and keeps your container dry and safe.
Insulation: Apply reflective foil insulation or extruded polystyrene foam panels to reduce thermal bridging. These materials stop the metal frame from conducting the intense shipping container outdoor heat or cold into. Energy used for heating and cooling can be reduced substantially by high-quality insulation.
If you know what each material does, you can build a better, longer-lasting roof for a shipping container that’s easier to maintain.
Step-by-Step Guide to Building the Roof
Building a shipping container roof is not something that can be accomplished in a short time. Each stage must be completed step by step according to the procedures.
Compliance Planning
In pre-construction, check with your local building department. Roofs for shipping containers are as hard to change as regular buildings; many cities and counties still require permits, particularly if the structure surpasses certain size limits or is used for commercial purposes.
You have to know local wind and snow load requirements in advance; a roof built in Southern California, for example, may not meet roof load requirements in coastal Minnesota or Florida. Knowing the loads before you build a shipping container roof will save you a lot of money in the end from having to make unplanned changes.
Structure Design
Next, begin by measuring your containers accurately. The dimensions, not only the height and width matter but also the top rails where the roof frame sits. Container older ones may be dented or rusty, and that can interfere with the mounting.
Choose your roof for shipping container type according to your climate and use, and then work out the span needed. If you are bridging the gap between two containers, the span is the distance between their outer edges. This figure will let you know the size of the frame, the thickness of materials needed, and if an arch or gable design is feasible within your budget.
Fabricate or Prefabricate the Structure
You either customise your own frame, or you buy a prefab kit assembled by some manufacturer.
You can choose to have the frame customised and made from either aluminium or steel beams. This work consists of manual cutting and bending metal pieces to shape, then spot welding or bolting sections together on site. The structure needs a hot-dip galvanising or powder coating finish against rust. While this enables supreme flexibility, it also requires professional welding skills, specialised custom metal work knowledge, and a lot of time and labour.
For most people, they can order a prefab kit from a manufacturer. These kits include precision-engineered and precision-cut components. They are bolted together instead of welded. This makes the installation safe, quick, and simple.
Prepare the Site
Before you begin installation, make sure the containers are sitting flush and level with one another. Even a slight bow will rack the roof frame out of square, making it difficult to install and causing uneven stress, which could lead to problems down the road. Place a level on top of the two containers and shim or add gravel under as necessary.
They should be spaced such that ladders, scaffolding, and any kind of lifting gear you need can get in. If you are using a crane or forklift to place large frame sections, make sure the ground can bear the weight of the machinery.
Install the Main Frame
With the bare site in place, you can start assembling the main frame. For the shipping container dome roof, which involves first attaching the mounting plates to the top rails of the containers, then lifting and fastening the arch ribs from one end to the other.
For gable or slant roof designs, you’ll be replacing ridge beams and rafters, which assures each join point is effectively bolted and braced. It’s always going to be two people to install the main shipping container frame, at least. Holding structural members in place, as fastening them isn’t a one-person job, and safety is serious.
Be sure to make it square and plumb at every step. It’s a lot easier to make corrections along the way rather than after you have a full frame built and bolted.
Install Roofing Materials
After the frame is set, you can start the roofing panel installation. The installation can be different based on the material:
PVC Fabric Panels: These panels are typically pulled over the frame and secured at the perimeter with clamps or lacing. Starting at one end and working toward the other, pull evenly to create consistent tension to avoid sagging.
Metal Panels: Installation methods vary depending on the type of metal roofing panel. However, as a general rule, place the panels from the eave up to the ridge. Please make sure that each panel covers at least one corrugated sheet of the panel previously installed. Drive the panels in with self-drilling screws, and keep a neoprene washer on each one to make the roofing water-tight.
Polycarbonate Panels: These panels need to be closed with UV-protective end caps and fitted with uniquely designed fasteners to adjust for thermal expansion. Make sure to follow the instructions from the manufacturer to avoid cracking.
The Pass on Everything: Pre-drilled holes need to be used rather than forcing the fasteners through the material. Don’t tighten too much, because the panels can bend or the seal can be broken.
Seal, Drainage, and Final Inspection
It is the last stage in the shipping container roof installation process, and yes, it does make a big difference in keeping the water out for an extended period of time. Different waterproofing needs to call for different steps. But a complete approach starts by installing flashing at every joint where the container walls meet the roof. Apply a compatible sealant on top of any overlaps or penetrations in the panels to prevent water ingress.
Then attach gutters to the bottom edges of the roof to channel rainwater away from the container walls and the earth surrounding the building. Since water pools against the container sides if it isn’t properly drained away, rust can develop and damage the container.
Finally, perform an overall structural inspection: make sure all fasteners are tight, check for any seams or imperfections in the roofing panels, and make sure the frame is solidly anchored to the containers. If you want, you can check the drainage by watering the roof with a hose before the first big rain to make sure it’s working as it should.
Final Thoughts
Building a shipping container roof is a great option to increase the usability of the container. whether you’re building more storage, a workshop, or versatile outdoor living. The process is somewhat complicated for adequacy, design, and material selection. But after you’ve done that, the install is a snap with the right materials.
Shelter Structures makes a special peedy route to building a shipping container fabric roof. Our roof structures are made from 6061-T6 aluminum alloy or Q235 steel and covered with robust, waterproof PVC. These structures can resist winds up to 120 km/h. There is nothing but open space down here below. And because the kits are preassembled, the building goes quickly. This is a really good choice and a whole lot easier if you just want a functional high-performance roof for a shipping container and you’re not really interested in the process of trial and error.