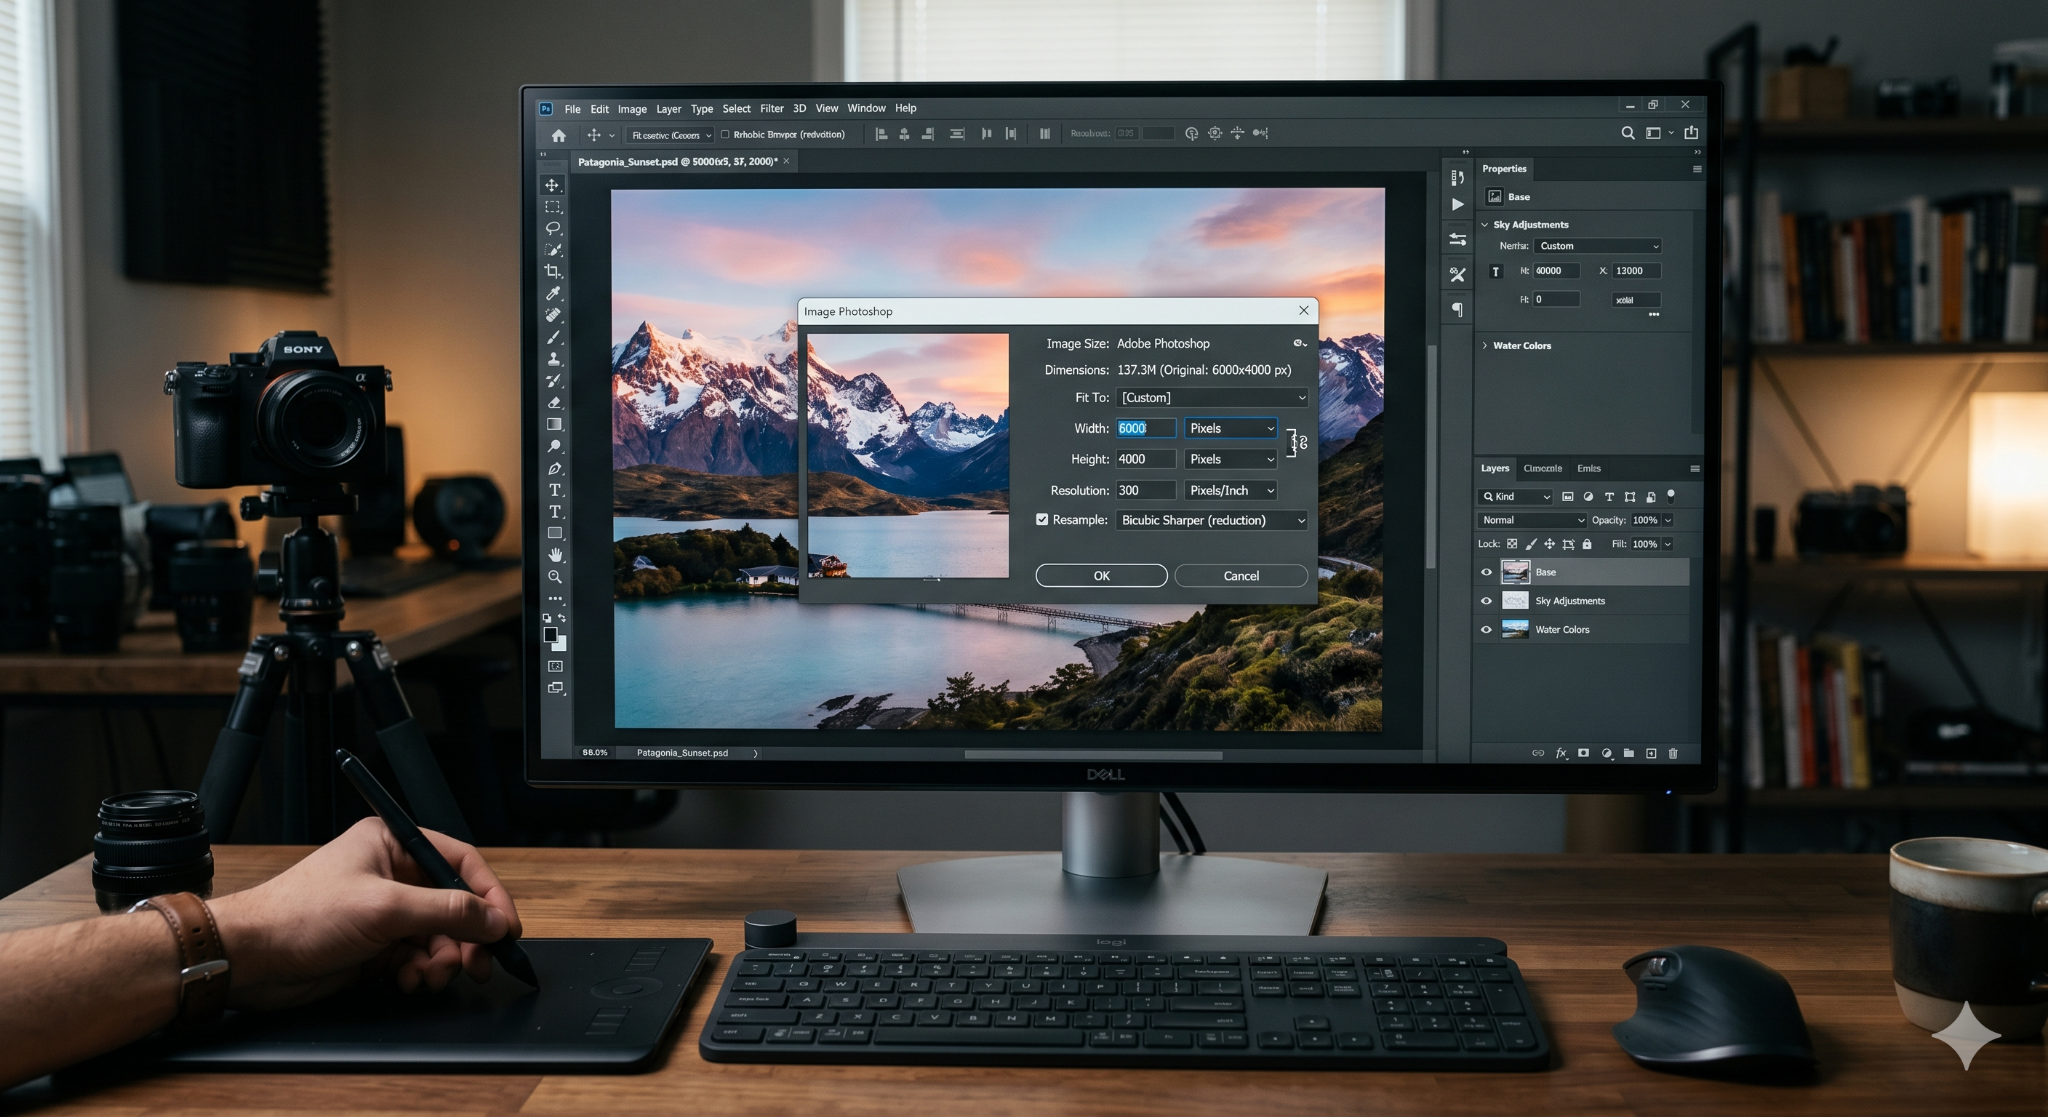
Resizing in Photoshop begins the moment you open the Image Size dialog box, a control panel where width, height, and resolution converge to define your file’s final output. Experienced editors know this menu bar entry point under Image is where permanent changes take shape, so understanding it before clicking matters.
The resample checkbox quietly governs whether Photoshop recalculates pixel data or simply adjusts document size. Toggling resample off lets you change pixels per inch (PPI) without altering dimensions, a distinction most beginners overlook entirely when adjusting files for print versus screen.
The chain link icon enforces constraint proportions, locking your aspect ratio so width and height scale together. Need to untie them? Click it. From there, selecting inches, percent, or other measurements from the drop-down menu lets you precisely resize for popular web sizes or print sizes before you click OK to apply changes.
How to Resize Images in Photoshop (Step-by-Step)
Resizing an image in Photoshop means adjusting pixel dimensions, file size, and resolution together, not just dragging corners. From my own workflow, skipping the right steps can wreak havoc on quality, especially when preparing large photos for a digital platform.
When you need to change dimensions without compromising output, open the image size dialog and treat every field as interdependent. Mishandling high resolution exports for storage is a common mistake, one that costs both download time and storage space unnecessarily.
Understanding how pixels, dimensions, and resolution interact is essential before you hit export. Many users just eyeball it; professionals treat each send or post as requiring its own perfect image size calibration based on the target format.
I’ve seen editors lower-resolution files incorrectly by only reducing one axis, leaving the smaller file size goal unachieved. A proper resize touches width, height, and resolution simultaneously; that’s what separates intentional output from accidental degradation.
At a glance, Photoshop’s image panel seems straightforward. But the real skill lies in knowing which combination of settings produces a large amount of saved space without stripping the visual integrity your high resolution original was captured with.
Explore the Image Size Dialog Box
The image size dialog box is where pixel data, document size, and resample options converge. Checking or unchecking the resample box determines whether Photoshop recalculates pixel dimensions or simply redistributes pixels across a new resolution, a distinction that changes everything.
When a resample is checked, Photoshop actively adds or removes pixels, which affects both dimensions and detail. Leaving it unchecked keeps the total pixel data the same but shifts how dense that data appears; your image file physically doesn’t shrink, only its output interpretation does.
The document size section reflects real-world output that prints or renders. Adjusting resolution here without resampling changes the bigger or smaller appearance in print without touching the data underneath. This is a subtlety most guides skip entirely.
High resolution files appear bigger in document size at 300 PPI than at 72 PPI same pixel count, different physical mapping. Understanding this in the dialog prevents over-processing. The image doesn’t need more pixels; it needs the right resolution instruction for its use case.
I always recommend adjusting the software settings with intent before touching dimensions. The resample box is either your best tool or your biggest liability depending on whether you understand what happens to pixel data when it gets recalculated on change.
Choose Your Unit of Measurement
Choosing the right unit in Photoshop’s image size panel directly shapes how you interpret and control dimensions. Whether working in pixels, inches, or percentages, each unit serves a different end goal; web output demands pixel-based thinking; print requires physical measurement tied to PPI.
For web users, 72 PPI is sufficient forcing higher resolution on a digital asset wastes file weight with zero visible gain. I’ve reviewed countless uploaded assets that were exported at 300 PPI for the web, tripling file size needlessly with no improvement in on-screen quality.
When the use case shifts to high-quality print, 300 PPI becomes the threshold. Here, pixels per inch directly impacts sharpness on paper different from screen rendering entirely. The unit you choose frames everything downstream from color to resolution calibration.
Scale and percentage are underused measurement modes. Scaling down by percentage within the export as panel lets you target a smaller file while keeping original size geometry intact, a precise approach for batching resize pictures tasks across a project.
Selecting the wrong unit, say, centimeters when your end goal is digital misaligns the resolution math entirely. I treat unit selection as the first decision, not an afterthought, because it dictates whether the final JPEG lands clean or ships at decreased quality by default.
Use the Export Function
The export function in Photoshop is the cleanest path to a smaller file without altering your original size or source file. Using export preserves the working document intact while generating a new file optimized for output ideal when you need to resize pictures repeatedly across formats.
Through export as, you can scale down by percentage, directly targeting a proportional reduction. This approach is reliable when the goal is a controlled smaller file without manually recalculating every dimension Photoshop handles the math while you manage the intent.
JPEG compression within the export panel introduces decreased quality at aggressive settings, so I keep compression moderate. For most digital platform deliverables, a mid-tier JPEG export balances file weight against visible quality going too low creates artifacts that undo good resize work.
The export function doesn’t touch your master file; that’s its core advantage. Your original size stays preserved in the working document while the exported new file reflects every resize decision independently. This non-destructive separation is essential for professional workflows.
Learning to resize pictures through export rather than “Save As” is a discipline shift. It forces you to think of output as a separate artifact from your source and once that habit forms, managing file, quality, and scale down decisions becomes significantly more controlled.
Use the Export Function
The export function in Photoshop is your most reliable path when resize precision meets workflow demands. Most practitioners overlook that Export As gives you simultaneous control over image dimensions and file compression, making it superior to Save As for scaled files.
Experienced editors know the export panel lets you preview the output while adjusting proportions live. Targeting specific files in a folder through this route also supports batch operations, keeping your process clean and repeatable.
How Resolution Relates to File Size
Resolution directly determines file size; higher pixels per inch means more data, more weight. Understanding this relationship prevents common mistakes when you’re scaling down for web-based delivery versus print, where image size expectations differ significantly.
When I reduced a client’s portfolio images for online display, dropping resolution from 300 to 72 PPI cut file size by nearly 70%. That practical quick access to quality control is what separates efficient photoshop users from frustrated ones.
Consider the End Goal for Your Image
Your end goal should dictate every resize decision scale, canvas, and compression all shift depending on whether output targets browser, print, or free distribution platforms. Always ask: where does this image live after export?
Adobe veterans approach this by reverse-engineering from output specs backward to image size settings. Knowing your destination informs resampling, dimensions, and even which command sequence to deploy for a faster workflow.
Understand Resampling Options
Resampling controls how Photoshop recalculates pixels when you scale an image choosing between Preserve Details, Bicubic, or Bilinear affects sharpness dramatically. This is the least-discussed setting yet most consequential for output quality.
Each resampling algorithm handles proportions and dimensions differently. Bicubic Sharper works best when scaling down; Bicubic Smoother handles enlargements. Matching the method to your specific resize intent is what separates polished work from generic AI-looking output.
Is there a way to resize an image in Photoshop online for free?
Photoshop online offers a free version via a free trial, functioning as a practical online tool for resize tasks. You can save as a new version, adjust canvas size, and preserve the original image file step-by-step without any desktop installation.
When you need a fast, non-Adobe option for converting file formats and adjusting dimensions, the Resize Image Converter is an essential tool.
Is there a shortcut key to resize an image in Photoshop?
The fastest resize shortcut is ALT+CTRL+I, a keyboard shortcut that opens the image size panel without clicking through the menu. Use this hotkey to choose from options covering reductions and enlargements, making it a reliable shortcut key and essential shortcut.
Can I batch resize images in Photoshop?
Photoshop’s image processor can automate resizing across multiple images using an action, droplet, or batch automation workflow. You can also change measurement options like centimeters, preserve original size, and configure resampling so Photoshop can resample data consistently across every file.
How do I resize an image in Photoshop by dragging?
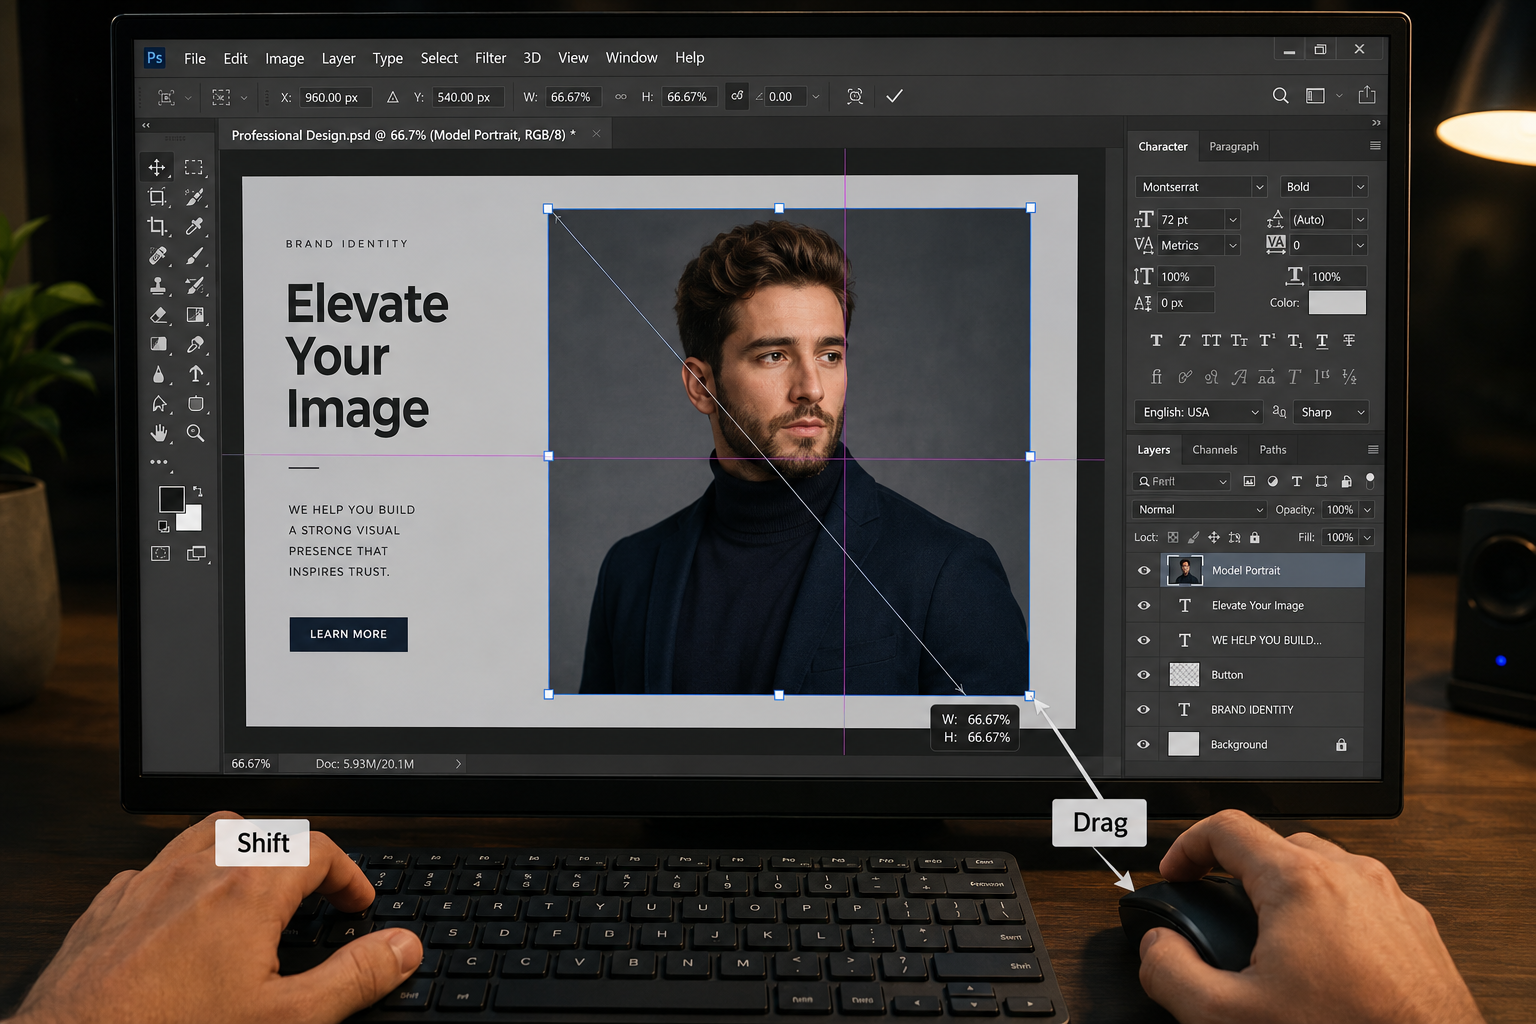
Press CTRL+T (or CMD+T) on your layer to enter a free transform for interactive resize. Grab corner handles or drag handles to drag within the bounding box. Hold shift, adjust handles, and keep work intact this transform can fit to a target size.
How do I resize an image that has layer styles in Photoshop?
Right-click a smart object in the image size dialog to enable scale effects option, safeguarding layer styles, layer effects, effects, and styles. Choose bicubic sharper or bicubic smoother as your interpolation method when adjusting scale, proportions, pixel data, image quality, and automatic scale layer effects.