This review is written for people buying their first 3D printer in 2026 or those upgrading from an older, manual machine and wanting fewer setup headaches.
The Creality SparkX i7 is positioned as a beginner-first desktop printer. The focus is not extreme customization or industrial output. The focus is on early success. Faster setup. Fewer things to break on day one.
This article answers practical beginner questions:
- What does setup actually feel like out of the box?
- How likely is your first print to succeed?
- What does the learning curve look like in the first few weeks?
- Which problems are reduced—and which ones still exist?
What “Beginner-Friendly” Means in Practice
For beginners, the biggest failure point is not speed or print quality. It’s friction.
The SparkX i7 reduces friction in specific ways:
- Less manual calibration
Bed leveling, Z-offset, and input shaping run automatically. - Guardrails against common mistakes
Filament runout detection and AI-based failure monitoring help catch obvious errors. - Simpler maintenance access
Nozzle swaps and cutter service do not require disassembly or special tools.
What it does not do:
- It does not remove the need to understand filament basics.
- It does not eliminate failed prints.
- It does not replace learning slicing concepts over time.
The learning curve is still there, but shorter.
Unboxing Experience and Physical Setup
For many beginners, unboxing is the moment where confidence is gained or lost. The SparkX i7 is clearly designed to reduce anxiety at this stage.
What Comes in the Box
Typical contents include:
- The SparkX i7 printer (mostly assembled)
- Dual-sided textured PEI build plate
- Power cable and basic tools
- Sample filament
- Quick-start documentation
- Optional CFS Lite (if purchased as a bundle)
There is no gantry assembly step. No frame alignment. No belt tensioning on day one.
Assembly: How Much Work Is Required?
Setup is limited to a few beginner-safe steps:
- Removing shipping brackets and zip ties
- Installing the build plate
- Plugging in the power and turning the machine on
- Connecting Wi-Fi during first boot
For most users, physical setup takes minutes, not hours. The printer then guides the user through automated checks on the screen.
This matters because many first-time users fail before ever reaching a print.
Desk Space, Noise, and Placement Considerations
The SparkX i7 is a bed-slinger printer. That means the bed moves forward and backward during printing.
Beginner placement tips:
- Use a solid table with no wobble
- Avoid placing it near open windows or air vents
- Allow space on the left side if using the CFS Lite
Noise levels are low enough for home use. When idle, the printer shuts down fans and lights automatically, which helps it blend into shared spaces like offices or bedrooms.
First Power-On and Guided Calibration
Turning on the SparkX i7 for the first time immediately sets expectations for beginners.
Instead of dropping you into menus full of numbers, the printer walks through a guided startup flow on the touchscreen.
What Happens on First Boot
The first power-on typically includes:
- Language selection
- Wi-Fi setup
- Account pairing with Creality Cloud
- Automatic hardware checks
Once connected, the printer begins its calibration routines without asking the user to make decisions.
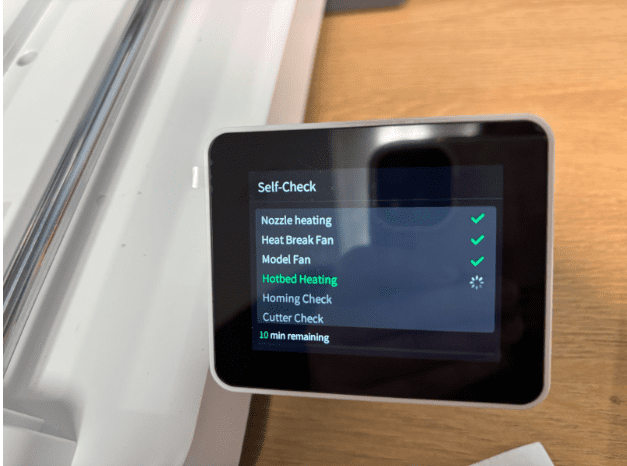
Automatic Calibration Steps (What the Printer Handles)
The SparkX i7 runs several processes that beginners usually struggle with:
- Automatic bed leveling
- Automatic Z-offset detection
- Input shaping and vibration checks
- Build plate detection
These steps take time. Around 10–15 minutes total is common. That wait is intentional. It replaces trial-and-error printing later.
What Beginners Still Need to Do
Even with automation, users still need to:
- Load filament correctly
- Make sure the build plate is clean
- Avoid touching the printer during calibration
The key difference is confidence. The printer assumes responsibility for the risky parts.
First Prints: What Beginners Actually Experience
First prints are where most beginners quit or continue. The SparkX i7 performs well here, not because it’s perfect, but because it removes surprises.
Typical First-Print Results
Across reviews and hands-on testing, beginners usually see:
- Successful adhesion on the first attempt
- Clean extrusion with PLA
- No manual tuning before printing
Small models like keychains, articulated toys, or calibration pieces print reliably.
Print times are reasonable. Quality is consistent, not magical.
Common First-Print Issues (And How Often They Happen)
Issues still appear, but less often:
- Minor stringing with humid filament
- Purge waste during color changes (if using CFS Lite)
- Occasional AI alerts that stop a print early
The difference is visibility. Problems are caught sooner, not after hours of wasted filament.
AI Monitoring: What It Does and Doesn’t Catch
The built-in camera watches for:
- Spaghetti-style failures
- Filament tangles
- Air printing
It does not catch every failure. It is best viewed as a safety net, not supervision. For beginners, that’s usually enough.
Software and Workflow Learning Curve
The SparkX i7 is designed so beginners can print before learning slicing software. That changes how people learn 3D printing.
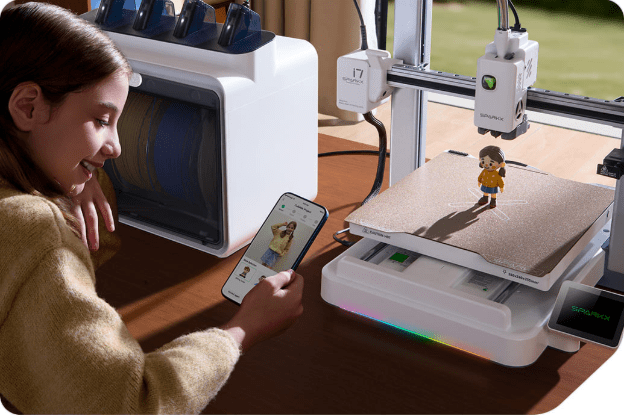
App-Based Printing vs Traditional Slicers
Beginners can:
- Browse models inside Creality Cloud
- Slice files automatically
- Start prints from a phone or laptop
It means no SD cards required. No profile tuning on day one. This lowers early frustration, especially for users without prior CAD or slicer experience.
When Beginners Start Hitting Limits
Over time, users notice boundaries:
- Fewer advanced tuning controls
- Limited custom profiles
- Less control over purge behavior in multicolor prints
This usually happens weeks or months in, not on day one. At that point, users often move to Creality Print on a desktop or export files manually.
Learning Curve with SparkX i7
For most beginners:
- Day 1–7: Print-first mindset
- Week 2–4: Basic understanding of materials and supports
- Month 2+: Interest in deeper control
The SparkX i7 supports that progression instead of blocking it.
Automation vs Manual Control: What the Printer Decides for You
One of the most important beginner questions is control. Specifically: what am I allowed to change, and what is handled automatically? The SparkX i7 leans heavily toward automation by default.
Tasks Fully Handled by the Printer
Out of the box, the printer manages:
- Bed leveling
- Z-offset calibration
- Input shaping and vibration compensation
- Filament runout handling
- Print start and end routines
This removes several failure points that traditionally stop beginners early.
What Beginners Can Still Adjust
Users still control:
- Material selection
- Print quality presets (layer height, speed tiers)
- Supports and infill choices
- Single-color vs multicolor printing (if CFS Lite is installed)
Advanced tuning exists, but it is not front-and-center. This is intentional.
When Automation Becomes a Limitation
More experienced users may eventually want:
- Manual flow tuning
- Custom acceleration profiles
- Fine control over purge behavior
Those controls are possible through desktop slicing tools, but the default experience prioritizes safety over flexibility.
Multicolor Printing: What Beginners Should Expect
The SparkX i7 supports multicolor printing through the optional CFS Lite accessory. This feature attracts many beginners, but it comes with tradeoffs.
How Multicolor Works on the i7
- Single nozzle
- Up to four filaments loaded
- Filament is swapped during printing
- Purge material is ejected between color changes
This is not multi-nozzle printing. Color changes take time and generate waste.
What Beginners Usually Like
- No manual spool swapping
- RFID detection with compatible filaments
- Simple loading and unloading
- Clean color separation on compatible models
For casual multicolor prints, it works as expected.
Common Beginner Friction Points
- Purge waste accumulation
- Loose filament slack if spools are not managed well
- Longer print times for color-heavy models
This does not mean multicolor is broken. It means beginners should start with single-color prints first, then add complexity.
Common Beginner Mistakes (And How the i7 Reduces Them)
No printer eliminates mistakes. But some reduce how often they happen.
Mistake: Poor First-Layer Adhesion
How the i7 helps:
- Automatic bed leveling
- Textured PEI build plate
- Guided startup checks
Most first-layer failures come from manual leveling.
That step is removed here.
Mistake: Printing Too Fast Too Soon
How the i7 helps:
- Conservative default profiles
- Pre-set quality modes
- Input shaping is handled automatically
Beginners are less likely to chase speed numbers and ruin prints.
Mistake: Letting Failed Prints Run Unnoticed
How the i7 helps:
- Camera-based failure detection
- Alerts through the app
- Automatic pauses
This saves filament and time, even if detection is not perfect.
Noise, Space, and Daily Use at Home
The SparkX i7 is designed to live in normal rooms, not workshops.
Noise Behavior
- Quiet stepper motion
- Fans shut down when idle
- The lights turn off automatically
This matters in shared spaces and small homes.
Desk and Room Placement
Best practices:
- Solid surface with minimal vibration
- Space on the left if using CFS Lite
- Avoid drafts from windows or AC
It fits comfortably on standard desks and shelving.
Maintenance Expectations for Beginners with SparkX i7
Maintenance is where many beginners feel overwhelmed. The Creality SparkX i7 simplifies this phase.
Routine Tasks Beginners Will Encounter
In the first few months, expect to:
- Clean the build plate occasionally
- Remove purge waste
- Check filament dryness
- Inspect the nozzle for buildup
None of these requires disassembly.
Tool-Free Maintenance Design
Key beginner-friendly features:
- Tool-less hotend removal
- Accessible cutter replacement
- Snap-off toolhead cover
This lowers anxiety around “breaking something.”
What You Likely Won’t Need to Do Early
- Belt tensioning
- Firmware flashing via USB
- Manual calibration loops
Those tasks are common on older machines. They are rare here early on.
FAQs About the Creality SparkX i7
Is the Creality SparkX i7 good as a first 3D printer?
Yes, it is designed specifically for that use case. The SparkX i7 reduces common beginner pain points like manual bed leveling, confusing calibration steps, and early print failures. It allows new users to focus on printing rather than troubleshooting.
It is best suited for people who want an easy setup 3D printer and a smoother first month of learning.
How hard is it to set up the SparkX i7?
Setup is simple compared to traditional hobby printers.
Most users only need to:
- Remove shipping brackets
- Install the build plate
- Power on and follow the on-screen instructions
Automatic calibration handles the rest. There is no gantry assembly and no manual leveling on day one.
Do I need a computer to use the SparkX i7?
No. You can print directly using the Creality Cloud app on a phone or computer. A desktop computer becomes useful later if you want:
- More slicing control
- Custom profiles
- Advanced tuning
Beginners can start printing without learning slicing software immediately.
Is multicolor printing beginner-friendly on the SparkX i7?
Multicolor printing works, but beginners should treat it as an advanced feature, not a starting point.
Recommended approach:
- Learn single-color PLA printing first
- Add multicolor prints later using the CFS Lite
- Expect longer print times and purge waste
It is simpler than manual color swapping, but it still adds complexity.
Final Takeaway: Who the Creality SparkX i7 Is Really For
The Creality SparkX i7 is not trying to be the fastest or most customizable 3D printer on the market. It is trying to solve a different problem. That problem is beginner dropout.
For people who:
- Want their first 3D printer to actually work
- Prefer guided setup over manual calibration
- Value consistency over experimentation
- Want a low-maintenance 3D printer for home use
The SparkX i7 delivers where it matters.
It removes enough friction that learning feels rewarding instead of exhausting. You still learn the fundamentals. You still make mistakes. But you make progress faster.
Users who enjoy deep tuning and modding should skip it. For everyone else, especially beginners in 2026, the SparkX i7 is one of the clearest examples of how far entry-level 3D printing has come from hobby project to everyday tool.
Read More From Techbullion