Taking a screenshot is taking a picture of the screen’s material. It might be a portion of the screen or the full screen, and a few other features can help the user improve the screenshot’s output and quality. As a result of screen captures’ ability to save photos, they’re becoming increasingly popular these days.
The usage of screenshots is growing in popularity and has shown to be highly beneficial for developing training materials or product manuals, troubleshooting, or simply coming up with engaging reading material.
Using Scribe Tool
Anyone collecting screenshots for step-by-step instructions or tutorials should use the new and well-liked Scribe tool. It offers a free Chrome extension that works with Mac or Windows.
It records your screen while you work and converts your mouse movements and keystrokes into a visual manual with annotated screenshots and textual instructions. After that, you may update the manual and distribute it to anybody.
Use of the PrtScn Key
Using the Print Screen key is the first and easiest way to take a screenshot (PrtScn). Let’s examine the next steps:
1) Press the PrtScn key when the picture or screen that needs to be taken is open. This key is located in the keyboard’s upper right corner.
The entire screen may be duplicated with this option, and users can then paste the copied text into programs like MS Paint or MS Word to make the needed adjustments. These tools provide a number of capabilities to improve the screenshot’s quality. Users can paste material onto these tools by using Windows shortcuts like Ctrl+V.
2) When combined with other keys, PrtScn can change a few things. Other keys that may be utilized with PrtScn include the following:
When used with PrtScn, the Alt key enables users to copy the currently active window on the screen. Users may use these tools to paste copied material and make necessary adjustments by following Step 2 as indicated before. Windows Plus PrtScn When these keys are pressed together, the full screen is captured and saved as a picture in the Pictures>Screenshots folder. The Pictures library’s Screenshots folder is available to us.
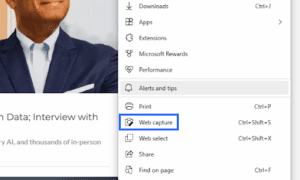
Using The Snipping Tool
The “Snipping Tool,” another intriguing feature included with Windows 10, allows users to snap screenshots of specific portions of open windows. Let’s see how this tool functions.
- Snipping Tool may be found by clicking the search icon. The Snipping tool is furthermore available under Start Menu -> All Programs -> Accessories.
- Click New when the Snipping tool has opened.
- Rectangular Snip or Free from Snip can be chosen by selecting the drop-down menu next to Mode.
- The user may drag and choose a rectangular area of the screen that has to be captured using a rectangle snip.
Free from snip gives the user the power to freely draw a border around the content by moving the mouse.
Users may quickly store the file at any location of their choice after taking a screenshot. In addition to Rectangular and Free from snip, this drop-down menu also offers two more choices. Window Snip and Full-Screen Snip are these alternatives. The user can pick a window on the screen using a window snip.
Employing Game Bar
In Windows 10, the Game bar is yet another really well-liked method for taking screenshots. Let’s examine the procedures used for this technique.
- The Windows key and G must be pressed simultaneously. The Game bar will then be shown. By selecting Settings > Windows Settings > Game Bar, the Game box’s settings may be changed.
- On the dialogue box that appears, choose Yes, it is a game.
- In order to snap a screenshot, press the camera button. The screen also shows a direct route to the screenshot’s location. Windows key + Alt + PrtScn is the shortcut for the camera.
- The PNG file type for these screenshots is kept in folder C: Users (Username) Videos Captures.
Snip and Sketch Technique
- Window key plus Shift key + S – The user may use the mouse to choose the required portion of the screen that has to be recorded after first softening the screen with this technique. After choosing the appropriate region with the mouse’s left button, the user can paste it into one of the aforementioned image editing programs. Alternatively, you might first launch the Windows Snip & Sketch program before taking the snip.
- Open the software by typing cut & draw into the Windows search box.
- The snip & sketch app will appear to be open. To take a screenshot, select “Snip now.”
- You can choose from a rectangular, free-form, windows, or full-screen snip.
Using a Microsoft Surface device to take a screenshot
On a few Surface devices, pushing a button will capture a snapshot of the full screen. This technique is quite similar to taking screenshots on a tablet or phone. The following keys need joint usage.
- The volume down button on the side of the device and the touch button with the Windows logo at the bottom of the screen. The snapshot is taken once the screen somewhat lights up and is stored under Screenshots in the Pictures folder.
- Some Surface devices with touch displays can snap screenshots of the full screen using the Surface Pen. The Surface Pen has a button on the rear that, when clicked twice, launches Snip and Sketch and allows screenshots to be altered.