There are several reasons why someone might want to take a screenshot of a website. One common reason is to capture a specific piece of information or image that is displayed on the website. This could be anything from a news article to a product image on an e-commerce site.
Or they want to take a screenshot of a website to document a problem or issue with the site. For example, if a user encounters an error message or a broken link, they may take a screenshot to provide evidence of the issue to the website owner or support team.
Taking a screenshot of a website can be useful for research or reference purposes. Researchers may want to capture a snapshot of a website to document how it looked at a specific point in time or to compare it to other websites. Similarly, individuals may want to take a screenshot of a website for personal references, such as to save a recipe or a travel itinerary.
In this article, we will show you how to screenshot a website in Chrome, Firefox, and Edge.
How to Screenshot a Website in Chrome?
As a frequent user of Google Chrome, you may have come across some of its hidden gems that can make your browsing experience more efficient and productive. One such feature is the built-in, full-page screenshot tool that allows you to capture an entire webpage in one go. This tool is particularly useful when saving a webpage for future reference or sharing it with others. In this guide, we will walk you through the steps to use this hidden gem and take full-page screenshots on Google Chrome.
Method 1. Using Chrome’s Built-in Tool
Chrome’s Built-in tool is a set of features and functionalities that are integrated into the Google Chrome web browser. These tools are designed to enhance the browsing experience and provide users with a range of useful features that can help them work more efficiently and effectively. Here, we will show you how to screenshot a whole page by using Chrome’s built-in tool.
Step 1. Open the webpage that you want to capture in Google Chrome.
Step 2. Press the Ctrl + Shift + I keys on your keyboard to open the Developer Tools panel.
Step 3. Click on the three-dot menu icon in the top right corner of the Developer Tools panel.
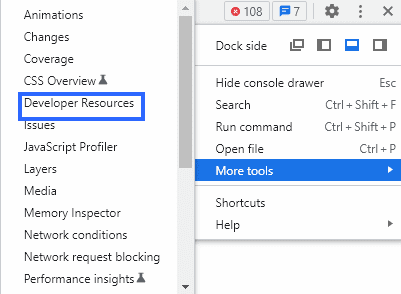
Click the Developer Resources
Step 4. Select “More Tools” from the drop-down menu and then click on “Capture a full-size screenshot.”
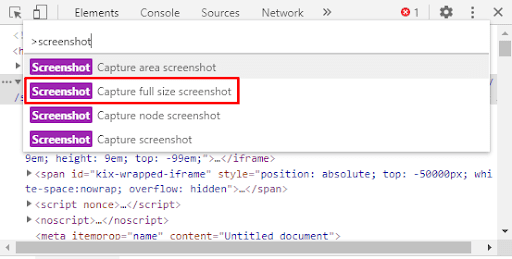
Capture a Full-size Screenshot
Step 5. Wait for Chrome to capture the full-page screenshot. The screenshot will be saved as a PNG file in your default Downloads folder.
Method 2. Using Chrome Extension
Gemoo Snap is available as both a Chrome plug-in and a desktop version for Windows and Mac users. This means you can use it on any device, whether you’re at work or at home.
With Gemoo Snap extension, you can take screenshots in a variety of ways, including capturing a scrolling page, selecting a specific area, capturing any HTML element of your choosing, capturing the visible area, and capturing from the browser. This makes it a versatile tool that can be used by anyone, whether you’re a teacher, designer, developer, or marketer. Here, let’s see how Gemoo Snap extension captures an entire webpage.
Step 1. Search for “Gemoo Snap” in the search bar and click on the “Add to Chrome” button to install the extension.
Step 2. Once the extension is installed, go to the website you want to take a screenshot of.
Step 3. Click on the Gemoo Snap extension icon in your browser toolbar.
Step 4. Select the “Scrolling Capture” button. Gemoo Snap Extension will automatically capture the entire screen of the webpage.
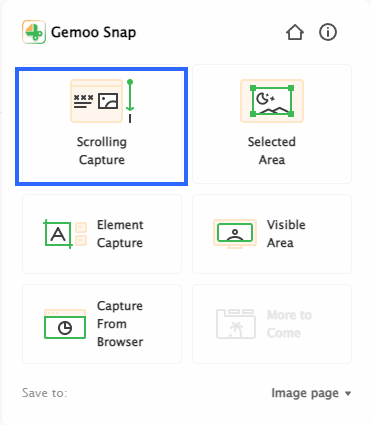
Gemoo Snap Chrome Extension
Step 5. The captured webpage will be uploaded to the Gemoo cloud directly which doesn’t occupy local memory and helps to manage your screenshots.
Step 6. Then, in the Gemoo cloud you can feedback, edit and share your image.
In conclusion, taking a screenshot of a website on Chrome is a simple process that can be done in just a few steps. By following the steps outlined in this article, you can easily capture and share information from any website.
How to Screenshot a Website in Firefox?
As a blogger or website owner, you may need to take screenshots of websites for various reasons, such as creating tutorials, showcasing your work, or reporting issues. While there are many tools available for taking screenshots, Firefox offers a built-in feature that allows you to capture full-page screenshots of websites without installing any extensions or add-ons. In this article, we will show you how to screenshot a website in Firefox.
Step 1. Open Firefox and navigate to the website you want to capture.
Step 2. Once the website is fully loaded, click on the three horizontal lines (menu icon) located at the top-right corner of the Firefox window.
Step 3. From the drop-down menu, select “Web Developer” and then click on “Take a Screenshot.”
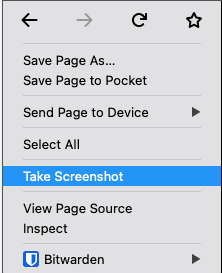
Screenshot a Website in Firefox
Step 4. A new tab will open with the website’s screenshot. You can choose to save the screenshot to your computer or copy it to the clipboard.
Step 5. If you want to capture the entire webpage, including the parts that are not visible on the screen, click on the “Save full page” button located at the top-right corner of the screenshot tab.
Step 6: Firefox will automatically scroll down the webpage and capture multiple screenshots until it reaches the end of the page. Once the process is complete, you can save the full-page screenshot to your computer or copy it to the clipboard.
Step 7: If you want to edit the screenshot before saving it, click on the “Edit” button located at the top-right corner of the screenshot tab. This will open the Firefox screenshot editor, where you can crop, resize, annotate, or add text to the screenshot.
Step 8: Once you are satisfied with the screenshot, click on the “Save” button located at the top-right corner of the screenshot editor. You can choose to save the screenshot as a PNG or JPEG file.
How to Screenshot a Website in Edge?
Taking a screenshot of a website can be useful for a variety of reasons, such as capturing a design or layout for reference or sharing it with others. If you’re using Microsoft Edge as your web browser, there are a few different ways to take a screenshot of a website. Microsoft Edge has a built-in screenshot tool that allows you to capture a screenshot of the entire webpage or a specific section of it. Here’s how to use it:
Step 1. Open the webpage you want to capture in Edge.
Step 2. Click on the three dots in the top-right corner of the browser window to open the menu.
Step 3. Select “Web capture” from the menu.
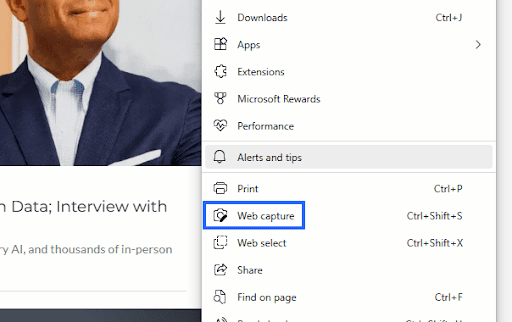
Select Web capture
Step 4. Choose whether you want to capture the entire page or a specific section of it.
Step 5. If you chose to capture the entire page, click on the “Capture full page” button to take the screenshot.

Click on Capture full page
Step 6. The screenshot will be saved to your Downloads folder by default.
In Conclusion
Chrome, Firefox, and Edge are popular web browsers that offer built-in or third-party screenshot tools to capture full-page or selected area screenshots. Each browser has its own advantages and limitations. Overall, taking screenshots of websites is a simple and effective way to enhance the web browsing experience and productivity. You can choose the method that works best for you to Improve work efficiency!