Introduction
If you have ever wanted to put a picture on a shirt, you are not alone. Custom shirts make amazing gifts, and they are also a fun way to show off your personality. The good news is that you do not need a print shop to make it happen. You can do the whole thing at home with tools you probably already own. This guide walks you through every method in plain, simple steps. So whether you want one shirt or ten, you will find a way that works for you. Custom shirts are more popular than ever right now. People wear them for birthdays, family reunions, team events, and even just for fun. However, a lot of people assume the process is complicated or expensive. That is simply not true. With a little preparation and the right method, your finished shirt can look just as good as something from a print shop. In fact, it might even look better because you had full control over the design. The key is knowing which method fits your goal. For example, some methods work better for photos, while others are great for bold graphics. Some need a special machine, while others only need your home iron. Throughout this guide, you will learn about six different methods in detail. You will also pick up tips on design quality, fabric choice, and how to make your print last through many washes. By the time you finish reading, you will feel ready to start your first custom shirt project with confidence.
Why Putting a Picture on a Shirt Is Easier Than You Think
A lot of people put off making custom shirts because they think it requires expensive equipment or special training. That idea is outdated. Today, the tools you need are affordable, easy to find, and simple to use. Most of them are available at your local craft store or online. So there is really no reason to feel intimidated before you even start. The process is much more straightforward than most people expect. Think about it this way. If you can print a document on a home printer, you already understand half of the process. The other half is just applying that printed image onto fabric correctly. Furthermore, the techniques have improved a lot over the years. Transfer papers are now more reliable. Heat press machines have become smaller and cheaper. Even the iron-on method, which has been around for decades, works better now thanks to improved materials. Another reason people hesitate is that they worry the result will look cheap or unprofessional. However, that only happens when someone skips the preparation steps. When you use a high-quality image, the right type of shirt fabric, and the correct heat settings, the result looks clean and sharp. In addition, learning how to put a picture on a shirt at home gives you creative freedom that no print shop can match. You choose the image, the placement, the shirt color, and the size of the design. That level of control is hard to beat.
What You Need Before You Get Started
Before you jump into any method, it helps to gather your materials first. Starting without the right supplies is one of the most common reasons people get frustrated midway through a project. So take a few minutes to prepare everything in advance. That small step saves you a lot of time and stress later on. First, think about your image file. The quality of your print depends heavily on the quality of your original image. A blurry or low-resolution photo will print blurry on your shirt too. Therefore, always use an image that is at least 300 DPI, which means 300 dots per inch. That is the standard for sharp, clear prints. If you are not sure about your image quality, zoom into it on your screen at full size. If it looks pixelated on screen, it will look even worse when printed. Next, think about your shirt. Cotton is the most popular choice for iron-on and heat press methods because it absorbs heat evenly. Polyester works better for sublimation printing, which we will cover later in this guide. A smooth, flat surface on the shirt also helps the image stick properly. Avoid shirts with thick textures or raised patterns. Finally, you will need either an inkjet printer and transfer paper, or access to a heat press machine, depending on which method you choose. In addition, keep a hard flat surface like a wooden board handy to place inside the shirt during pressing. This stops the heat from bleeding through to the back of the shirt.
How to Put a Picture on a Shirt Using Iron-On Transfer Paper
The iron-on transfer method is the most popular way to put a picture on a shirt at home, and for good reason. It is cheap, simple, and needs nothing more than a printer, transfer paper, and a regular household iron. Most craft stores carry transfer paper for a few dollars a pack. So this method is a great starting point if you have never done this before. Here is a simple numbered process to follow so nothing gets missed:
- Choose your image and open it in any photo editing or printing software on your computer.
- Flip the image horizontally before printing so that it mirrors itself. This step is critical, especially for text. If you skip it, your design will print backwards on the shirt.
- Print the image onto the transfer paper using an inkjet printer. Make sure you print on the correct side of the paper, which is usually the slightly shiny or coated side.
- Cut around the edges of your printed image carefully. The closer you cut, the cleaner the final result will look on the shirt.
- Preheat your iron to the cotton setting and remove all steam. Place your shirt on a hard, flat surface and iron out any wrinkles first.
- Position the transfer paper face-down on the shirt exactly where you want the image to appear.
- Press the iron firmly over the paper using slow, steady circular movements for about 30 to 60 seconds. Apply firm pressure and do not let the iron slide around loosely.
- Let it cool completely before peeling the backing paper away slowly from one corner. The result should be a clean, vibrant image bonded to your shirt. Furthermore, always follow the specific instructions on your transfer paper brand, as timing and heat levels can vary slightly between products.
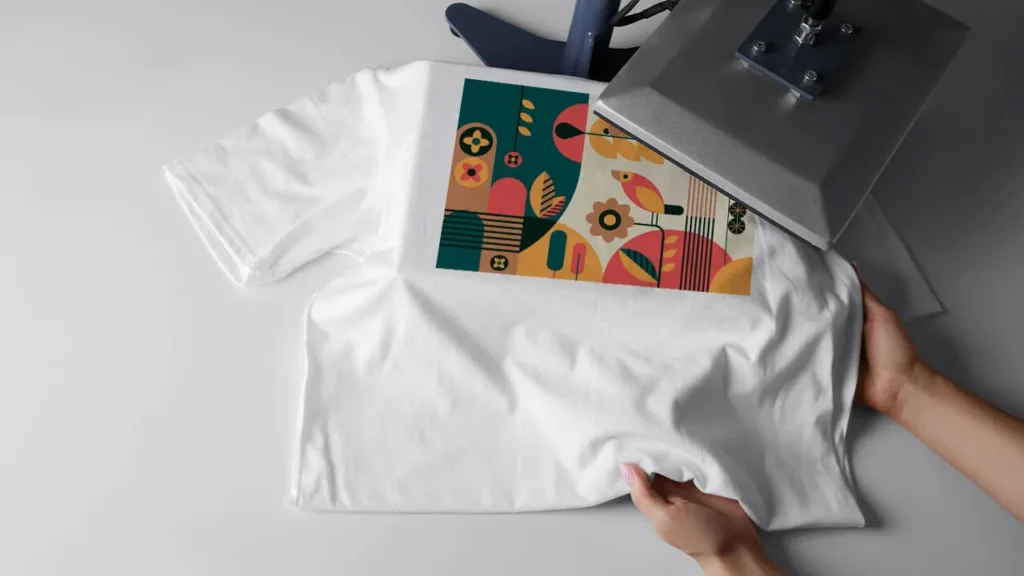
Using a Heat Press Machine for a More Professional Finish
A heat press machine works on the same basic idea as the iron-on method, but it delivers much more even and consistent results. It applies uniform heat and pressure across the entire design at once, which your household iron simply cannot do. As a result, the final print looks sharper, lasts longer, and has cleaner edges. If you plan to make shirts regularly or want a more polished outcome, a heat press is worth the investment. Entry-level machines now start at a reasonable price and are easy to find online. Using a heat press is also straightforward. You still print your image onto transfer paper the same way as the iron-on method. However, instead of using an iron, you place the shirt flat on the lower plate of the machine, position your transfer face-down, and close the top plate down onto it. The machine applies steady heat and pressure for a set number of seconds, usually between 15 and 30 seconds depending on the paper type. Then you open the machine, let it cool slightly, and peel the backing away. The image bonds deeply into the fabric fibers, which means it holds up well through repeated washing. One important tip is to always pre-press your shirt for about five seconds before applying the transfer. This removes moisture and wrinkles from the fabric, which helps the image stick more evenly. In addition, use a Teflon sheet or parchment paper over the transfer during pressing to protect both the design and the machine plate. A heat press also gives you the option to work with other types of transfer materials, such as vinyl sheets, which we will touch on in later sections of this guide.
The Screen Printing Method: When Volume Matters
Screen printing is one of the oldest and most trusted methods for putting images on shirts. It works by pushing ink through a mesh screen that has your design cut into it, layer by layer. Each color in your design requires a separate screen, which is why this method takes more setup time than others. However, once you have everything ready, you can print the same design on dozens of shirts very quickly. That makes it a smart choice for team uniforms, event shirts, or any project where you need more than a handful of identical pieces. Here are the key advantages that make screen printing stand out for volume projects:
- The ink sits on top of the fabric rather than soaking in, which gives colors a bold and vivid look even on dark shirts.
- Prints made with screen printing tend to be extremely durable and can survive hundreds of washes without significant fading.
- The cost per shirt drops considerably when you print in bulk, making it more budget-friendly for large orders.
- You can use specialty inks like glow-in-the-dark, metallic, or puff ink, which are not possible with other home methods.
- Screen printing works on almost any fabric type, including cotton, polyester, and blended materials. That said, screen printing does have a learning curve. Setting up the screens correctly takes practice, and the initial supply cost is higher than iron-on or heat press methods. Therefore, it makes more sense for people who plan to print regularly or in large quantities. For a one-off shirt or a small personal project, one of the other methods in this guide will be a better fit.
How to Put a Picture on a Shirt with Sublimation Printing
Sublimation printing is a fascinating process, and understanding it starts with knowing how it works. When you heat a special sublimation ink to a high temperature, it skips the liquid stage and turns directly into a gas. That gas then bonds with the fibers of the fabric at a molecular level. Because of this, the image becomes part of the shirt itself rather than sitting on top of it. The result is a print that will never crack, peel, or fade the way iron-on transfers sometimes do over time. This method is one of the most durable ways to put a picture on a shirt for long-term use. However, sublimation printing works best on fabrics that contain at least 65 percent polyester. The reason is that polyester fibers open up when heated and allow the gas to bond with them. Cotton fibers do not respond the same way, so the colors come out dull and faded on pure cotton shirts. Therefore, if you want to use this method, choose a white or light-colored polyester shirt for the sharpest and most vibrant results. Dark shirts do not work well with sublimation because the ink is transparent and will not show up over dark fabric. To get started, you need a sublimation printer, sublimation ink cartridges, and sublimation transfer paper. You print your design onto the transfer paper just as you would with regular transfer paper. Then you place it face-down on your polyester shirt and press it with a heat press at around 385 to 400 degrees Fahrenheit for about 45 to 60 seconds. In addition, make sure to tape the paper firmly to the shirt before pressing so it does not shift during the process. When you lift the paper, the image will be permanently fused into the fabric with bright, photo-quality color.
Tips to Make Your Design Look Great and Last Long
Getting a good first print is satisfying, but making that print last is where a lot of people fall short. The good news is that a few simple habits make a big difference in how long your design holds up. So before you declare the project finished, take a moment to think about care and quality. That extra attention at the end is what separates a shirt that looks great after fifty washes from one that starts cracking after five. One of the most important things you can do is wash the shirt inside out. This protects the printed surface from rubbing against other clothes or the inside of the washing machine drum. Furthermore, always use cold water and a gentle wash cycle. Hot water and aggressive spin cycles are two of the biggest reasons custom prints break down early. Also, avoid using bleach or harsh detergents on printed shirts. These chemicals weaken the bond between the ink and the fabric over time. When it comes to drying, air drying is always the safest option for printed shirts. If you must use a dryer, choose the lowest heat setting available. High heat in a dryer can cause iron-on transfers to bubble, crack, or peel at the edges. In addition, never iron directly over a printed design. If the shirt needs ironing, turn it inside out and iron on the reverse side. Another tip worth knowing is that image resolution plays a big role in how professional your final print looks. Always start with a high-resolution image file, ideally in PNG format with a transparent background. This gives you clean edges and avoids white boxes appearing around your design on colored shirts. Finally, if you are printing photos, consider adjusting the brightness and contrast slightly before printing, since colors often print slightly darker than they appear on screen. Learning how to put a picture on a shirt at home with lasting results takes a little practice, but these habits make the process much smoother from the start.
Common Mistakes to Avoid When Printing at Home
Even with the best intentions, small mistakes can ruin an otherwise great project. The encouraging thing is that most of these errors are easy to avoid once you know what to watch for. So going through this list before you start your first shirt can save you from a lot of disappointment. The single most common mistake is forgetting to mirror the image before printing. If your design includes any text or faces, printing it without flipping it first means everything will appear backwards on the shirt. Always double-check the mirror setting in your print dialogue before hitting print. Another frequent mistake is using the wrong type of transfer paper for your printer. Inkjet transfer paper and laser transfer paper are not the same thing, and using the wrong one will produce a faded or sticky mess. Check your printer type and match it to the correct paper. Using a low-resolution image is also a very common problem. As a result, the print comes out blurry or pixelated, which makes the whole shirt look amateurish. Always use images that are at least 300 DPI for sharp results. Not preheating the shirt before applying the transfer is another mistake that leads to poor adhesion. A quick five-second press with your iron or heat press removes moisture from the fabric and helps the transfer bond more securely. Furthermore, peeling the backing paper too quickly is a mistake that causes the design to lift unevenly. Always let the shirt cool down completely before peeling. Patience at this step makes a real difference. For more helpful design tips, check out our guide on custom shirt design tips to take your next project even further. If you want a reliable brand for transfer paper, Avery is a widely trusted option that many home printers use with consistent results. Avoiding these mistakes puts you in a great position to get clean, professional-looking results right from your very first attempt.
Ready to Put Your Picture on a Shirt?
You now have everything you need to get started with confidence. From the simple iron-on method to the more advanced sublimation process, each technique has its own strengths and is suited to different goals. If you are brand new to this, the iron-on transfer method is the best place to begin. It costs very little, needs no special equipment, and gives you a real feel for the process before you invest in anything more. As you get more comfortable, you can move on to a heat press for better consistency, or try sublimation printing if you want photo-quality results that truly last. The most important thing is to simply start. Pick one method, gather your materials, and make your first shirt. It does not have to be perfect. Every shirt you make teaches you something new, and you will get better with each attempt. Furthermore, the satisfaction of wearing or gifting something you made yourself is something that store-bought items just cannot match. Custom shirts are personal, creative, and genuinely fun to make. So do not overthink it. Choose your favorite photo, grab your supplies, and start printing. Whether you are making a gift, building a brand, or just trying something creative for the first time, knowing how to put a picture on a shirt at home is a skill that will serve you well for years to come.
FAQs
- What is the easiest way to put a picture on a shirt at home? The iron-on transfer paper method is the easiest way to put a picture on a shirt at home. All you need is an inkjet printer, transfer paper, and a regular household iron. It is affordable, beginner-friendly, and produces good results when done carefully.
- Do I need a special printer to print on transfer paper? Most standard inkjet printers work well with iron-on transfer paper. However, you need to make sure you buy transfer paper that matches your printer type, since inkjet and laser printers require different kinds of paper. Always check the packaging before you buy.
- Can I put a picture on a dark-colored shirt? Yes, but you need to use transfer paper made specifically for dark fabrics. Regular transfer paper is designed for white or light-colored shirts and will not show up properly on dark material. Dark fabric transfer paper has an opaque white base layer that makes colors show up vividly.
- How do I make sure my design does not crack or peel after washing? To keep your design looking fresh, always wash the shirt inside out using cold water and a gentle cycle. Avoid bleach and high heat in the dryer. Air drying is the safest option and helps the print stay intact for much longer.
- How to put a picture on a shirt using sublimation printing? To use sublimation printing, you print your image onto sublimation transfer paper using a sublimation printer, then press it onto a polyester shirt with a heat press at around 385 to 400 degrees Fahrenheit for 45 to 60 seconds. The heat turns the ink into a gas that bonds permanently with the fabric fibers for a long-lasting, vibrant result.