Ask any product team what slows them down, and somewhere near the top of the list is the gap between design and development. Designers create beautiful mockups in Figma. Developers need clean, lightweight SVG code they can drop into a React component. Somewhere in that handoff, things get messy—heavy files, flattened layers, manual rewrites, and a lot of back-and-forth. The promise of an AI-powered svg generator is that it can close that gap by producing editable vector assets that work equally well in design tools and codebases. No redraws. No raster handoff. Just structured SVG that ships.
I spent the last several days testing this tool specifically through the lens of a design-to-development workflow. Not as a designer looking for pretty visuals, but as someone who has watched too many projects stall because the assets weren’t production-ready. What I found was a tool that understands the difference between a nice image and a usable asset—and prioritizes the latter at every step.
The Problem That No One Talks About
Every designer knows the feeling of exporting an SVG from a tool only to find that it’s been flattened into a mess of overlapping paths. Every developer knows the frustration of receiving an SVG that’s five times larger than it needs to be, filled with inline styles that break in production, or structured so poorly that it’s easier to rebuild from scratch than to clean up.
The industry has spent years building better design tools, better handoff platforms, and better component libraries. But the fundamental bottleneck remains: creating custom vector assets from scratch takes time, and modifying existing ones often takes almost as long. This is where an AI SVG generator enters the picture—not as a replacement for design tools, but as a bridge between the initial concept and the final implementation.
The Four-Step Workflow That Keeps Teams Moving
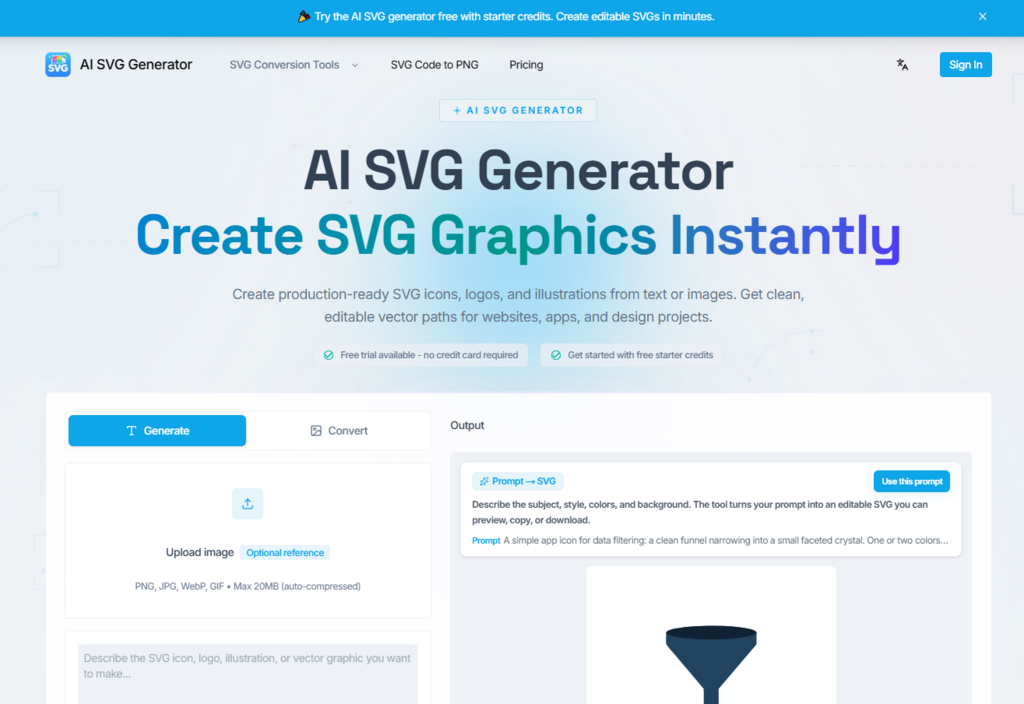
The tool’s workflow is refreshingly direct, built around the reality that most design projects don’t need a hundred settings—they need a fast path from idea to editable asset.
Step 1: Describe What You Need
Natural Language That Understands Design Context
The first step is simply describing what you need in plain English. Icons, illustrations, logos, UI elements, diagrams—the tool accepts all of them. During my testing, I found that the more specific I was about the context, the better the results. A prompt like “a 24px line icon for a settings gear” produced something usable. A prompt like “a 24px line icon for settings, consistent with a dashboard UI, monochrome, with rounded corners” produced something that felt like it belonged in a production interface.
The tool doesn’t require any special syntax. You describe the subject, the style, the colors, and the background in natural language. For a designer who knows exactly what they want but doesn’t want to spend an hour building it from scratch, this is a significant time saver. For a developer who needs a custom icon but doesn’t have design skills, it’s even more valuable.
Step 2: Generate the SVG
Structured Code, Not Flat Pixels
This is where the tool distinguishes itself from other AI image generators. Instead of producing a PNG or JPG, it generates clean, structured SVG code with editable paths. The output preserves individual paths, groups, and shapes, which means you can inspect the geometry, adjust coordinates, and keep everything editable after export.
In my testing, the generation consistently completed in under ten seconds. The resulting SVGs included proper viewBox settings, semantic nodes, and precise anchor points—the kind of structure that makes a developer’s job easier rather than harder. There’s no bitmap tracing, no flattening, no hidden raster data masquerading as a vector. Just clean SVG markup that you can drop directly into your workflow.
Step 3: Customize and Refine
Iteration Without Starting Over
Once the initial SVG generates, you have options. You can fine-tune the style, color, and details, or regenerate variations to explore different directions. This flexibility matters because the first generation rarely matches the final vision. During my testing, I found myself regenerating several times to dial in the right aesthetic—sometimes getting a perfect result on the second try, other times needing four or five iterations.
What’s notable is that the tool keeps output consistent across generations. If you’re generating a set of icons for a dashboard, you can maintain visual coherence without manually adjusting each asset. This is particularly valuable for product teams building design systems or component libraries.
Step 4: Export and Use
Code-Ready for Product Teams
The final step is getting your SVG out of the tool and into your workflow. You can download the SVG file directly or copy optimized code. The output works with Figma, React, Illustrator, Sketch, Tailwind CSS, Shopify, and Cricut.
What impressed me most was the quality of the code output. When I copied an SVG into Figma, the layers preserved their anchor points, stroke weights, and groups. When I copied the React component markup, it was clean enough to drop directly into a product interface without cleanup. The tool produces SVGO-optimized code with JSX compatibility and Tailwind-ready styling. For a developer, this means shipping lightweight web assets faster. For a designer, it means handing off assets that developers can actually use.

What the Workflow Actually Looks Like in Practice
To understand whether this workflow delivers on its promise, I tested it across three common scenarios that represent the kind of work product teams do every day.
Building a Dashboard Icon Set
The task was straightforward: generate a consistent set of 24px line icons for a product dashboard, including navigation, analytics, and user management icons. I generated each icon individually using similar prompt structures. The consistency across generations was impressive—stroke weights matched, visual language remained coherent, and the SVG code was clean enough to drop directly into a React component library.
The time savings here were substantial. Creating a custom icon set from scratch would have taken hours of work in Figma or Illustrator. This took about 15 minutes, including regeneration for a few icons that didn’t quite hit the mark. The resulting assets were production-ready for the frontend, with no additional cleanup required.
Creating a Landing Page Hero Illustration
The task was more ambitious: generate a flat illustration for a SaaS hero section, with a friendly, approachable aesthetic. This was the most challenging test. The tool produced decent results, but the complexity of multi-element illustrations pushed its limits. The first generation had compositional issues—elements felt disconnected. Subsequent regenerations improved the layout, but I found myself needing to do more manual cleanup in Figma than with simpler assets.
The tool handles simple illustrations well but struggles with complex scene compositions that require careful spatial relationships. For a hero section with multiple interacting elements, the tool provides a solid starting point that still requires refinement in a design tool. The key insight is that the tool accelerates the process—it doesn’t eliminate it.
Generating a Logo Mark for a Product
The task: generate a scalable symbol mark for a productivity product, with a modern, tech-forward aesthetic. I prompted with detailed specifications about geometry, negative space, and color palette. The first generation produced something usable but slightly off in proportion. The second generation nailed the composition, with clean vector paths that scaled perfectly from favicon size to hero section display.
The result was production-ready enough that I could have handed it to a developer without further refinement. The limitation? The tool doesn’t handle typography well—it generated placeholder text that I had to replace manually. For logo marks without text, it’s genuinely useful. For logos that include custom typography, you’ll need to add the text in a separate tool.
The Pricing Model That Makes Sense for Teams
The pricing structure is straightforward and avoids the confusing feature-gating that plagues many AI tools. New users get starter credits to try the tool without entering a credit card. From there, you choose between one-time credit packs for occasional use or monthly subscriptions for ongoing work.
The Standard plan runs at $19.9 per month for 100 credits, while the Pro plan costs $39.9 per month for 350 credits. Most generations use between one and four credits, and downloads and exports don’t consume extra credits. What’s notable is that every plan unlocks the full AI engine—there’s no feature gating between tiers. You’re simply paying for more generations, not for access to better capabilities.
All plans include commercial usage rights for generated SVGs. For product teams building assets for clients or commercial products, this is essential. The credit pack model deserves special mention because credits never expire. This makes the tool viable for both high-volume production work and occasional one-off projects.
Where the Tool Shines in a Team Workflow
From a practical user perspective, the tool excels at specific parts of the design-to-development pipeline. It’s genuinely impressive for generating icons, logos without text, simple illustrations, and UI assets that need to work across web and app interfaces. The output quality for these use cases is consistently high enough for production work, especially if you’re willing to regenerate a few times to get the best result.
The tool is particularly valuable for teams that need to move fast. Product designers can use it to generate 4-5 icon or illustration directions before opening Figma, then refine the chosen direction in their design tool. Growth marketers can generate campaign graphics for landing pages, email, and social in a fraction of the time it would take to brief a designer. Solo founders can create consistent assets for app icons, onboarding illustrations, and launch pages without hiring separate freelancers.
The tool also works well for teams that need to maintain visual consistency across multiple assets. If you’re generating a set of icons for a design system, you can keep the style consistent across generations. If you’re creating campaign graphics, you can generate variations that share a common visual language.
Real Limitations Worth Acknowledging
No tool is perfect, and this one has clear boundaries that any honest assessment should acknowledge. The tool’s performance varies across different types of prompts and image references. Complex scenes may require multiple generations to get right, and there’s no guarantee that a particular prompt will produce the exact result you’re envisioning.
The tool doesn’t handle gradients, shadows, or complex effects particularly well. It’s optimized for clean, flat vector graphics—the kind that work well in UI design, branding, and print—rather than photorealistic or heavily stylized illustrations. If you need complex visual effects, you’ll likely need to add them in a separate design tool after generation.
The image-to-SVG capability, while useful, doesn’t always preserve the exact composition of the reference image. It interprets the reference rather than tracing it, which means you get a stylized interpretation rather than a direct vectorization. For some workflows, this is exactly what you want; for others, it’s a limitation.
Text generation is particularly weak—the tool tends to produce placeholder gibberish that you’ll need to replace manually. For any design that requires custom typography, you’ll need to handle the text layer in a separate tool.
Who Benefits Most from This Workflow
The tool makes the most sense for specific workflows and team structures. Product designers will find it invaluable for rapid prototyping, generating icon sets, and creating consistent visual assets without leaving their design flow. Frontend developers who need custom icons or illustrations but lack design skills can generate production-ready assets directly.
Small business owners and solo founders can create professional-looking branding assets, social media graphics, and marketing materials without hiring a designer for every small task. Marketing teams can create campaign illustrations and social media assets at scale, maintaining visual consistency across multiple pieces.
What the tool isn’t designed for is replacing professional illustrators for complex, high-detail artwork, or replacing brand identity designers for comprehensive brand systems. It’s a tool that accelerates certain parts of the design process, not a wholesale replacement for design expertise.
The Bottom Line for Teams
After testing this svg generator through a design-to-development workflow, the verdict is clear: it’s a tool that understands the difference between a pretty picture and a usable asset. The output is structured, editable, and production-ready for many common use cases. It won’t replace the need for skilled designers on complex projects, but it will save significant time on the 80% of design work that doesn’t require a specialist’s touch.
The pricing model is fair, the commercial rights are clear, and the output quality meets professional standards for many use cases. For any team that regularly needs custom vector assets but doesn’t have the time or budget to outsource every request, this tool belongs in the workflow. The key is knowing when to use it—for rapid iteration, icon sets, simple illustrations, and UI assets—and when to reach for traditional tools for complex work that demands complete creative control.