Understanding the Importance and Purpose of Tile Installation
Tile installation is one of the most versatile and impactful ways to enhance the aesthetic appeal, functionality, and long-term value of any living space. Whether you are upgrading a kitchen backsplash, bathroom walls, or flooring, a well-installed tile surface provides elegance, durability, and easy maintenance that few other materials can match. Beyond aesthetics, properly installed tiles offer practical benefits such as water resistance, ease of cleaning, and long-term durability. Choosing to install tiles without understanding the process, the types of tiles available, or the proper installation techniques can lead to uneven surfaces, cracked tiles, or loosening over time. Understanding the purpose and scope of your tile installation project is the first step toward achieving a successful outcome that combines beauty, functionality, and longevity.
Selecting the Right Tile Material Based on Durability, Functionality, and Style
Tiles are available in a wide variety of materials, each with unique characteristics that influence their performance, appearance, and installation requirements. Ceramic and porcelain tiles are among the most commonly used due to their durability, water resistance, and affordability, making them suitable for both floors and walls. Natural stone tiles, including marble, granite, and travertine, provide a luxurious and high-end aesthetic but often require specialized cutting tools, sealing, and maintenance to prevent staining or moisture damage. Glass tiles, while visually striking, can be fragile and demand precise installation to avoid cracking. Choosing the right material for your specific environment, whether it is a high-traffic floor or a moisture-prone bathroom, ensures that your installation is both functional and visually pleasing. Selecting the proper tile material also impacts your choice of adhesive, grout, and sealing requirements, which are critical for long-term performance.
Planning the Layout to Achieve Symmetry, Balance, and Efficiency
Proper planning is critical in tile installation, as a well-thought-out layout ensures symmetry, even spacing, and visually appealing results. Start by measuring the space accurately and identifying a central reference point for placement. Dry-laying tiles without adhesive can help you visualize how the tiles will fit, allowing you to determine where full tiles will be placed, where cuts are required, and how to maintain a balanced pattern throughout the space. It is important to consider key focal points, such as vanities, cabinets, or other architectural features, to ensure tiles align harmoniously around them. Planning a detailed layout not only prevents aesthetic issues but also reduces waste and minimizes the risk of errors during installation. A carefully executed layout is essential for both functionality and design cohesion.
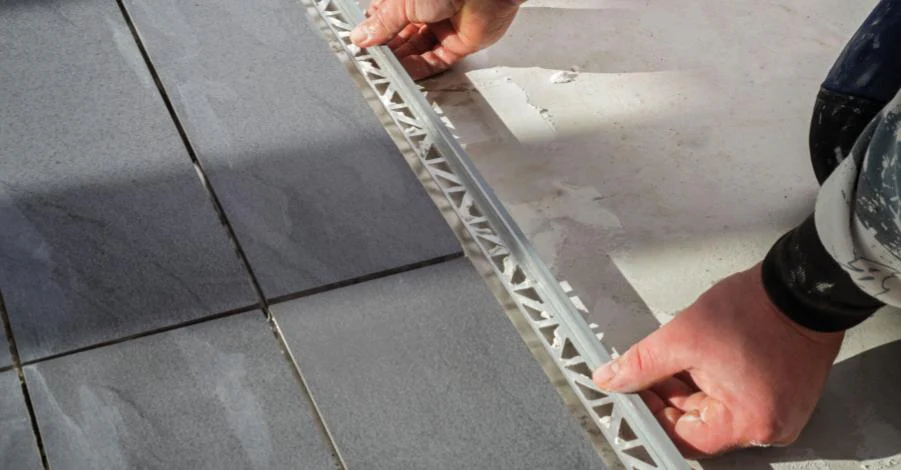
Preparing Surfaces Properly to Ensure Long-Lasting Adhesion
Surface preparation is one of the most crucial steps in achieving a durable tile installation. The surface must be clean, dry, level, and free from dust, grease, or old adhesive to provide a stable base for the tiles. Uneven or damaged surfaces can result in tiles that shift, crack, or develop uneven grout lines over time. For floors, leveling compounds can smooth dips or high spots, while walls may require patching or sanding for a flat surface. In moisture-prone areas like bathrooms or laundry rooms, installing a waterproof membrane is highly recommended to prevent water damage, mold growth, and loosening of tiles. Proper preparation may take time, but it is essential for ensuring that the installation will remain secure and visually appealing for years to come.
Gathering the Right Tools, Adhesives, and Grout for a Professional Finish
Using the right tools and materials is essential for achieving a high-quality tile installation. Key tools include a notched trowel for spreading adhesive evenly, tile spacers for consistent grout lines, a tile cutter or wet saw for precise cuts, a level for alignment, and a rubber float for grouting. Additional tools such as measuring tape, pencil, sponge, bucket, and a straight edge can aid in accurate measurements and clean results. Selecting the correct adhesive is equally important; thin-set mortar is commonly used for its strong bond and versatility, but the type of adhesive may vary depending on the tile material. Grout, available in sanded or unsanded forms, fills the gaps between tiles and adds both stability and aesthetic uniformity. Choosing the right combination of tools, adhesive, and grout is a critical step in ensuring professional-quality results.
Applying Adhesive and Laying Tiles with Precision and Care
Applying adhesive correctly requires patience and attention to detail. Using a notched trowel, spread the thin-set mortar evenly over a small section of the prepared surface, creating ridges that promote strong adhesion. Work in manageable areas to prevent the adhesive from drying before tiles are placed. Carefully position each tile, pressing it firmly into the adhesive and using tile spacers to maintain consistent grout lines. Regularly check alignment with a level, making small adjustments while the adhesive is still wet. When reaching edges or corners, measure and cut tiles precisely with a tile cutter or wet saw. Proper placement and consistent spacing are key to achieving a professional, durable, and aesthetically pleasing finish.
Grouting, Sealing, and Finishing for Long-Term Durability and Visual Appeal
Once the adhesive has cured, grouting fills the gaps between tiles, adds strength, and completes the look of the surface. Use a rubber float to press grout firmly into the joints, ensuring complete coverage, and remove excess from the surface. After the grout sets, wipe the tiles with a damp sponge to remove any haze without disturbing the grout lines. Depending on the tile and grout type, applying a sealer may be necessary to protect against moisture, stains, and discoloration, particularly for natural stone or porous tiles. Proper grouting and sealing not only enhance the appearance of the installation but also increase its longevity, making cleaning and maintenance easier over time.
Maintaining Tiled Surfaces to Preserve Their Beauty and Functionality
Maintaining tiles is crucial for long-term performance and visual appeal. Regular cleaning with mild detergents prevents buildup of dirt, grime, and soap residue, while avoiding harsh chemicals that can damage the surface or degrade grout. Moisture control, particularly in bathrooms and laundry areas, is essential to prevent mold and mildew growth. Reapplying sealant periodically for natural stone and certain grout types ensures continued protection against water penetration and staining. Proper maintenance complements careful installation, allowing tiled surfaces to remain durable, functional, and visually appealing for years.
Deciding When to Hire Professionals and When to DIY
While many homeowners successfully complete tile installation themselves, some situations warrant professional expertise. Large projects, intricate patterns, natural stone installations, and areas requiring precise leveling may be beyond the skill set of a beginner. Professionals bring specialized tools, knowledge of building codes, and experience that ensures accuracy, durability, and safety. Even for simpler projects, consulting an expert can prevent costly mistakes, ensure proper surface preparation, and provide guidance on layout and material choices. Weighing the benefits of professional assistance against the potential challenges of DIY can help homeowners make informed decisions that result in a high-quality finish.
Final Thoughts on Achieving a Beautiful and Long-Lasting Tile Installation
Tile installation is a rewarding way to enhance both the functionality and visual appeal of any space. From selecting the right materials to careful surface preparation, precise layout planning, meticulous adhesive application, and thorough grouting and sealing, each step contributes to a successful, long-lasting result. Well-installed tiles improve the durability, cleanliness, and elegance of your home, making them a worthwhile investment. By combining patience, attention to detail, and knowledge of proper installation techniques, any homeowner can achieve stunning, professional-quality surfaces that are both functional and aesthetically pleasing. Proper installation and maintenance ensure that tiled areas remain beautiful, resilient, and enjoyable for many years.