It is no longer time-consuming to convert audio into engaging videos. AI tools can transform the voice into a fully produced video with just a recording. Wondershare Filmora is also among the AI tools that have dedicated audio-to-video features. It enables users to generate podcasts and social media content within a few clicks. This article is a detailed guide to this feature of Filmora and how it can be used.
Part 1. What Is Audio to Video in Filmora?
The Audio to Video feature in Filmora can turn all audio files into a video file readily available for export. This tool’s intelligent features automatically match the users’ voice with matching video visuals, transitions, and timelines. This not only saves production time but also highlights the video content in a unique way. A user can upload an image of a character that can serve as the video’s character.
The imported audio file can be replaced at any time, enabling users to make quick changes. Users can track the progress of video generation for a better workflow. Filmora generates multiple video clips from the audio and ranks them out of 10. Users can pick the highest-ranking clips to post the most engaging content. After the audio-to-video results are generated, editors can refine the video using the built-in video editing features.
Key Features of Filmora Audio to Video AI
- Audio Clip Duration: Users can import an audio file of 30 seconds to 120 minutes and convert it into long or short-form videos.
- Audio Input Support: Filmora supports MP3, AVI, and all major audio formats for conversion. Users can also paste a YouTube video URL from their channel and convert its audio into a video.
- Custom Video Settings: This tool lets the editor pick the video language and aspect ratio to match content needs.
- Video Style Choice: The choice of built-in video style lets creators make a video of any type, from anime to sketch. Users can also pick a material template and make a video from the pre-built themes.
Part 2. How to Convert Audio to Video in Filmora (Step-by-Step Guide)
Wondershare Filmora offers a fully automated audio-to-video AI feature that generates social media-ready content. Follow this guide and see how this feature can be used for video creation:
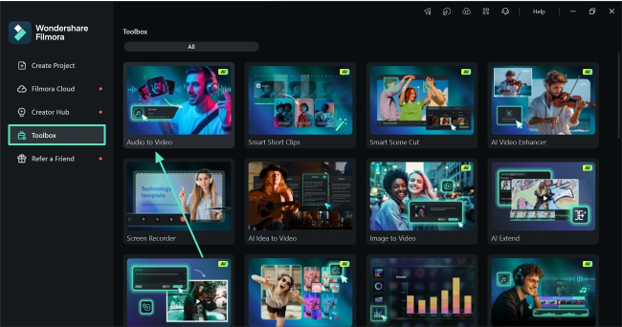
Step 1. Select the Audio to Video Feature from the Toolbox
To begin with, enter the “Toolbox” from the left sidebar and find the “Audio to Video” feature.
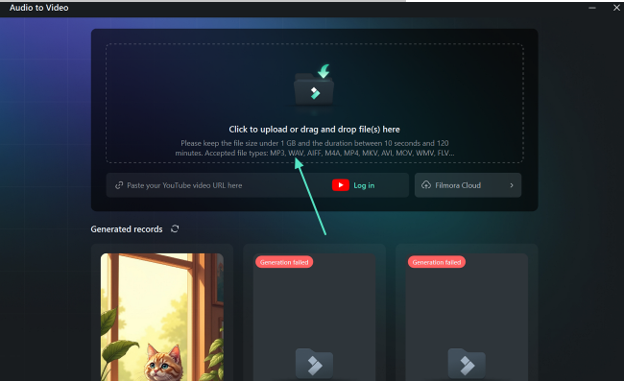
Step 2. Import an Audio File for Conversion
In the next window, import an audio clip that needs to be converted to a video. This tool also allows users to paste a YouTube video URL and transform its audio into a video.
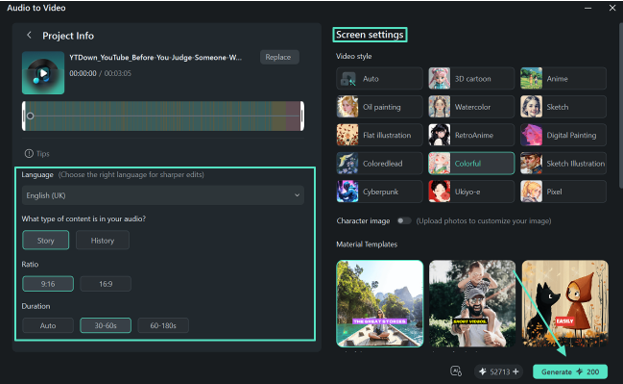
Step 3. Personalize the Video as Needed
When the next window opens, select the desired “Language,” “Content Type,” “Ratio,” and “Duration.” Finally, enter the “Screen Settings” and click “Generate” to find the results in the following screen.
Step 4. Edit or Export the Video
As the video clips are generated, scroll and find the one that meets the needs. At the end, click the “Edit” button to make further changes to the video. If satisfied, click the “Export” button to save the video to the device.

Part 3. 5 Tips for Better Audio to Video Results in Filmora
Certain steps ensure good-quality video results when using Filmora. The following tips highlight the ways users can get the best out of this AI audio-to-video generator:
- Match the Voice Style to the Content Tone: Select the voice style that matches the video’s tone in Filmora. Use a warm, conversational tone for vlogs and a clear, authoritative voice for tutorials or explainers to keep viewers engaged throughout.
- Fine-Tune Speed and Pitch for Natural Delivery: Filmora’s pitch and speed controls prevent the robot sound. Moderate speed and a pitch that is slightly lower than normal will give a more natural-sounding voice-over, which will keep the audience engaged for longer.
- Sync Audio to Video Timeline Before Exporting: One of the most common causes for viewers leaving a video is misaligned audio. Always use the voice and video sync feature to get the TTS audio exactly in sync with the on-screen video.
- Layer Background Music at a Lower Volume: This tool’s audio mixing panel allows editors to mix the AI voiceovers into background scenes with lower volume. Use music at 10–20% below the voiceover to enhance, don’t overlook or overpower the key message and narration.
- Preview and Edit in Segments: Make the script into shorter segments to be edited more easily before generating the TTS clip. This leaves users with a more finished, professional video.
Conclusion
Conclusively, Filmora simplifies the transformation of an audio file into a video. By offering style and language settings, this tool serves as a practical option for creating podcasts and social media content. Users can also edit the final outcome after converting their audio to video.
Note to Reader: This section is an independent editorial review based on publicly available product information and comparative analysis. It is intended for informational purposes only and does not represent the official views or endorsements of any publisher, software company, or media organization.
Read More From Techbullion