If you’ve been thinking about getting into 3D printing but feel a little overwhelmed by all the setup, calibration, and technical jargon, you’re not alone. Most beginners don’t quit 3D printing because it’s too hard. They quit because their first printer made it too frustrating.
That’s exactly the problem Creality designed the SPARKX i7 to solve.
Released in early 2026 under Creality’s new SPARKX sub-brand, the i7 is built from the ground up for people who just want to print, not spend their weekends leveling beds and tweaking Z-offsets. But does it actually live up to that promise? And is it the right first printer for you?
Let’s dig in.
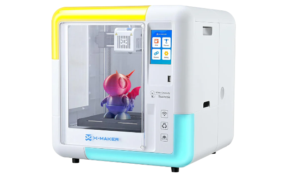
What is the Creality SPARKX i7?
The SPARKX i7 is a desktop FDM (Fused Deposition Modeling) 3D printer — meaning it builds objects layer by layer by melting and depositing plastic filament. That’s the same technology behind most consumer 3D printers you’ve seen.
What makes the i7 different is the brand strategy behind it. Creality is one of the most recognized names in desktop 3D printing, known for machines like the Ender 3 series. But the Ender line carries a reputation for requiring patience, manual tinkering, and a decent learning curve. The SPARKX brand is Creality’s clean break from that legacy — a fresh lineup aimed squarely at beginner and home users who want results, not a project.
Here’s a quick look at what the SPARKX i7 brings to the table:
- Build volume: 260 × 260 × 255 mm — plenty of space for most beginner and hobby prints
- Max print speed: Up to 500 mm/s
- Extruder: Direct drive with a tool-free quick-swap hotend
- Max nozzle temp: 300°C
- Bed: Dual-sided PEI textured plate with full auto leveling
- Display: 2.85″ color touchscreen
- Connectivity: Wi-Fi (2.4 GHz), USB, and Creality Cloud support
- AI camera: Built-in 720p camera for real-time print monitoring
- Price: ~$300–$399, depending on bundle
The combo bundle, which includes the CFS Lite 4-color filament system, is the version most people will encounter. We’ll get into whether that’s worth it for beginners later on.
How Easy Is It to Set Up?
For most beginners, this is the make-or-break question. A printer that takes three hours to assemble and calibrate before you print a single thing is a printer that tests your patience before your skills.
The SPARKX i7 gets this right.
Unboxing and Assembly
The i7 ships nearly fully assembled. Everything is organized neatly in the box — hex wrenches, a metal scraper, a filament sample, power and signal cables, a spool holder, and a printed quick-start guide alongside a QR code card linking to Creality’s unboxing video and slicer download.
There are very few pieces to connect. You’re not building a frame from scratch or routing cables through a gantry. Most users report going from box to first print in under five minutes. That’s not a marketing claim — that’s what hands-on reviewers are consistently finding.
For comparison, older Creality machines like the Ender 3 required assembling the frame, routing belts, connecting stepper motors, and then manually leveling the bed before you could even think about printing. The SPARKX i7 skips almost all of that.
First-Time Calibration
Once the printer is powered on, a setup wizard walks you through language selection, Wi-Fi connection, and calibration — all on the touchscreen. You don’t need to touch a computer yet.
The bed leveling is fully automatic. The printer probes the print surface, measures it across multiple points, and compensates for any unevenness — all on its own. The Z-offset (the gap between the nozzle and the bed) is also set automatically. So is input shaping, which fine-tunes the motion system to reduce vibration artifacts on your prints.
In other words, everything that used to trip up beginners on manual printers is handled before you load your first filament.
Beginner-Friendly Features That Actually Matter
Specs on paper are one thing. What actually matters for a beginner is whether the day-to-day experience of using the printer feels manageable. The SPARKX i7 packs in several features that genuinely move the needle — not just marketing bullets.
AI Camera for Print Monitoring
The i7 has a built-in 720p AI camera that watches your prints in real time. It’s trained to detect common failure modes — specifically “spaghetti” (when a print comes loose and the nozzle starts printing into thin air) and air printing (when nothing is actually sticking but the printer keeps going anyway).
When it spots a problem, it alerts you so you can step in before you waste an entire spool of filament on a failed print.
For beginners, this is genuinely valuable. Your first few weeks of 3D printing will involve failed prints — that’s just part of learning. Having a camera that catches failures early saves filament, saves time, and saves the frustration of walking back to find a tangled mess on your print bed.
You can also monitor prints remotely through the Creality Cloud app, which means you’re not tied to sitting next to the machine the whole time.
Filament Runout Detection and Power Loss Resume
Two features that sound small but will save you more than once: filament runout detection and power loss resume.
Runout detection means the printer pauses and alerts you the moment your filament spool runs empty mid-print. Without this, you’d come back to a half-finished object with no way to know exactly where the filament stopped — and no easy way to resume. With it, you swap in a new spool and keep going.
Power Loss Resume does exactly what the name says. If the power cuts out mid-print, the printer remembers where it was and picks back up when power returns. Given how long some prints take (hours, sometimes overnight), this is the kind of safety net beginners really appreciate.
Tool-Free Hotend and Nozzle Swaps
The SPARKX i7 uses a quick-swap hotend design — meaning you can change the nozzle without tools, without disassembly, and without the kind of anxious YouTube tutorial session that nozzle changes used to require.
The printer supports 0.2mm, 0.4mm, 0.6mm, and 0.8mm nozzle sizes. As a beginner, you’ll almost certainly start with the default 0.4mm — but knowing you can swap when you’re ready, without breaking anything, lowers the stakes considerably.
This also matters for maintenance. When a nozzle clogs (and at some point, it will), clearing it or swapping it out is a quick job rather than a half-hour ordeal.
Creality Cloud and App-Based Printing
One of the most genuinely beginner-friendly aspects of the SPARKX i7 is how it handles the software side. Traditional 3D printing workflows involve downloading a slicer, learning how to import models, configuring print settings, exporting G-code, and loading it onto an SD card. That’s a lot of steps before you see a single layer print.
With the SPARKX i7, you can skip most of that on day one.
The Creality Cloud app lets you browse a library of ready-to-print models, automatically slices them for your printer, and sends the job wirelessly — no SD card, no desktop slicer, no profile setup. You pick a model, tap print, and it starts.
This doesn’t mean you’ll never learn to use a slicer. Most users naturally start exploring Creality Print (Creality’s desktop slicer, built on the same foundation as Orca and Cura) within the first few weeks. But the fact that you don’t have to on day one removes a significant barrier for complete newcomers.
Print Quality — What Can a Beginner Actually Expect?
All the ease-of-setup in the world doesn’t matter if the prints come out looking rough. So let’s talk about what the SPARKX i7 actually produces.
Single-color prints on the i7 come out clean. The dual-sided PEI textured plate gives good first-layer adhesion without needing glue sticks or hairspray — another common beginner headache eliminated. The automatic calibration system does a solid job of ensuring the first layer goes down correctly, which is usually where beginner prints succeed or fail.
The 500mm/s top speed is an impressive number, but worth some context: beginners rarely need to print at maximum speed. Standard quality prints run at more moderate speeds, and the i7’s input shaping and pressure advance settings help keep print quality consistent even when you do push things faster. You’re not going to hit a wall where the prints start looking bad just because you didn’t manually fine-tune the motion system — the printer manages that for you.
Compatible materials include PLA, PLA-Silk, PETG, TPU, and PLA-CF. For most beginners, PLA is where you’ll spend the majority of your time — it’s forgiving, easy to print, and comes in a huge range of colors. The i7’s 300°C max nozzle temperature means you have plenty of headroom if you eventually want to experiment with more demanding materials down the line.
The layer height range of 0.05–0.3mm gives you solid flexibility too. Higher layer heights print faster but show more visible layers. Lower layer heights take longer but produce smoother surfaces. As a beginner, starting at 0.2mm is a sensible default that balances speed and quality without needing to overthink it.
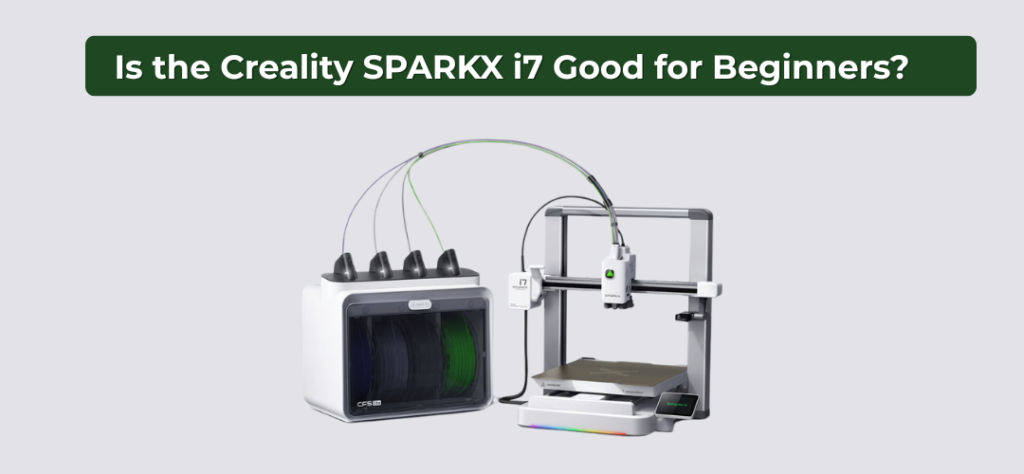
The CFS Lite: Is Multicolor Printing Worth It for Beginners?
One of the biggest selling points of the SPARKX i7 combo bundle is the CFS Lite — Creality’s optional 4-color filament system that clips onto the side of the printer and feeds up to four different filament colors into a single print.
For a printer at this price point, that’s a genuinely exciting feature. Multicolor 3D printing used to be reserved for much more expensive machines. The i7 brings it within reach of beginners without a dramatic jump in complexity.
Here’s how it works in practice.
What the CFS Lite Does
The CFS Lite holds four filament spools simultaneously. When your print calls for a color change, the system automatically cuts the current filament, feeds in the new color, and resumes printing. The whole process is handled by the printer and slicer without you having to intervene.
RFID recognition is built in for Creality-branded filaments. Load a Creality spool, and the printer automatically reads its material type, color, and recommended settings. For beginners, this is a nice touch because it removes one more variable you’d otherwise have to manually configure.
Runout detection and tangle detection are both included on the CFS Lite as well, so you get the same safety net for multicolor printing that you do for single-color.
How Multicolor Prints Actually Look
When the colors are dialed in, multicolor prints from the i7 look genuinely impressive. You can print logos, figurines, signs, and decorative pieces with distinct color separation that would otherwise require painting or post-processing by hand.
The CFS Lite supports up to 4 colors per print, and with thoughtful model design, you can get results that look far more polished than anything a single-color printer could produce.
A Few Things to Know Before You Dive Into Multicolor
Multicolor printing does come with one trade-off worth knowing about upfront: purge towers.
When the printer switches between filament colors, it needs to purge the previous color out of the nozzle before depositing the new one cleanly. That purge material prints as a small separate structure next to your actual model, called a purge tower. It gets discarded after the print. It’s standard across virtually all consumer multicolor printers at this price range, not a flaw specific to the i7.
Also worth noting: flexible TPU filament should be loaded directly into the printer rather than through the CFS Lite system. The CFS Lite’s design works best with more rigid filaments like PLA and PETG. For most beginners who are starting with PLA anyway, this won’t be an issue at all.
Should Beginners Get the Combo Bundle?
Honestly, yes, if your budget allows. The CFS Lite doesn’t add complexity to single-color printing at all. You can ignore it entirely while you find your footing and activate it when you’re ready. Having it available from day one means you won’t need to buy a separate accessory later when multicolor printing starts looking appealing, and it will start looking appealing quickly.
SPARKX i7 vs. Other Beginner Printers: How Does It Stack Up?
If you’re doing your research before buying (which you clearly are), you’ve probably come across a few other names. Here’s a quick, honest comparison of where the SPARKX i7 sits relative to the most common alternatives beginners consider.
SPARKX i7 vs. Bambu Lab A1
The Bambu Lab A1 is the most direct competitor and, frankly, a strong one. It has a good app experience, a more established user community, and Bambu’s reputation for reliability.
The SPARKX i7 counters with a lower price, open firmware that lets you customize and modify as your skills grow, and a comparable feature set for core beginner needs. If budget is a priority and you value the flexibility to tinker down the line, the i7 makes a compelling case.
SPARKX i7 vs. Elegoo Neptune 4
The Neptune 4 is a popular budget alternative with decent print quality and a growing community. It sits below the i7 in price and also below it in beginner-friendly automation. You’ll do more manual calibration and setup on the Neptune 4, and you won’t get an AI camera or tool-free hotend swaps.
Final Verdict: Is the Creality SPARKX i7 Good for Beginners?
Yes. Clearly and confidently, yes.
The SPARKX i7 is one of the most thoughtfully designed beginner 3D printers available in 2026. It doesn’t just check beginner-friendly boxes on a spec sheet. It actually removes the specific friction points that cause new users to give up: confusing calibration, fragile first prints, intimidating software, and zero feedback when something goes wrong.
With fully automatic bed leveling, a near-instant setup experience, AI-powered print monitoring, tool-free maintenance, and an app that lets you start printing without touching a slicer, the i7 meets beginners exactly where they are. And because it supports open firmware, a generous build volume, and materials like PETG and PLA-CF, it has enough room to grow with you as your skills develop.
It’s not the right machine for experienced makers who want deep customization or a large, established modding community. But for someone buying their first 3D printer and wanting to actually enjoy the experience from day one, the SPARKX i7 is exactly what the hobby has needed at this price point.
The best printer is the one you actually use. The SPARKX i7 makes it very easy to use.