
How to Improve Blurry or Low-Quality Photos Without Making Them Look Artificial

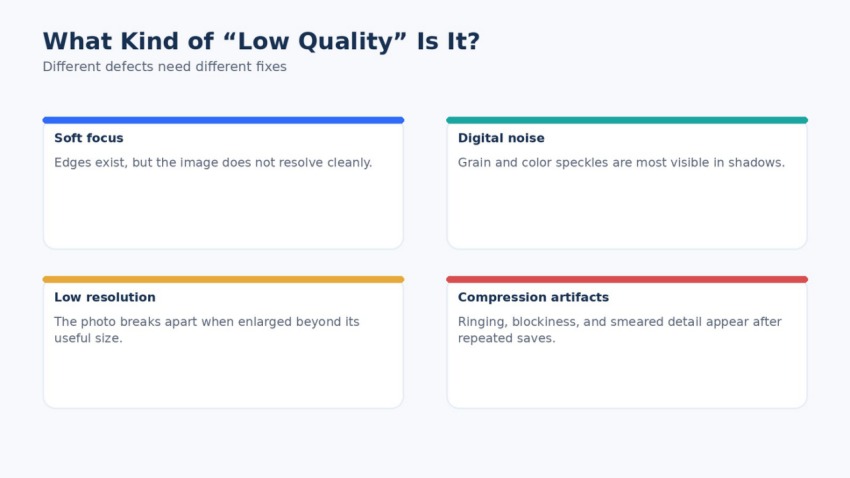
Improving a weak photo is not the same thing as making it look sharper. The best results usually come from identifying the main defect first—blur, digital noise, low resolution, compression, or poor lighting—then applying the least aggressive treatment that solves that specific problem. That is how you make a photo more usable without turning skin waxy, edges crunchy, or fine detail obviously artificial.
Start With the Defect, Not the Resolution Number
“Low-quality photo” is a symptom, not a diagnosis.
An image may look unclear because the camera missed focus, the subject moved, the file was saved too aggressively, the image is too small for the intended use, or a dark scene introduced visible noise. Research on restoration has long treated degraded images as mixtures of blur, noise, downsampling, and compression rather than as one simple defect. (The Perception-Distortion Tradeoff (CVPR 2018)).
A practical first inspection:
- Soft focus or mild blur: edges are present, but they are not clearly resolved.
- Digital noise: grain or colored speckles show up, especially in shadows.
- Low resolution: the image looks acceptable small, but falls apart when enlarged.
- Compression damage: edges show ringing, blockiness, or smeared fine detail.
- Poor lighting: the photo is technically visible but lacks clean tonal separation.
Why Maximum Sharpness Is Usually the Wrong Goal
There is a natural temptation to judge enhancement by one question: Does it look sharper? But that question is too narrow.
Image-restoration research describes a tradeoff between reconstruction fidelity and perceptual quality. A result can look more dramatic or more detailed without necessarily being more faithful to the source. That is why aggressive AI enhancement sometimes produces plastic skin, invented eyelashes, or textures that look more generated than photographed.
Make the original problem less distracting without making the processing itself obvious.
Match the Treatment to the Actual Problem
Instead of stacking every available enhancement option, start with the dominant defect.
| Image problem | Better first treatment | What to avoid |
|---|---|---|
| Mild overall softness | Gentle clarity or detail enhancement | Extreme sharpening |
| Low-light grain | Noise reduction | Sharpening the noise first |
| Blurry portrait | Face-aware or controlled detail enhancement | Invented facial texture |
| Small source image | Upscaling only when larger output is actually needed | Upscaling just because a higher number sounds better |
| Light motion or focus blur | Controlled unblur processing | Expecting severe blur to return perfectly |
| Heavy compression | Conservative restoration | Sharpening blocks and ringing |
This defect-first method also fits denoising research, which emphasizes that preserving fine texture while removing noise is one of the hardest parts of restoration. (Texture Enhanced Image Denoising via Gradient Histogram Preservation (CVPR 2013)).
Generative enhancement makes this even more important. Convincing detail is not always faithful detail. That matters most for faces, product images, screenshots, documentary material, and old family photographs.
A Practical Way to Improve a Low-Quality Photo Without Overprocessing It
Once the problem is identified, use the least aggressive treatment that makes the defect acceptable.
One practical implementation is UniConverter AI Image Enhancer. Its current desktop workflow separates Gentle enhancement from Detail (GenAI), while targeted tools address faces, noise, blur, text, color, and lighting. It also supports 2X, 4X, and 8X upscaling, AI Auto Fix, and batch processing for up to 200 supported images.
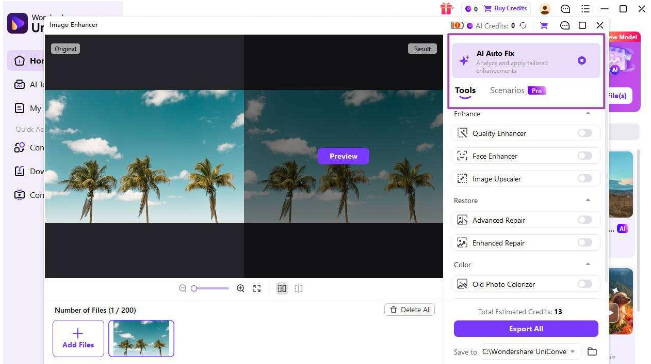
Step 1: Add the photo and identify the dominant defect
If the image is generally usable but slightly soft, begin conservatively. If the main issue is clearly noise, a face, light blur, or unreadable text, choose the treatment aimed at that problem rather than forcing stronger reconstruction across the whole image.
Step 2: Start with the least aggressive appropriate enhancement
For a photo that mostly needs cleaner clarity, Gentle is the logical first test because UniConverter positions it as the more natural-looking option. If the source is visibly degraded and conservative enhancement still leaves important areas weak, Detail (GenAI) is the next step.
Step 3: Judge the result against the original
Inspect faces, skin texture, hairlines, fabric, foliage, small text, product edges, and high-contrast boundaries. Only upscale when the image actually needs larger output dimensions. A bigger file is not automatically a better result.
Example: A Soft Indoor Smartphone Portrait
Consider an indoor smartphone portrait taken in weak light. The face is slightly soft, the shadow areas contain moderate noise, and the original resolution is already sufficient for normal online use.
A better sequence is to reduce distracting noise while preserving believable skin texture, then apply conservative clarity enhancement. Because the photo is already large enough for its intended use, there is no practical reason to upscale it simply to create a larger file. Stronger generative reconstruction becomes relevant only if important facial or surface detail remains genuinely weak after the conservative pass.
How to Tell When an AI Photo Enhancer Has Gone Too Far
Skin starts looking synthetic
If every pore becomes equally crisp or the face begins to resemble a generated portrait, reduce the enhancement.
Hair gains strands that do not behave naturally
Check whether hairlines, eyelashes, patterned fabric, jewelry, and foliage still resemble the source.
Bright or dark halos appear around edges
Strong sharpening can create outlines around faces, buildings, text, or other high-contrast objects.
Noise disappears along with useful texture
Over-denoising can make surfaces look painted or plastic.
Small details change identity
This is especially important for text, faces, logos, product shots, and documentary material. More detail is not helpful if the detail is wrong.
Compare at the Size the Photo Will Actually Be Used
A tiny artifact visible at 400% zoom may be irrelevant in a web article, social post, presentation, or normal print. So evaluate the result at both close range and its actual delivery size.
- For a social photo, does the face still look natural on a phone screen?
- For an e-commerce photo, do product edges, materials, and labels remain accurate?
- For a blog image, does it look cleaner without obvious halos or fake texture?
- For an old family photo, does the person still look recognizably like the same person?
The best enhancement is often the version that draws the least attention to the enhancement itself.
Final Takeaway
The best way to improve blurry or low-quality photos is not to chase maximum sharpness. It is to diagnose the real problem, choose the least aggressive fix that matches it, and compare the result against the original at normal viewing size.
That is also why UniConverter’s current workflow is a sensible fit for this topic: it gives users a conservative Gentle option, a stronger Detail (GenAI) mode, targeted tools for specific defects, and upscaling only when larger output is genuinely needed. Used that way, AI enhancement can make weak photos more usable without making them look obviously artificial.
FAQ
Can AI really fix a blurry photo?
Sometimes—but only when enough usable information remains in the file. Mild softness and light blur can often be improved. Severe defocus usually cannot be recovered perfectly.
Should I sharpen a noisy image first?
Usually no. If noise is the main defect, sharpening first often makes it more obvious.
Does upscaling automatically improve image quality?
No. Upscaling increases output pixels. It does not automatically increase trustworthy source detail.
How do I avoid an artificial-looking result?
Start with the least aggressive mode, compare against the original, and inspect faces, hair, text, edges, and texture before saving the result.
When is stronger generative reconstruction worth testing?
When the image is visibly degraded and conservative enhancement still leaves important areas unusable—but it should still be judged carefully against the source.






Comment