If the doubts like “ How can I check my RAM type in my windows 10 and 11?” What might be the list of procedures that I should follow “ and “ what is the speed of my RAM “hunt you then you are in the right place we hope this article will solve all your dilemmas today.
After reading this post, you will be clear about any kind of doubts regarding the RAM specs like type, size, and speed in Windows 10 and 11.
Fortunately, there are many tools and methods to check the RAM specs in your system. From CMD prompt to system information, checking the specs is getting more simpler with the new versions. there are multiple ways to learn the details of the RAM of your PC but it depends on the quantity of information you are desiring.
Knowing the RAM of your own system is very important as lacking or not meeting the minimum criteria can make the system go into unwanted issues. So let’s learn about the ways in which you can check the RAM specs in your WIndows 10 or 11.
What is RAM
RAM ( Random Access Memory ) is regarded as amazingly fast memory inserted on our motherboard, which stores the files temporarily that we need to access as soon as possible. The more RAM we have on our system means we can store more running files as we can switch from one app to another, managing a lot of assets and layers.
Also known as DIMM ( dual Inline memory module ) because it works by storing each different bit in separate memory cells before it is loaded into the system.
RAM is gaining popularity since it consumes less power than hard disks, CDs, and other older discs.
How to check ram type in windows 10 and 11?
As we know, there are two types of RAM available: DRAM (Dynamics RAM )and SRAM (Statics RAM ). So to check which type your pc is working on following are the steps
1. Checking RAM type by task manager
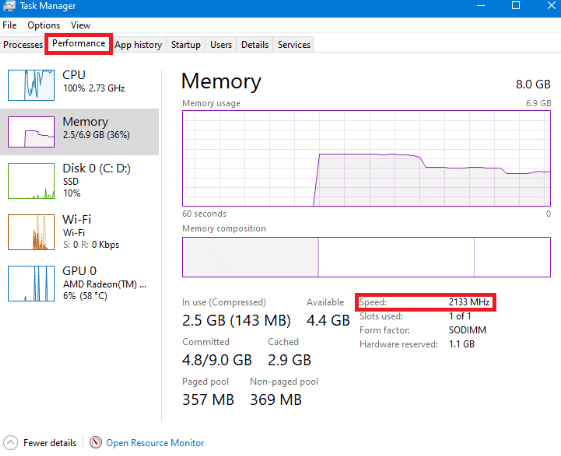
If you want to know about any specification of your system, the task Task manager might be the one-stop destination. Not only limited to the information of all the processes running on the computer, but the task manager also plays a huge role in monitoring the performance and functionality of hardware and peripherals that are already being installed on your computer. To check the RAM typeOpen the task manager. At first, right-click on the Start button in your bottom left and click on the “Task Manager” in the menu. After the task manager opens, then click the “Performance” tab which is at the top, then select the “Memory” option in the sidebar.
You can a open the task manager directly just by pressing Ctrl + Shift + Esc keys simultaneously. If the ram your system is using is DDR2, DDR3 or DDR4 then you can see the RAM generation from the top right corner depending on the device manufacturer and model.
Or , If the speed of your RAM ranges between 2133-3200 MHz, then it is DDR4 RAM. you can match other speed ranges with the table provided below :
| Generation | Speed range (MHz) | Data transfer rate (GB/s) | Operating voltage(V) |
| DDR1 | 266-400 | 2.1-3.2 | 2.5/2.6 |
| DDR2 | 533-800 | 4.2-6.4 | 1.8 |
| DDR3 | 1066-1600 | 8.5-14.9 | 1.35/1.5 |
| DDR4 | 2133-3200 | 17-21.3 | 1.2 |
In this way, you can check your RAM type with the help of the task manager. Also, DDR5 is recently introduced and many people started preferring them for their needs, so if you’re not sure which ram should you get between DDR4 and DDR5, then you can read our detailed guide here.
2. Checking RAM type through Command Prompt
Another method of checking your RAM type is using Command Prompt .
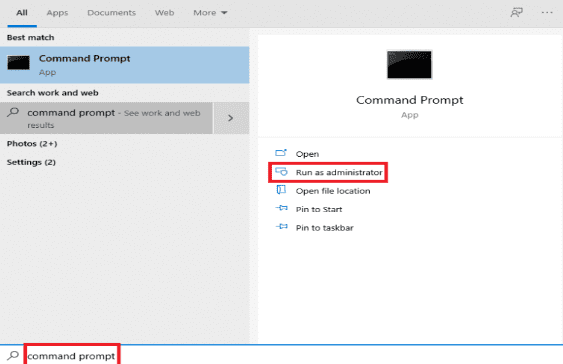
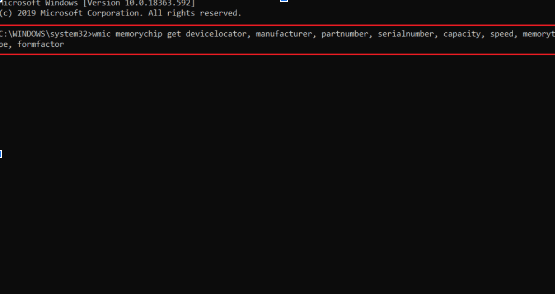
At first, click on the Windows search bar and type the command prompt. After that, press on the option of Run as administrator. After that, you should type the command “wmic memorychip get devicelocator, manufacturer, part number, serial number, capacity, speed, memorytype, formfactor”
Then the description of the Memory Type is displayed, and note the numerical value it shows. With the help of that output value, you can find some important facts about your RAM like RAM capacity, RAM speed, manufacturer of RAM, serial number, etc.
Then with the information listed in the table below you can find the type of RAM installed on your computer.
| Numerical Value | Type of RAM installed |
| 0 | Unknown |
| 1 | Other |
| 2 | DRAM |
| 3 | Synchronous DRAM |
| 4 | Cache DRAM |
| 5 | EDO |
| 6 | EDRAM |
| 7 | VRAM |
| 8 | SRAM |
| 9 | RAM |
| 10 | ROM |
| 11 | Flash |
| 12 | EEPROM |
| 13 | FEPROM |
| 14 | EPROM |
| 15 | CDRAM |
| 16 | 3DRAM |
3. Checking the RAM type using Windows PowerShell
Command Prompt has been an important feature for checking the RAM type, but since it is an old method, Windows 10 is unable to recognize DDR4 RAM. Hence, Windows PowerShell can be a better choice. It runs on its own command line. Here’s the method to check RAM’s type in Windows 10 using Windows PowerShell:
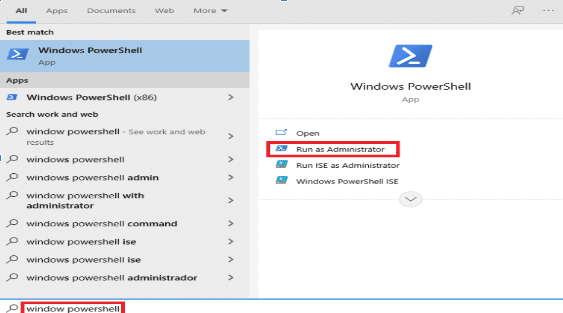
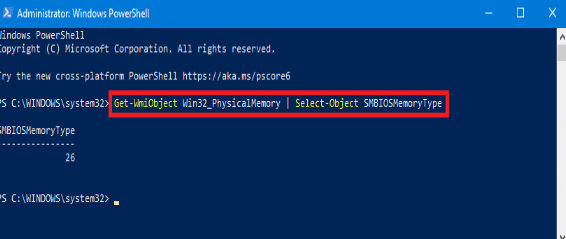
At first press the Windows key, in your screen, then type window Powershell. then after that click on Run as Administrator. After that type the given command.
Get-WmiObject Win32_PhysicalMemory | Select-Object SMBIOSMemoryType and enter
Now the results numerical value that the command gives under SMBIOS MemoryType should be matched with the column below to check the RAM’s type
| Numerical Value | Type of RAM installed |
| 26 | DDR4 |
| 25 | DDR3 |
| 24 | DDR2 FB-DIMM |
| 22 | DDR2 |
4. Checking RAM through the third-party app
If in any case other methods mentioned above didn’t work or you find them not working properly, then you can use a third-party app in Windows 10. The application is called CPU-Z. It is a tool that makes sure to note down all the features that are essential and one should know about their computer hardware and peripherals. Here’s how to know your RAM type if you have using the CPU-Z tool.
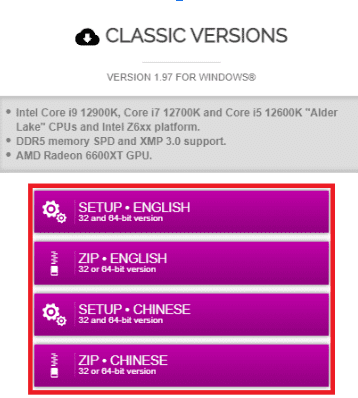
First, open any web browser and open the CPU- Z website. After that, you need to scroll down the website and make a decision between SETUP or ZIP file choosing the language you are comfortable in which falls under the CLASSIC VERSIONS section.
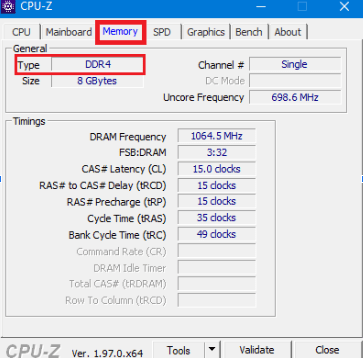
Then, press the DOWNLOAD .option soon. Now, if you downloaded the .zip file, then Extract the downloaded file to your desired folder. And again, If you have downloaded the .exe file, then you should double-click on the file which was downloaded before and follow the on-screen instructions properly to install CPU-Z. After installing the app, launch the program and then switch to the memory tab and find the type of RAM installed on your system under the GENERAL.
In this way, we can check the RAM type in Windows 10 and 11. If you hae any doubt regarding the RAM and its type feel free to ask your query in the comment section.


