After reading the official docs of tailwind to start the tailwind project with just creating the file manually, it makes me wonder how to run this html simply at local server?
Actually you can click your html file but the things is the route will follow the folder project like this:
file:///Users/fatael/project%20sample/tailwind/Master%20File/src/index.html
and sometimes the assets file like javascript and css cannot be read properly, even though it’s not a big deal but i think it’s not a good start to run the project as best practices. So here is my solution, let’s go. You may visit technogaku to read more such types of blogs.
Snowpack
Snowpack is a web development tool. It is an alternative to traditional front-end build tools like webpack and Parcel. It aims to make front-end development more accessible and scalable by providing a simpler, more modern development experience.
with snowpack you can simply create your tailwind css project with the builtin server, you can setup snowpack with 2 options:
- Use createapp.dev site to generate the tailwindcss project, It’s useful to start here because this is the most simple project set up tools.
- using NPM
How to use
1.createapp.dev
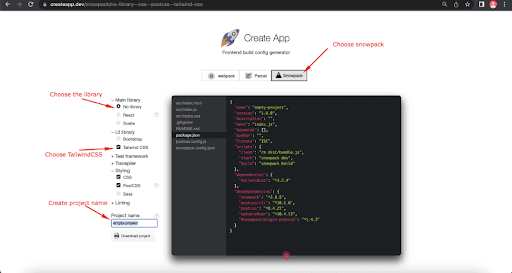
- Choose Snowpack
- Choose the main library (if you want use tailwind css in original html file you can check “No Library” opt)
- Check the UI Library with TailwindCSS
- Choose the styling (by default it will be checked css and post css when you choose tailwind css)
- Create a name for the project
- Download
Or you can simply click this link to setup what we note above
2.NPM
If someday createapp.dev no longer active because the developer forget to pay the domain extension, you can still create snowpack project with npm
Here is the step
1.Create a folder for your project, replace “myapp” with your project name
mkdir myapp
2.Go inside the folder
cd myapp
3.Initial the npm project
npm init -y
4.Install the snowpack config
npm install –save-dev snowpack postcss-cli postcss autoprefixer @snowpack/plugin-postcss
5.Install tailwindcss
npm install tailwindcss
After everything clear, you can start to create folders src and dist and create source code files and setup the tailwind.config.js like this
/** @type {import(‘tailwindcss’).Config} */
module.exports = {
content: [“./src/**/*.{html,js}”],
theme: {
extend: {},
},
plugins: [],
}
In the end, your folder structure project will be like this
YourProjectName
-node_modules
-src
index.html
styles.css
index.js
package.json
snowpack.config.js
tailwind.config.js
And run your project to local server with
npm start
Compiling the project
After everything clear at the development stage, you can simply build your project for production by running this command
npm run build
it will generate the folder build and yup your project is ready to publish at production server