A needle winding machine is an essential tool in the electronics and manufacturing industry, particularly for producing precise and uniform electromagnetic coils. Its operation requires more than just pressing a start button; it involves a sequence of deliberate steps to ensure safety, consistency, and product quality. Operators must be trained to handle the machine effectively, understanding both its structure and functionality.
This guide outlines the complete procedure to operate a needle winding machine efficiently and safely, from initial setup to final shutdown.
Understanding the Machine
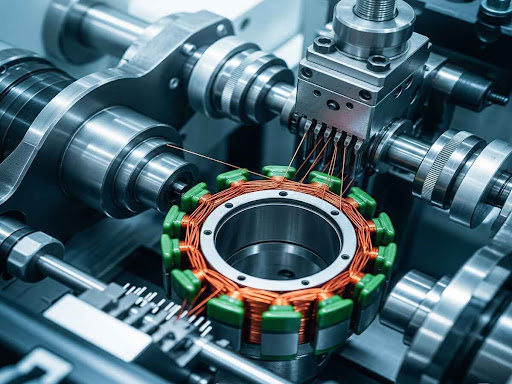
The needle winding machine includes key parts like the spindle, wire guide, controller, tension unit, and rotating needle, each essential for accurate coil production. The spindle secures the bobbin, the guide ensures precise layering, and the controller sets parameters like speed, pitch, and turns. Understanding these components is vital for smooth and efficient operation. Below are the steps involved in operating the machine effectively and safely.
1. Safety First
Before anything else, safety must always come first when operating a needle winding machine. Operators should wear personal protective equipment such as gloves and eye protection to prevent injury. Loose clothing and jewelry should be removed to avoid entanglement in moving parts. Emergency stop buttons must be tested regularly to ensure proper function.
Workspaces should be kept clean and free of clutter to avoid tripping hazards and accidental contact with machinery. Machines should only be operated when all safety guards are in place and functional. Ensuring a secure environment protects not just the operator but also the integrity of the machine and its output. Regular safety checks are non-negotiable in any professional setting.
2. Powering Up
Begin by connecting the machine to the designated power source and turning on the main switch. Most modern machines will go through a brief startup process where internal diagnostics are run. Once the system is initialized, the machine will display its operational status. Ensure that all warning indicators are off before moving forward.
During startup, make sure that no mechanical parts are obstructed or misaligned. The screen or panel should clearly indicate readiness before beginning any setup. If the machine shows error codes or abnormalities, refer to the manual before proceeding. Starting with a fully functional system avoids issues later in the operation.
3. Wire Selection
Selecting the appropriate wire is one of the most critical decisions in the setup process. The wire gauge, material, and insulation type must match the coil specifications exactly. For example, thinner wires are used for small sensors, while thicker wires are used in high-power devices. Any deviation can compromise the coil’s performance.
Make sure the wire is not damaged or kinked before loading it onto the machine. Poor-quality or inconsistent wire leads to unstable winding results and increased rejection rates. Always store wire in dry, organized conditions to maintain its quality. Careful handling during selection and installation ensures smooth operation throughout the winding process.
4. Loading the Bobbin
Mount the bobbin securely onto the spindle, ensuring it is perfectly centered and tightly clamped. An off-balance or loosely fitted bobbin can cause vibration and erratic winding. Double-check alignment by slowly rotating the spindle by hand. If there is any wobbling, readjust the bobbin immediately before proceeding.
The stability of the bobbin is crucial because it directly affects wire layering and overall shape. Incorrect loading may also damage the spindle or cause the wire to jump during winding. A secure fit ensures precise turns and uniform layering. This foundational step cannot be overlooked if high-quality coils are to be produced.
5. Threading the Wire
Carefully feed the wire through each guide, tensioner, and alignment point as per the machine’s design. Follow the exact threading path shown in the manual or on the machine label. Incorrect routing can lead to uneven tension or tangled wire, disrupting the entire winding process. Every path should be checked for obstructions.
Ensure the wire moves smoothly through the guides without friction or snagging. Tight bends or sharp angles should be avoided, as these can damage the wire insulation. Proper threading allows for consistent wire flow and accurate coil shaping. Take your time during this step to guarantee reliability during actual operation.
6. Setting Parameters
Input all required settings on the control panel, including number of turns, winding pitch, speed, and layering sequence. Most modern machines allow you to store profiles for recurring jobs. Be sure to double-check all entries to avoid miswinding. Incorrect settings can lead to wasted materials and lost production time.
The accuracy of the input data directly impacts the quality of the coil. Review the design document or datasheet before entering values. If available, use the simulation mode to verify the path and motion of the needle. Making precise entries ensures that the machine performs exactly as needed without deviation.
7. Tension Adjustment
Adjust the tensioning unit so that the wire feeds consistently and smoothly throughout the winding process. Too much tension can stretch or snap the wire, while too little will create loose and unstable coils. Use a calibrated tension gauge if available for more accurate adjustments. Always check the manufacturer’s guidelines.
Observe the wire during manual feed to get a feel for the resistance. Slight drag is ideal, providing enough pull to form tight coils without damaging the wire. Tension settings might need to be fine-tuned depending on the wire’s material and thickness. Stability in tension ensures predictable and uniform coil results.
8. Trial Winding
Start the machine with a short trial winding of 10–20 turns to check the setup. Observe the coil formation closely, watching for any overlap, gaps, or inconsistencies. If the wire is not laying down correctly, stop immediately and make necessary adjustments. Never proceed with full winding until the trial is perfect.
Check wire tracking and layer formation during the trial. A smooth and even buildup indicates the setup is working correctly. Use this opportunity to fine-tune tension and speed settings. Once satisfied, reset the counter and prepare for full operation. The trial run acts as a safety net against large-scale errors.
9. Full Operation
Once the trial run is successful, initiate the complete winding cycle. Monitor the process carefully, especially during the first few hundred turns. Listen for unusual sounds and check the coil periodically. The machine should run smoothly without jerks or sudden changes in speed. Do not leave the machine unattended.
Throughout the winding, verify that wire layers are stacking correctly and that the needle is moving in the programmed path. Real-time displays should show turn count, layer position, and speed. Keep your hands clear of all moving parts and remain alert. Consistent supervision ensures both safety and production quality.
10. Quality Check
After completion, remove the coil and visually inspect it for uniformity. Check that the layers are neat and that there are no crossed wires. Measure the resistance using a multimeter to ensure it falls within the desired range. Defective coils should be recorded and isolated for reprocessing or testing.
Look for signs of insulation damage or physical deformation of the coil. Use precision tools like micrometers or digital calipers to confirm exact dimensions. Accurate inspections help maintain a high production standard. Feedback from this process should be used to refine future machine setups and operator practices.
11. Wire Termination
Cut the wire with insulated tools and secure the ends using solder, clips, or connectors depending on the design. Be careful not to burn or nick the insulation during soldering. Each termination must be tight and clean to ensure proper electrical conductivity. Poor terminations can cause failures during application.
Label or mark the coil ends if required by your production documentation. Keep track of polarity and lead orientation for further assembly. Finished coils should be placed in anti-static containers for safe storage. Proper termination marks the final touch to a high-quality winding operation and ensures long-term performance.
12. Maintenance Tasks
Clean the machine regularly to remove dust, wire particles, and oil residues. Wipe down guide rails, check tensioners, and lubricate bearings as needed. Preventive maintenance extends the lifespan of your equipment and reduces downtime. Document all tasks in a maintenance log for reference and compliance.
Inspect belts, spindles, and moving parts for signs of wear. Replace any faulty components before they cause operational issues. Calibration should also be checked periodically to ensure accuracy in winding. A well-maintained machine operates more reliably, saving time and cost over its operational life.
13. Shutdown Procedure
Turn off the control system first, then switch off the main power supply. Unplug the machine if it will not be used for an extended period. Clean the area and return all tools and materials to their proper places. A systematic shutdown maintains machine health and prepares it for the next use.
Make sure the coil is safely removed and documented before leaving the workstation. Check that no wire is left threaded through the guides to avoid rust or damage. A proper shutdown routine is as important as startup, ensuring safety and equipment longevity. It reflects professionalism in manufacturing environments.
Reliable Winding Machine Maker
Honest Automation is a trusted manufacturer of high-precision winding machines. Their equipment is designed for consistent coil production across many sectors. One of their standout products is the electric motor winding machine, built for reliability and efficiency. These solutions are ideal for both small and large-scale operations.
They also offer expert support, training, and full customization to meet unique requirements. With years of experience in coil winding automation, they are known for delivering dependable performance. Clients worldwide rely on Honest Automation for quality machinery and service. Their focus on innovation ensures long-term customer success.
To learn more or request a solution tailored to your needs, contact them directly:
Phone: +86 189 2373 2990
Email: sales@honest-hls.com
Website: https://www.honest-hls.com/
Final Thoughts
A needle winding machine is a powerful tool that demands respect and precision. Mastering its operation means producing high-quality coils that meet rigorous industrial standards. Each step, from wire selection to final shutdown, plays a vital role in the success of the task.
By following a structured, detail-oriented approach, operators can achieve consistency and reliability. Regular practice combined with safety awareness ensures a smooth workflow. With this step-by-step guide, anyone can gain the confidence and skills needed to operate a needle winding machine effectively.


