As YouTube is among the in-demand streaming platforms today, you may think of sharing interesting videos for others to enjoy offline. To acheive this, you can simply record YouTube videos to get get your favorite shows and clips from YouTube without considering restrictions. Unlike downloading, you can easily capture the desired parts without waiting too long. As you scroll down on this page, you will see 6 easy ways to record YouTube videos on PC, Mac, Online, and mobile devices, each with detailed instructions.
Detailed Steps to Record YouTube Videos on Windows PC
This post will begin with the best screen recording tools you can find today for Windows and Mac: the AnyRec Screen Recorder. Aside from being lightweight, it is powerful in terms of recording features to record YouTube videos effectively, such as having an area selection to set an area to record, whether the entire screen, selected window, or customized part. Furthermore, you can set the quality and format to export the YouTube recordings with the original high resolution. Explore more to record YouTube videos now!
Features:
- An Area Selection is supported to select which part of your screen to record.
- Trimming recording clips to remove extra parts in the Preview window is covered.
- Provide high-quality recording settings, including 1080P resolution and 60 fps.
- Set hotkeys are provided for a quick start, stop, pause, resume, and others.
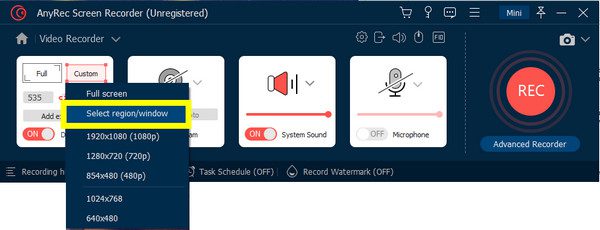
Step 1: Click the “Video Recorder” button on the program’s main screen. Select the “Custom” button there, then click “Select region/window” to select the browser window with YouTube videos.
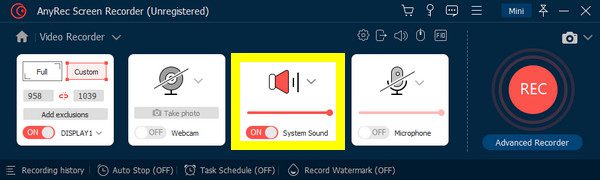
Step 2: Afterward, turn on the “System Sound” button for recording the internal sound. If you will do the narration, enable the “Microphone” option as well.
Step 3: When you have finalized all the options, click the “REC” button or press the “Ctrl + Alt + R” keys for a quick start recording. Take note that you can capture, annotate, adjust the volume, etc., using the floating toolbar during recording YouTube videos.

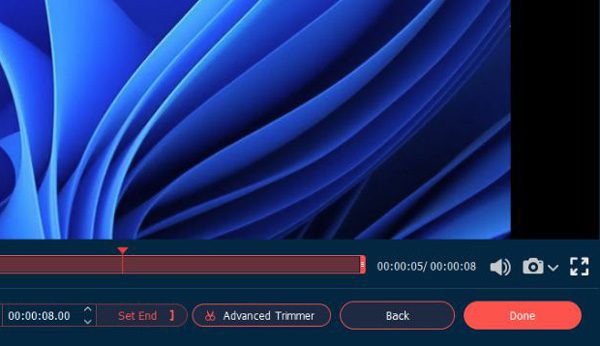
Step 4: If satisfied with the recorded YouTube video, click the “Stop” button to open the “Preview” window. You can remove unwanted extra parts from there before clicking “Done” to save. That’s how you record YouTube videos easily!
How to Record YouTube Videos on Mac with QuickTime
Aside from the Windows and Mac programs discussed to record YouTube videos, Apple also has built-in software for Mac named QuickTime. QuickTime for Mac is capable of playing videos and capturing YouTube videos. Besides the screen, you can record your voice or audio using a microphone, and it also comes with highlighting the point or the mouse clicks. Read more about the detailed steps:
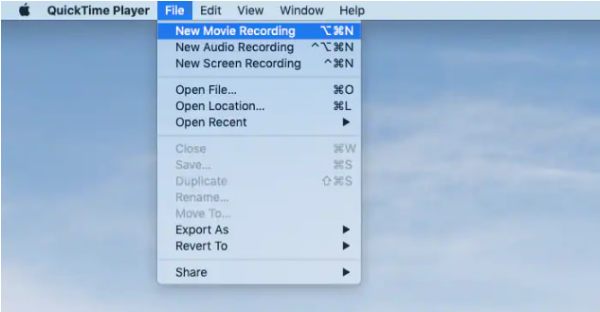
Step 1: After running the QuickTime, you can head over to the “File” menu, then click “New Movie Recording” button. Click the “Record” button to start. Open the YouTube video, then click anywhere on your screen to start recording.
Step 2: Once settled, click the “Stop” button in the menu or press the “Command + Control + Esc” keys. When the saving process is completed, QuickTime will open a window where you can preview, edit, and share the recorded YouTube videos.
The Default Way to Record YouTube Videos on an iPhone
Succeeding to Mac, iPhone also has a built-in screen recording feature to capture YouTube videos. The screen recording feature was introduced in iOS 11 and the latest versions of iPhones. Thanks to it, you can effortlessly record YouTube videos without encountering problems regarding the screen or audio. However, don’t expect too much, as it can’t always meet the quality you want. But for basing recording needs, follow the detailed tutorial below to record YouTube videos.
Step 1: View the YouTube video you want to record. Then, to access the screen recorder, open the “Control Center” by swiping up from the bottom for iPhones with a Home button. For iPhones without a Home button, you can swipe down from the right corner.

Step 2: From the “Control Center,” tap the “Screen Recording” option to record YouTube videos. Wait for the “3-second” countdown to start recording. When it’s done, tap the “Red” floating recording option to Stop. It will be saved automatically to “Photos.”
Bonus Tips: If you want to record videos in MP4 on iPhone, you can go to the “Settings” app and the “Camera” button. Then, tap the “Format” button and tick the “Most Compatibiity” option to set MP4 as the default format.
2 Methods to Record YouTube Videos on Android Easily
Do Android devices also have a built-in screen recording feature like iPhones? Fortunately, the screen recording tool will be here if you have the Android 10 update for phones such as Samsung, Oppo, LG, and others. But worry not if you can’t find it on your Android device right now, as this part also provides you with an alternative app to record YouTube videos.
1) The Built-in Recorder
The built-in recorder for Android comes in handy if you wish to have a more effortless and quicker process to record YouTube videos. It can record internal sound as well as the audio coming from the mic.
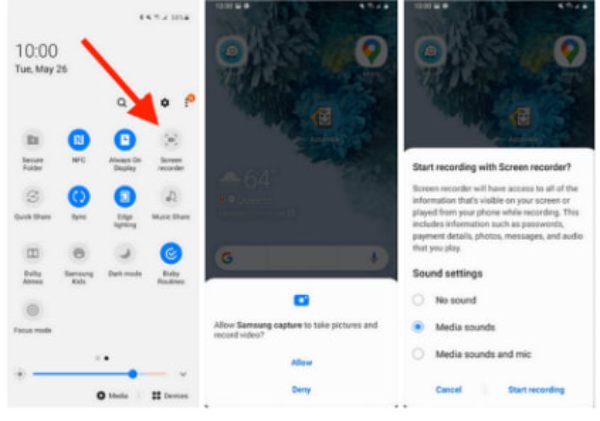
Step 1:Go to the YouTube app, then find the video you wish to record. Swipe from the screen above to open the “Quick Settings” menu.
Step 2: Tap the “Screen Recorder” button. However, if there’s none, you need to “swipe left” to access other options. You will be then asked to choose to record media sound, microphone, media, or no audio.
Step 3: After that, a countdown will start, and the recording begins right after. When recording YouTube video process is finished, tap on the “Stop” button.
2) AZ Screen Recorder
If your device is among those that don’t come with the built-in recorder, various apps assist in recording YouTube videos. You must install a screen recording app called AZ Screen Recorder. It supports capturing the screen, editing, and also live streaming. Android users can surely use this for free recording video calls, gameplay, videos, and more! Here’s how to use it to record YouTube videos.
Step 1: After installing the application, launch it. Then, you will instantly see the “bar” on the screen. Go to the “YouTube video” you intend to record.
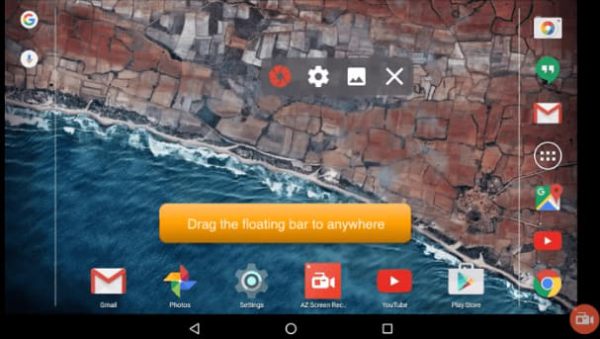
Step 2: On the app, tap the “Record” button. A “three-second” countdown will appear before the recording starts. When it’s done, tap the “Stop” icon, and the recorded video will be in your “Gallery.”
How to Record YouTube Videos Online for Free
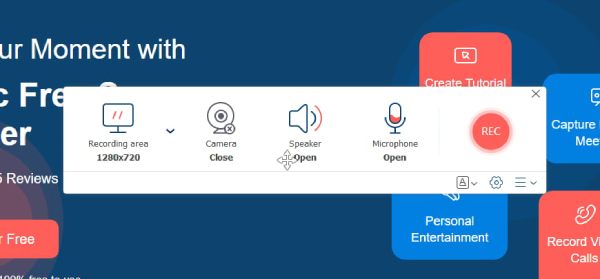
If you prefer just to sit back and relax without installing anything, a free screen recorder with no watermark like AnyRec Free Screen Recorder is designed for you to record YouTube videos. It is an online tool that allows you to record all screen activities without any limitations. Not to mention it is free from watermarks but also free from any viruses and advertisements that may annoy you during the recording process.
Step 1: Navigate to the official website of AnyRec Free Screen Recorder and click the “Record for Free” button. Then, you can select the recording area and other audio options. Make sure that the YouTube video window is ready.
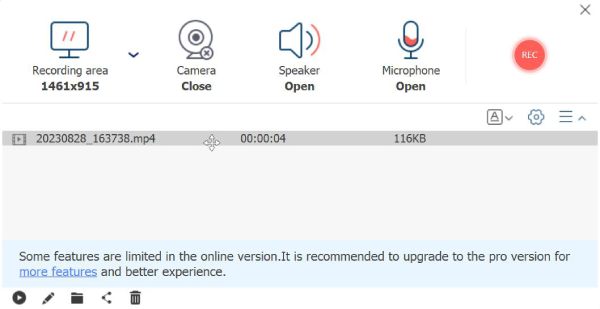
Step 2: When everything is settled, click the “Rec” button to start. And finally, it ends! Click the “Stop” button, then choose whether to save it in “WMV” or “MP4” format or share it directly to social media platforms.
Conclusion
That’s how easy it is to record YouTube videos on PC, Mac, and mobile devices! With the detailed tutorials for each, you will surely get your favorite shows and clips and share them with others instantly. If you want to have a versatile screen recorder for all devices, get AnyRec Screen Recorder now! With it, you can enjoy lots of recording features that will meet your expectations. Make sure to download it now for your Windows PC or macOS!