From Stress to Softness — Why DIY Resin Squishies Work
Everyone carries a little stress — long days, tight deadlines, the quiet hum of busyness that never seems to stop. Most people try to relax by scrolling through their phones or zoning out in front of a screen, but that kind of rest rarely sticks. You finish, and the tension lingers.

Now imagine something different: a quiet afternoon, your hands stirring smooth resin, pouring it into a small mold, and watching it slowly take form. The steady rhythm feels grounding, almost meditative. When you pull the finished squishy from its mold and feel that soft, slow bounce under your fingertips, your thoughts finally ease.
That’s the charm of making your own stress toy. With a quality resin squishy kit, you’re not just crafting something cute — you’re finding a hands-on way to slow down. Many makers describe it as part art, part mindfulness, and part quiet joy you can hold.
For many, this small act of creation has become a new kind of rest — a few minutes of tactile calm in an over-connected world.
The Science of Calm — How Making Things Relaxes the Mind
There’s something deeply grounding about working with your hands. It pulls the mind out of overdrive. Psychologists often call it active mindfulness: the moment when your attention shifts from worry to awareness — to texture, movement, and color.
Resin crafting naturally invites that state. You mix slowly, move carefully, and wait as it sets. There’s no fast-forward button, no instant reward — and that’s what makes it so peaceful. The rhythm of stirring and pouring becomes its own quiet meditation.
It’s also wonderfully sensory: the shine of liquid resin, the faint warmth as it cures, the soft bounce when the piece is done. Many crafters compare it to painting or gardening — activities where your hands lead and your thoughts follow.
Inside a Squishy Kit — What’s Included & What to Expect
Opening a DIY squishy kit feels like unboxing creativity itself. Inside, you’ll find clear resin, flexible molds, mixing sticks, and color pigments that invite you to experiment. Each piece is simple, yet together they open endless possibilities.
The process begins with mixing and pouring, but the real magic happens in the transformation — when liquid resin turns into something soft, smooth, and a little bit alive. Some makers swirl in pastel dyes or add glitter and charms. No two squishies ever look quite the same, and that’s what keeps it exciting.
If you’re sourcing materials, bondcraftor.com is a great place to start. Their beginner-friendly kits cure evenly and include balanced formulas that make the first project feel easy. You don’t need special tools or experience — just a clean table, a bit of patience, and curiosity.
A well-made kit takes away the guesswork so you can focus on the best part — the making.
Step-by-Step — How to Make Your First Resin Squishy
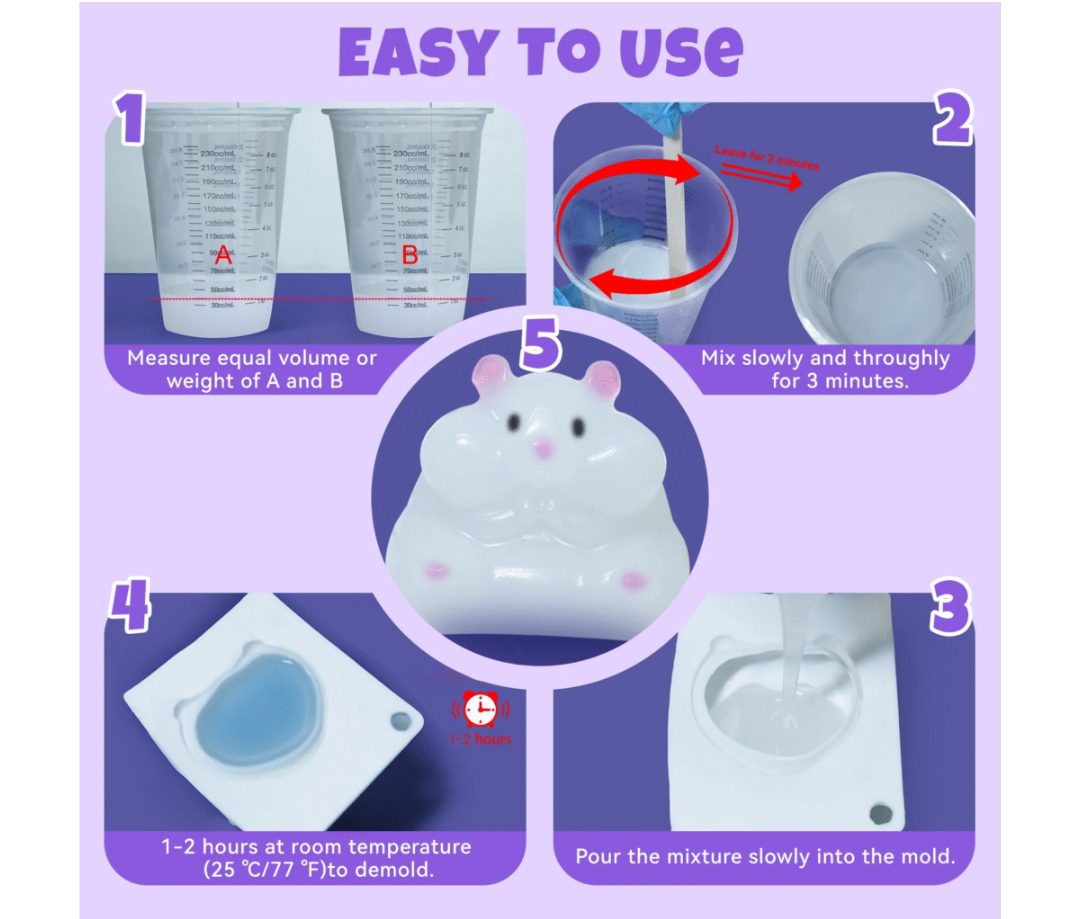
Making your first resin squishy sounds technical, but it quickly becomes second nature — a calm rhythm that flows from start to finish.
- Prepare Your Space
Cover your table with parchment or plastic to catch drips. Good light and steady airflow help. Resin works best in a clean, quiet space.
- Mix Slowly
Measure your resin and hardener exactly as directed. Stir gently for two to three minutes, scraping the sides and bottom. Consistency matters more than speed.
- Add Color or Glitter
Once smooth, add a drop of pigment or a touch of shimmer. Mix evenly but don’t over-stir — you’ll keep that beautiful clarity.
- Pour Gently
Pour the mixture into your mold. Watch the small bubbles rise; pop them with a toothpick or by tapping the mold lightly. This is the moment where creativity feels alive.
- Wait Patiently
Let it cure for 24–48 hours. It’s tempting to check, but waiting gives your squishy the best finish and texture.
- Demold and Enjoy
When it’s ready, flex the mold gently to release your creation. That soft bounce feels rewarding — a small reminder that calm can be made, one pour at a time.
Creative Ideas — Personalize Your Squishy
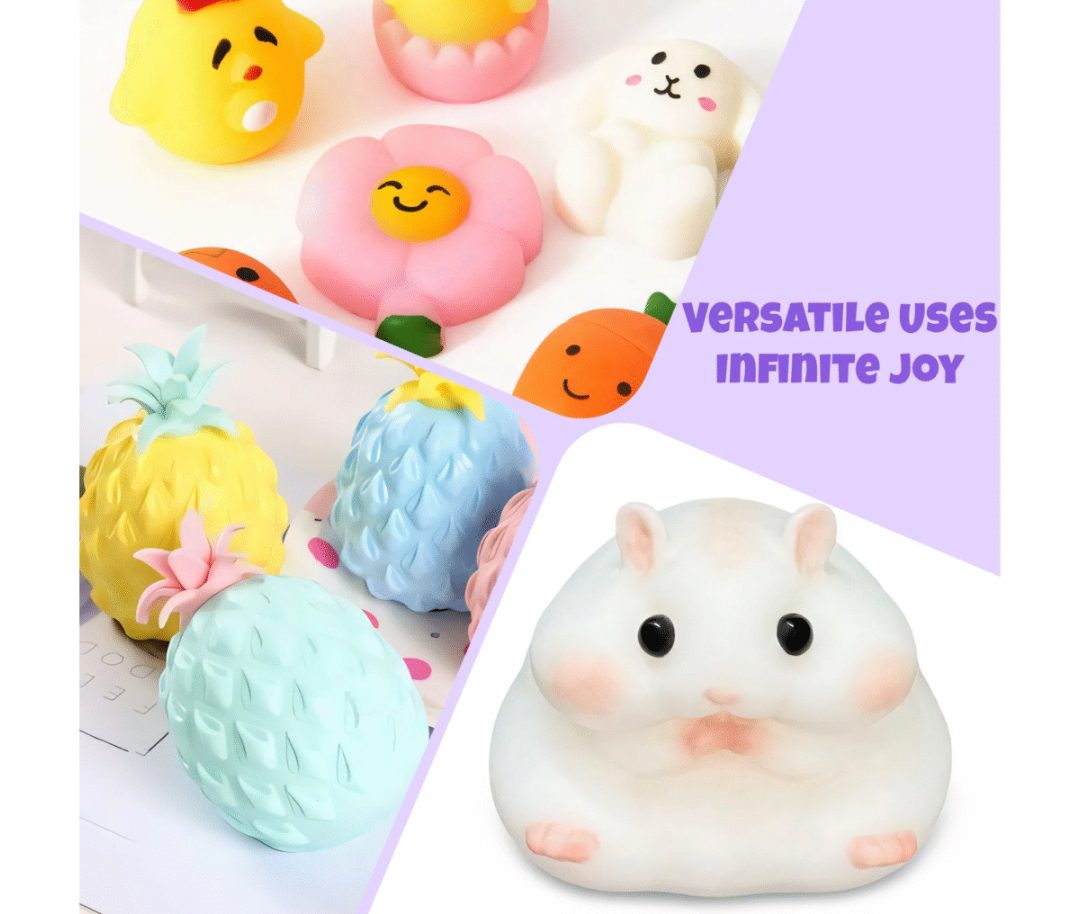
Once you’ve mastered the basics, the fun really begins. Each squishy can reflect a mood, a memory, or a spark of imagination.
Play with Color
Try pastel gradients or galaxy swirls. Transparent layers add depth, like bubbles frozen in light.
Add Texture or Charm
A touch of white pigment can create a soft, cloudy effect. Or embed glitter, beads, or small charms for personality.
Make It Meaningful
Some people craft squishies for study breaks, calming moments, or thoughtful gifts. Handmade pieces carry a quiet warmth that store-bought ones can’t match.
Turn It into Art
Arrange your DIY resin squishies by color or shape on a shelf, or display them in a clear jar. They make soothing, playful accents that brighten your space.
Every squishy tells a small story — tactile, imperfect, and uniquely yours.
Why Resin Crafts Are the New Form of Mindful Play
Life moves fast, but creativity slows it down. Making something with your hands helps you notice the shimmer of color, the warmth of resin, and the quiet joy that patience brings.
Many makers see resin crafting as a gentle form of mindful play. It doesn’t ask for perfection — only attention. And when you hold your finished squishy, you realize creativity isn’t about results; it’s about permission to pause.
Each DIY resin squishy becomes proof that calm can be shaped — gently, deliberately, beautifully.
Conclusion — Small Crafts, Big Calm
Calm rarely appears on its own. Sometimes, it starts with a few materials and a few minutes to yourself.
The real magic of resin crafting isn’t just what you make — it’s what you learn along the way: patience, focus, and the quiet reward of turning a simple idea into something real.
So clear a space, pick up a beginner-friendly kit, and let your hands lead. The next time life feels too fast, your calm might already be waiting — right there in your hands.