Live Footage to Stylized Animation: A 2025 Playbook
Studios aren’t the only ones turning everyday footage into scroll-stopping animation anymore. Cheaper GPUs, smarter models, and easier pipelines mean a single editor can now prototype animated explainers, brand stings, or music-video looks in an afternoon. This post breaks down where “video-to-animation” delivers ROI, how to wire it into your stack, and the guardrails worth adding so your output scales without legal or brand headaches.
Why convert video into animation?
- Differentiation at the same cost. Animated styles boost watch time and share rates without reshoots.
- Localization wins. It’s easier to reskin colors, signage, and character traits for markets.
- IP safety. Original stylization avoids stock-footage sameness and messy clearance trails.
- Explainers that don’t age out. Animated diagrams stay evergreen longer than raw screen-caps.
TL;DR: Think of animation as a style layer on top of live footage—fast to iterate, simple to A/B, and highly brandable.
A pragmatic toolchain
- Stage 1 — Ideation & beats. Outline 30–60s segments and visual motifs; keep each beat 3–5 seconds so it’s easy to swap variants.
- Stage 2 — Generate source or filler shots. When you’re missing coverage, a general-purpose AI video generator can create bridging clips (city fly-throughs, abstract transitions, logo macros) that match your palette.
- Stage 3 — Stylize the footage. Push your edited sequences through a dedicated video to animation converter online to apply anime, ink-wash, toon-shader, rotoscope, or painterly looks with controllable strength.
- Stage 4 — Composite & finish. Re-import stylized shots to your NLE, add motion graphics, captions, and a unified grade.
Interoperability tips
- Export intermediates in mezzanine codecs your team already trusts (ProRes, DNxHR).
- Keep asset exchange simple: glTF/GLB from the Khronos Group’s glTF for 3D inserts; EXR for passes; or USD scenes if you work across DCC apps (OpenUSD).
- For 3D comps, it’s hard to beat official pipelines from Blender or real-time tools like Unreal Engine.
Quality checklist (so it reads “cinema,” not “cheap filter”)
- Edge discipline. Animated outlines should follow motion vectors, not just luminance edges—otherwise fast movement smears.
- Temporal consistency. Favor models/presets with optical-flow stabilization; lock your seed to reduce flicker between frames.
- Shading continuity. Keep shadows and highlights consistent across shots—grade at the end, not before stylization.
- Legibility first. Don’t let line work swallow faces, hands, and on-screen text; ease back on style strength for dialogue scenes.
- 24/30/60 cadence. If you’re going for anime or toon timing, test 2s/3s holds (drawing every other/third frame) rather than true 1s—it feels hand-animated without exploding render time.
Governance and provenance you shouldn’t skip
TechBullion readers ship content at scale; trust scaffolding is non-negotiable.
- Attach content credentials. Use standards from the Coalition for Content Provenance and Authenticity (C2PA) or the Content Authenticity Initiative so platforms and partners can verify what was generated or edited.
- Mind broadcast basics. If you deliver to linear or FAST channels, align with relevant SMPTE practices (levels, color spaces, captioning) to avoid last-mile rejections.
- Disclose clearly when needed. For sponsored or synthetic sequences, follow local ad-disclosure rules (e.g., the U.S. FTC Endorsement Guides) and label “AI-assisted” where appropriate.
Sample 1-day pipeline (solo editor or small team)
Morning
- Pull selects from your live shoot (or smartphone b-roll).
- Generate gaps (logo reveal, abstract B-roll) with the AI video generator.
- Lock the cut to 40–60 seconds.
Afternoon
- Batch-stylize sequences with the video to animation converter using two style presets (A/B).
- Re-conform in your NLE, add captions and SFX, then export two variants.
Evening
- Add content credentials, run a platform-safe loudness pass, and publish both versions for A/B on Shorts/Reels.
Where the ROI shows up (quick table)
| Use Case | KPI Moved | Why Animation Helps |
| Product explainers | Watch time, completion | Visual metaphors clarify steps better than raw screen capture |
| Brand stings & intros | Recall, share rate | Distinct line work and color palettes increase recognition |
| Music videos & reels | Replays, follows | Beat-matched stylization turns simple coverage into “wow” |
| Thought-leadership clips | Save rate, embeds | Whiteboard-style toons convey complex concepts quickly |
Final take
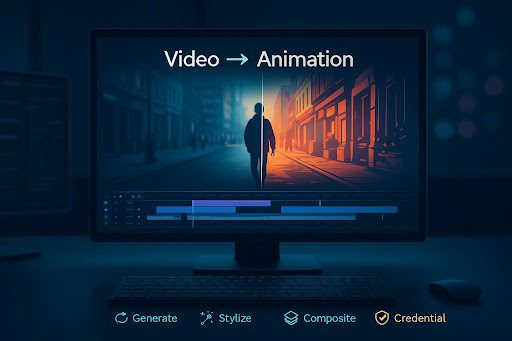
Video-to-animation is no longer a “nice-to-have effect.” It’s a modular style layer that lets lean teams ship faster, differentiate harder, and localize smarter—all while keeping costs predictable. Wire an idea → generate → stylize → composite → credential loop into your workflow, and you’ll publish more often without diluting craft. Start small: a 45-second explainer or a 10-second logo sting. Once the pipeline clicks, scale it across your campaign calendar.