In today’s hybrid work environment, productivity and peace are everything. For tech professionals, developers, and remote teams, working from home can blur the line between personal and professional life. Enter insulated garden rooms and garden office pods—innovative spaces that offer privacy, focus, and comfort without sacrificing the benefits of working remotely.
Whether you’re building software, managing IT projects, or running a startup from home, setting up your tech office in a garden pod might be the smartest move you make this year.
Why Choose a Garden Room or Pod for Your Tech Workspace?
Before diving into setup tips, let’s explore why so many tech professionals are switching to the best garden office pods for their workspaces:
- Complete separation from your home environment
- Peace and quiet for deep work and virtual meetings
- Quick installation compared to home extensions
- Energy efficiency, especially in insulated models
- Customizable to your tech and ergonomic needs
These benefits translate into better productivity, healthier work-life balance, and a space that truly reflects your tech-driven lifestyle.
Planning the Perfect Tech Office in Your Garden Pod
Setting up a productive workspace in a garden room starts with smart planning. Here’s what you need to consider:
1. Select the Right Garden Room or Pod
Not all pods are created equal. Think about:
- Size: Will it fit your desk, chair, tech setup, and perhaps a couch or bookshelf?
- Insulation: A must-have for year-round use. Look for insulated garden rooms that keep heat in during winter and out in summer.
- Power and Internet: Make sure the unit supports full electrics and allows for stable high-speed internet.
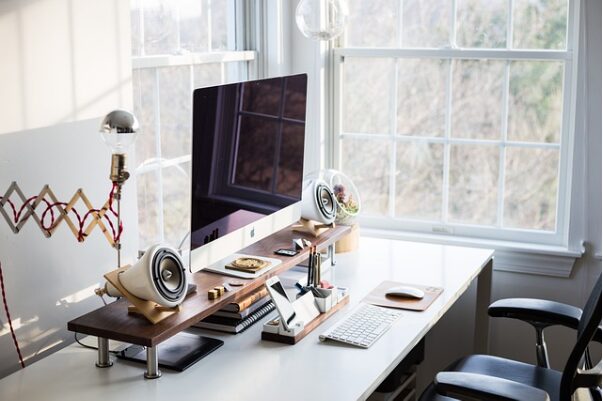
2. Layout and Ergonomics Matter
Don’t cram everything in. Design with comfort and usability in mind:
- Position your desk near a window for natural light.
- Use vertical space for shelves or pegboards.
- Choose an ergonomic chair and sit-stand desk combo if possible.
Tech Essentials for Your Garden Office Setup
Once your garden office pod is installed, the real fun begins—equipping it with the tech you need to thrive.
1. Reliable Power Setup
Make sure your pod is connected to the main grid or has a dedicated consumer unit. Add enough outlets for:
- Laptops and desktops
- Monitors
- Printers or 3D printers
- Charging station
Consider surge protection to safeguard your gear.
2. Internet Connection Options
Stable internet is non-negotiable. You have a few options:
- Hardwired Ethernet from your house (most reliable)
- Wi-Fi extenders or mesh networks
- 4G/5G routers as backup or if cabling is difficult
3. Lighting and Climate Control
Smart lighting systems are ideal for adapting to different tasks throughout the day. Pair with climate control:
- Install LED task lighting and overheads.
- Add a small smart heater and/or fan.
- Consider blinds or tinted windows to control glare.
4. Audio-Visual Setup
Video calls and focus require solid audio and visual systems:
- Invest in a quality webcam and microphone.
- Soundproofing helps reduce echo.
- Wireless noise-cancelling headphones improve concentration.
Making It a Space You Love
Productivity isn’t just about tech—it’s about how the space makes you feel. Make your garden pod a place you enjoy spending time in.
Add Personal Touches
- Green plants or a moss wall
- Inspirational art or tech posters
- Ambient lighting (e.g., Philips Hue or Nanoleaf)
Organize Smartly
Keep cables and clutter out of sight:
- Use cable trays and organizers
- Label everything
- Use drawers and storage cubes for peripherals
Work-Life Balance in Garden Annexes
A major reason to invest in garden annexes or pods is to create a physical boundary between work and personal life. But it only works if you set boundaries.
Here’s how:
- Set office hours and stick to them.
- Use a smart lock or door sign to avoid interruptions.
- Turn off work notifications when you “leave” your garden office.
Having a separate space also makes it easier to mentally switch off at the end of the day—something many remote workers struggle with.
Energy Efficiency and Sustainability Tips
Modern insulated garden rooms can be incredibly energy-efficient. But you can take it a step further:
- Install solar panels on the roof or nearby.
- Use energy-efficient appliances.
- Automate lighting and temperature control with smart plugs and thermostats.
If sustainability is important to you, consider pods made from recycled or sustainable materials.
Costs and Value: Is It Worth It?
The cost of building a tech office in a garden office pod can range from £5,000 to £25,000+ depending on the size and finish. But consider:
- You’ll save on commute and co-working space costs.
- It may increase your property value.
- It creates a permanent, customizable work zone.
For many, the ROI is clear in just a year or two.
Conclusion
Setting up your tech office in a garden pod or room is more than just a trend—it’s a lifestyle choice that supports productivity, health, and work-life balance. With the right planning, gear, and environment, your garden annex can become the ultimate hub for innovation and focus.
Whether you’re a solo developer, a tech team lead, or a digital nomad creating a home base, investing in a modern garden office is one of the smartest moves you can make in 2025.
FAQ: Setting Up a Tech Office in Garden Pods
Q: Do I need planning permission for a garden pod?
A: In most UK areas, garden rooms under 2.5m tall and not used for overnight accommodation fall under Permitted Development. Always check with your local council.
Q: What’s the best way to heat a garden office in winter?
A: Use insulated panels, double-glazing, and energy-efficient smart heaters. Avoid relying solely on portable space heaters.
Q: Can I install air conditioning in a garden pod?
A: Yes. Many people use compact AC units or split systems for year-round comfort.
Q: Are garden pods secure for expensive tech?
A: Modern pods often come with reinforced doors, locks, and alarm systems. You can enhance security with smart cameras and motion sensors.
Q: How long does installation typically take?
A: Most garden office pods can be installed in 1–3 weeks, depending on complexity and groundwork requirements.