If you want greater performance from your CPU, then overlocking is an option. By overclocking your CPU, you can make it work faster than its original intention, which means you can enjoy the performance of higher-priced models without extra expenses. If you are also doing heavy tasks like Video Editing, Graphics designing then overclocking is the best option for you. Maybe you are aware of the fact that overlocking can be harmful to your computer. Some of the overlocking disadvantages are listed below:
- When you are overclocking your computer, your CPU starts to produce some extra heat to damage your CPU. And if there is insufficient cooling, then it also can damage your CPU physically.
- During overlocking, some of the users experience a blue screen, restart, or system error. If anything from these happens, then you have to reset the BIOS.
- Overclocking is done at your own risk as your CPU’s warranty becomes void after overclocking. This means you will not be covered if any damage is caused because of overclocking.
- As the CPU gets overheated after overclocking, if you left your CPU overheated or undercooled for too long, it can damage your PC’s hardware.
Things to make sure before you overclock your PC:
There are a few things you have to make sure of before you start the procedure of overlocking. As in case of any laziness, it can cause physical damage and increase your expenses. Here are the things you look at during the process of overlocking:
- In the room in which you are overclocking your computer, there should be additional cooling. When you are overlocking, the CPU produces additional heat, so if your room is cold, it will prevent your system from being too hot.
- There should be good airflow throughout the PC’s case. Removing the heat from the CPU can make your overlocking more stable.
- If the heat sinks, it will work well. Invest in the heat sink procedure, or the powerful CPU fan will be perfect for removing the heat faster.
- Doing thermal grease is a bit critical. Even having a good heat grease system cannot transfer the heat from the CPU without applying a layer of thermal grease.
- To maximize heat dissipation, you should apply a thinner thermal grease coating to create an ideal interface between the CPU and heat sink.
- You can also try water cooling, which can work better than air cooling. Water can absorb the heat present inside your PC case and then pump it out to expel it into the air.
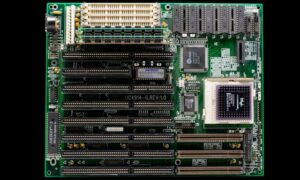
Process of the overclocking motherboard:
Now you can start the process of overlocking. You will have three different methods to choose from:
The first method of overlocking:
In the first method, you can use automatic overclocking tools. You can consult your motherboard’s manual for further details if you are a beginner and completely new to overclocking. But in terms of performance, this method doesn’t always give the best results. After you are automatically overlocked, you can notice changes in voltage as it can be too high or even too low. This will cause some unstable changes in your computer.
The second method of overlocking:
The only method you can use to overclock your motherboard is using the operating systems software that will overclock your motherboard manual for GPU. You can easily overlock all the GPU computers. You have to do a few steps, including adjusting the fan, clock, and memory speed. To test the result, you can use any highest spec game. There is no need to follow any cautions during this procedure as the voltage is not adjusted with the built-in overclocking tools. You have to choose the right to overclock settings.
The third method of overlocking:
In this method, you can manually overclock the BIOs of the motherboard. This method is more stable, and after overclocking through motherboards BIOS, you will notice the significantly achieved performance. Before starting back up all the important data. And make sure to use the latest version of motherboard BIOS. Now install the following free software that will help you check your system’s stability during overlocking.
The software’s to download before overlocking:
® CPU-Z: This software uses real-time information to monitor the clock’s speed of your monitor. Not only this can have you also check the amount of voltage you are applying.
® Prime95: This software is to test the system’s stability for a prolonged period.
® Real Temp: This software monitors the temperature of your CPU during overlocking so it won’t exceed 70 degrees.
What are the steps to overclock the BIOS?
- Start by opening the BIOS and press the delete key while starting the computer.
- Now open the overlocking menu, which may be labeled as the frequency or voltage control.
- Time to reduce the bus speed of the menu. To prevent any error that the memory can cause. Reset the memory frequency by pressing ctrl +ALT+F1. It will reduce the speed.
- Now increase your processor’s back speed by 10%; you may find the option labeled as a base clock.
- It’s time to perform a stress test, restart your computer, and boot into the OS. Keep checking the stability and temperature of your computer.
- While overclocking, keep increasing the base clock each time you increase it by a small amount until the system becomes unstable.
- For improved performance, adjust the multiplier on the motherboard. And change the CPU ratio from Auto to Sync across all the cores.
- After increasing each multiplier, don’t forget to do a stress test.
- Please keep checking the temperature as it’s possible that you can reach the end of the limit until your computer becomes unstable. It’s a general rule that the temperature of your PC doesn’t have to exceed 70-degrees.
- Now return the multiplier to its last stable point. If the temperature is still at its safest limit, you can now adjust the voltage level to increase the performance. This is the riskiest part of overlocking, so keep it slow.
- Keep raising the core voltage by 0.025 each time. Never go higher than this as the voltage can be increased too high and damage the components of your computer.
- After each increase in the voltage, run a stress test. Check the system’s stability and temperature limit. If anything is unstable, reduce the base clock and multiplier and check once again.
- Time to go back to the multiplier and base clock selection stable the unstable state. You can do this by increasing the voltage. Don’t forget to do a speed test after every increase to check the stability.
- Keep repeating the process until you reach the maximum voltage and temperature.
- Keep reducing the base clock to its last safe setting. Now you will notice that the speed of your CPU is increased by the original.
- Increase the memory speed, bring it to its original level slowly, and don’t forget to run the stress test each time.
- This time you have to perform a longer stress test, and now time to use the Prime95. Open the software and allow the test to run for about 12 hours to get the surety that the system remains stable. If you feel that it becomes unstable at any point, readjust the voltage, multiplier, and clock speed until everything reaches the optimum level.
- In the end, perform a life test. This can be done by choosing one of the high-spec games and see if your system remains stable while the game is running. You will surely experience improved performance.
Conclusion:
Can you overclock all CPUs? In short, you can’t overclock all the CPUs, as there are the majority of CPUs and motherboard multipliers locked, so those types of CPUs didn’t support overclocking. So if you are interested in overclocking your CPU, you have to make sure that you have the right type of CPU. So if you want to do overclocking, you can follow the steps given above in the article. And run your computer with more speed.