What is the HTVRONT Auto Heat Press? How to iron vinyl with HTVRONT?
Are you hoping to add an individual touch to your closet? Have you considered creating custom shirts that reflect your unique style? With the HTVRONT Auto Heat Press, you can easily transform plain shirts into personalized works of art. Whether you’re a DIY enthusiast, a small business owner, or simply want to make a memorable gift, this article will guide you through the process of making shirts with the HTVRONT Auto Heat Press.
Part 2. Exploring the Versatility of Iron-on Vinyl
Designing Unique T-shirts with Iron-on Vinyl
T-shirts are like blank canvases waiting to be adorned with your imagination. Iron-on vinyl enables you to design unique graphics, logos, or messages and transfer them onto your favorite tees. Whether you want to express your creativity, promote your business, or support a cause, making custom T-shirts using the HTVRONT Auto Heat Press is an excellent choice.
Customizing Mugs with Iron-on Vinyl
When it comes to creative possibilities, iron-on vinyl opens up a world of opportunities. It’s not just limited to shirts; you can also use it to customize mugs and create stunning designs. Imagine sipping your morning coffee from a mug that showcases your favorite quote or a vibrant pattern. With iron-on vinyl and the HTVRONT Auto Heat Press, you can bring your mug customization ideas to life.
Personalizing Hats with Iron-on Vinyl
Complete your personalized look by adding customized designs to hats. From baseball caps to beanies, iron-on vinyl allows you to create eye-catching designs that showcase your individuality. Whether you prefer a bold logo or a subtle monogram, the HTVRONT Auto Heat Press provides a simple and efficient way to personalize hats.
Part 3. Step-by-Step Guide: Making Shirts with HTVRONT Auto Heat Press
Preparing the Materials
Before you start creating your custom shirts, gather all the necessary materials. You’ll need plain shirts, iron-on vinyl in various colors, a weeding tool, scissors, a cutting machine (if available), and, of course, the HTVRONT Auto Heat Press. Ensure that your shirts are clean and free from wrinkles to achieve the best results.
Creating the Design
Begin by brainstorming your design ideas. You can sketch them on paper or use design software for more precise results. Consider the size, placement, and colors of your design. Once you’ve finalized your design, mirror it before printing or cutting it onto the iron-on vinyl. Mirroring is crucial because it ensures that the design appears correctly when transferred onto the shirt.
Cutting and Weeding the Vinyl
If you have a cutting machine, load the ironing on vinyl and let it work its magic. Otherwise, you can carefully cut the design by hand. After cutting, use a weeding tool to remove the excess vinyl, leaving only the desired design on the carrier sheet. Take your time during this step to ensure clean edges and accurate details.
Positioning the Vinyl on the Shirt
Now it’s time to position the vinyl on the shirt. Lay the shirt on a flat surface and preheat it using the HTVRONT Auto Heat Press. This step removes any moisture and wrinkles, providing a smooth surface for the heat transfer vinyl. Place the vinyl design onto the shirt, making sure it’s centered and aligned correctly.
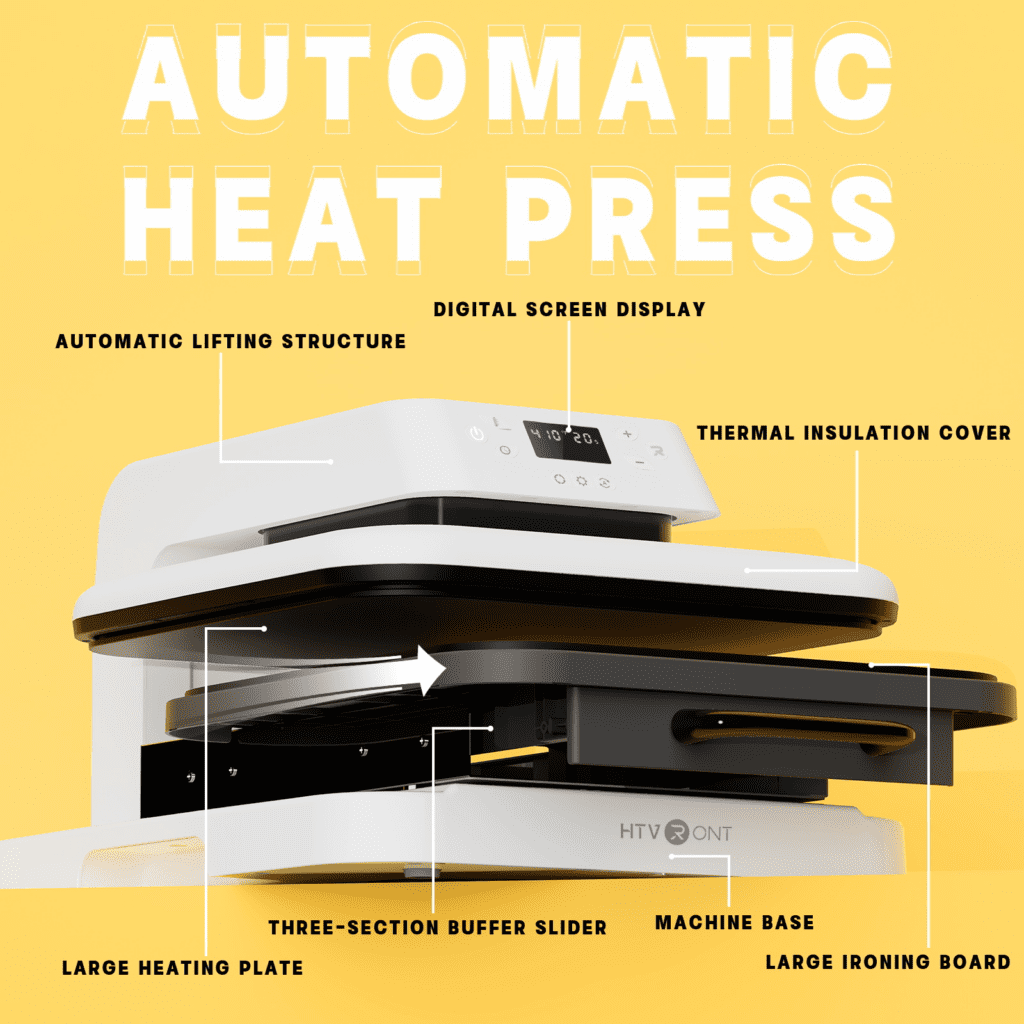
Using the HTVRONT Auto Heat Press
Following the instructions provided with the HTVRONT Auto Heat Press set the appropriate temperature and time settings. Gently place the heated upper plate onto the vinyl design and apply pressure using the machine’s handle. The heat and pressure will activate the adhesive on the vinyl, causing it to bond with the shirt fabric securely.
Peeling and Finishing the Design
After the recommended pressing time, carefully lift the upper plate of the auto heat press. Allow the vinyl to cool down for a few moments before gently peeling off the carrier sheet. If any part of the vinyl lifts with the carrier sheet, lower it back down and press for a few more seconds. Once the design is fully transferred, remove the shirt from the machine and let it cool completely.
Part 4. Advantages of HTVRONT Heat Press Machine
High-Quality Results
The HTVRONT Auto Heat Press is designed to deliver professional-grade results. Its precise temperature control and even heat distribution ensure that the vinyl adheres smoothly and evenly to the fabric, resulting in vibrant and long-lasting designs.
Time and Cost Efficiency
Creating custom shirts using the HTVRONT Auto Heat Press is both time and cost-efficient. Compared to other methods like screen printing or embroidery, heat pressing requires fewer steps, reduces production time, and eliminates the need for expensive setup costs or minimum order quantities.
User-Friendly Operation
Even if you’re new to heat pressing, the HTVRONT Auto Heat Press is user-friendly and easy to operate. Its intuitive controls, clear instructions, and safety features make it suitable for beginners and experienced users alike. You can quickly learn the process and start making personalized shirts in no time.
Durability and Longevity
Shirts made with the HTVRONT Auto Heat Press are built to withstand the test of time. The vinyl adheres firmly to the fabric, creating durable and long-lasting designs. The colors won’t fade even after repeated washes, ensuring that your custom shirts retain their vibrancy and quality.
Conclusion
Making shirts with the HTVRONT Auto Heat Press offers a fantastic way to express your creativity, showcase your personal style, or promote your business. By following the step-by-step guide provided in this article, you can transform plain shirts into one-of-a-kind garments that reflect your individuality. With the advantages of the HTVRONT Auto Heat Press, you can achieve professional-quality results in the comfort of your own home.
Unlock the world of customization and start making shirts that truly stand out. Embrace your creativity, unleash your imagination, and let the HTVRONT Auto Heat Press be your trusted companion on this exciting journey.