Deleting emails on Gmail can seem like a daunting task, especially if you have a large number of emails that need to be deleted. However, the process is actually quite simple and can be accomplished in just a few steps. This blog post will provide a step-by-step guide on how to delete all emails on Gmail, as well as some tips and warnings to keep in mind. This can be useful for decluttering your inbox or in cases where you need to free up storage space on your Gmail account.
Step-by-Step Guide
A. Log into Gmail: The first step in deleting emails on Gmail is to log into your account. You can do this by going to the Gmail website and entering your email address and password. Ensure you are logged into the correct account, as deleting emails on the wrong account can lead to data loss.
B. Select “More” from the left side panel:
Once you are logged in, you will see a left side panel with different options. Select “More” from the left side panel. This will give you access to different folders within your account, including the “All Mail” folder, which contains all your emails. If you want to delete emails from a specific folder, you can select that folder instead of “All Mail.”
C. Select “All Mail” from the drop-down menu:

From the drop-down menu that appears, select “All Mail.” This will display all the emails in your Gmail account, including those in the inbox, sent items, and other folders.
D. Use the search bar at the top of the page to search for emails:
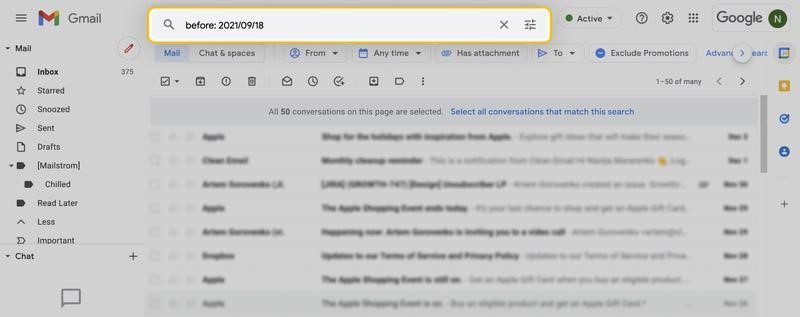
If you want to delete a specific group of emails, you can use the search bar at the top of the page to search for them. You can search for emails based on various criteria, such as sender, subject, or keywords in the email. You can also use advanced search operators like “label: inbox” to search for emails within a specific label. For example, if you want to delete all emails from a specific sender, you can type “from:example@gmail.com” in the search bar, and it will show you all the emails from the specific sender.
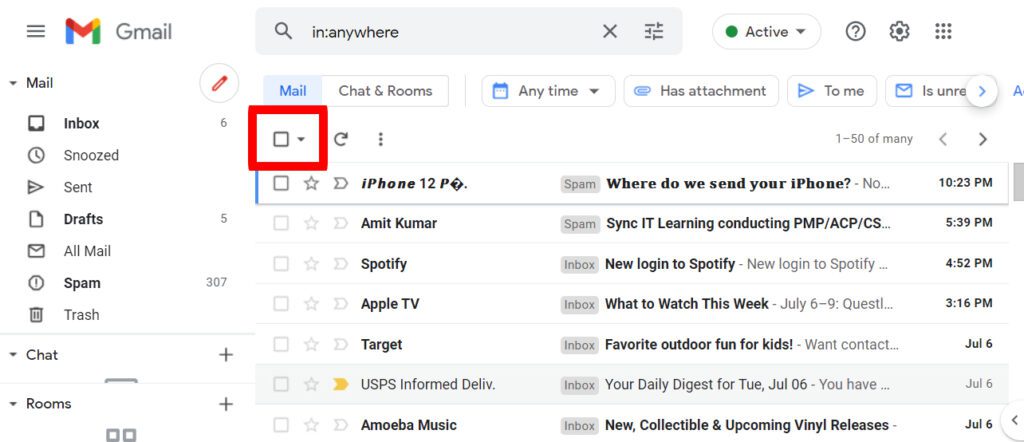
E. Select all emails that need to be deleted:
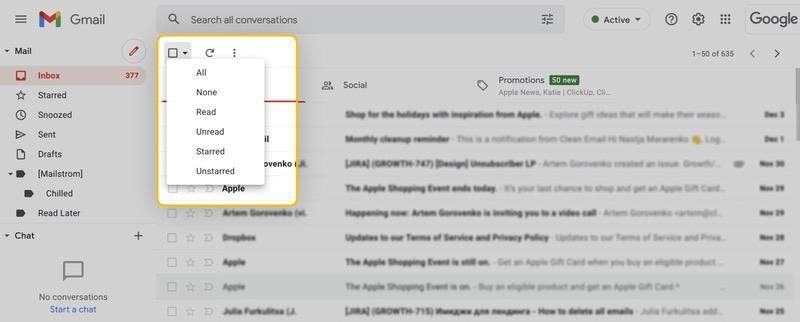
Once you have located the emails you want to delete, you can select them by clicking on the checkbox next to each email. You can also select all the emails by clicking on the checkbox at the top of the page, or use the select all option from the selection drop-down. Once you have selected the emails, you can also use the “Select all conversations that match this search” option to select all the emails that match the search criteria. This can be useful if you want to delete a large number of emails at once. The best way to use relevance in your email drip campaign is by making sure that you’re sending the right message to the right person at the right time.
F. Click the “Trash” icon at the top of the page:
Once you have selected all of the emails that you want to delete, click on the trash icon at the top of the page. This will move the selected emails to the trash folder. Emails in the trash folder are deleted after 30 days, so if you need to delete them permanently, you’ll have to manually delete them after 30 days.
G. Confirm the deletion: A pop-up window will appear asking you to confirm the deletion. Click on the “Delete” button to confirm and delete the emails permanently.
Email Tips and Tricks
Email has become an essential part of modern communication, and it’s important to use it effectively. Here are some Email tips and tricks to help you make the most of your email communication:
- Keep your subject line clear and concise. The subject line is the first thing your recipient will see, so make sure it accurately reflects the content of the email. Avoid using vague or misleading subject lines, as this can lead to confusion or your email being overlooked.
- Use a professional tone. Emails are a form of written communication, and it’s important to approach them as such. Avoid using slang or overly casual language, and be sure to proofread your email for spelling and grammar errors.
- Get to the point. Email is a quick and efficient way to communicate, so make sure your message is clear and concise. Avoid rambling or going off on tangents, and stick to the main topic of the email.
- Be mindful of your recipient’s time. Respect the recipient’s time and attention by keeping your email short and to the point. Avoid sending long-winded emails that require a lot of time and effort to read and respond to.
- Use bullet points or numbered lists. These can make your email more readable and easier to understand. It breaks down the important points and makes it easy for the recipient to scan through.
- Use the BCC (blind carbon copy) field. If you’re sending an email to multiple recipients, use the BCC field instead of the CC field. This will hide the email addresses of the other recipients, which can help protect their privacy and reduce the risk of spam.
- Be mindful of attachments. Attachments can be a great way to share information, but be sure to keep them to a minimum. Large attachments can slow down the email process and make it difficult for the recipient to access the information.
- Follow up appropriately. If you haven’t received a response to your email, it’s appropriate to send a follow-up email. But be patient, give the recipient some time to respond before sending a follow-up.
- Organize your inbox. Keeping your inbox organized will make it easier for you to find important emails when you need them. Use filters, labels, and folders to keep your emails organized.
- Use keyboard shortcuts. Keyboard shortcuts can help you navigate and manage your email more efficiently. Some of the most common shortcuts include using “C” to compose a new email, “R” to reply to an email, and “A” to reply to all.