Introduction
Elementor is the ultimate WordPress page builder plugin that simplifies the web design process for everyone, including those with no coding knowledge. With its
intuitive drag-and-drop interface, you can easily create custom web pages that are visually stunning and unique.
Creating popups with Elementor is also a quite famous aspect among WordPress users as they’re a type of ad display method used to increase web traffic. Crafting distinctive popups for your WordPress website is a breeze with Elementor’s intuitive, drag-and-drop visual interface.
There are a series of steps you need to follow to create a popup using Elementor that we’re going to list below. Stay tuned and get to know some Elementor plugins with exciting features curated all according to your needs!
A Brief Overview of Elementor Popups
Incorporating popups into your marketing strategy can prove to be beneficial.
Popups serve as a tool for lead generation, promotion of your top deals and offers, and the exhibition of your highlighted products and services.
Elementor enables you to design beautiful popups that show up either after a set time or when a user takes a specific action. Additionally, you can link Elementor popups with different email marketing solutions.
This facilitates list-building and empowers you to communicate with your online store subscribers via emails tailored to their interests. Even if you’re interested in conducting a survey or gathering customer feedback, consider utilizing popups as a means to achieve your goal.
You can create a variety of popups using Elementor ranging from lead capture popups, promotion & sales popups, restricted content popups, exit intent popups, announcement popups, and more.
Beginner-Friendly Step-by-Step Guide To Create Popups Using Elementor
Let’s suppose you want to create a discount popup upon placing the order! It will be triggered by the visitor’s intent to leave the website. Here is a brief explanation of the step-by-step guide on how to create this kind of popup using Elementor.
Step 1: Add a new popup
Type CTRL / CMD + E to open the Elementor Finder. Start typing Add New Popup
into the Finder. Then, hold down CMD/CTRL, and click to open a new tab.
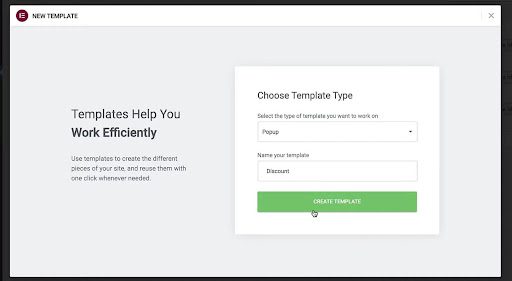
Step 2: Create a new template
Follow this step if you’ve not created your template in the Elementor. As the new tab opens, type in the name of your popup which is ‘Discount’ in this case, and click
Create Template button as shown below.
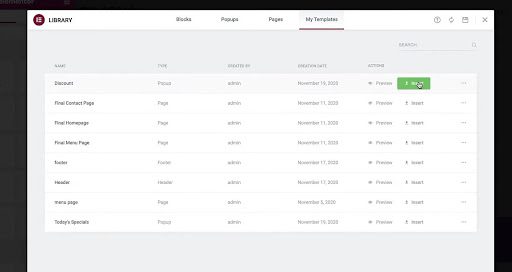
Step 3: Insert your template (optional)
If you’ve already created your template, you can directly insert it. Go to the My Templates tab, find your template, and click the Insert button.
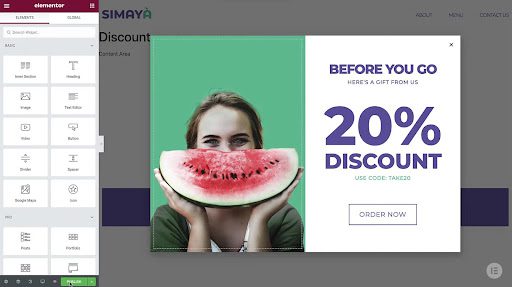
Step 4: Publish your template
Since we’ve used the template above, the design is ready to publish. Click the
Publish tab in the bottom left corner.
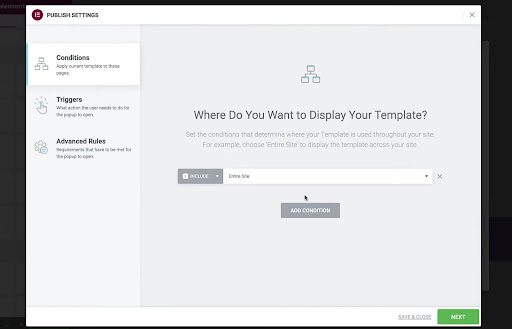
Step 5: Add a condition to your popup
You can set conditions under which the popup will be displayed on specific pages of your website. Customize the conditions that dictate the placement of your popup (except manual triggering).
For example, there is a Header template that has an Include condition for the Entire site. It is possible to add another condition, such as Exclude, for a specific page.
For instance, we can apply this to the Front page.
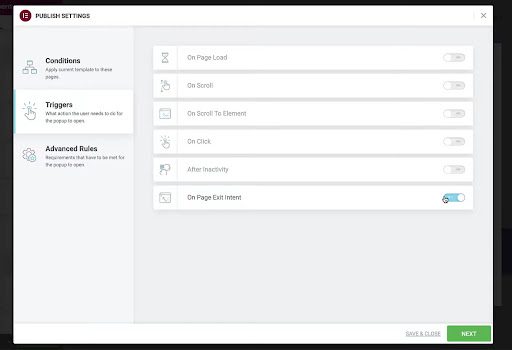
Step 6: Add triggers to your popup
Here, you can set triggers that will prompt a popup to appear based on specific actions they take. Examples of common triggers include scrolling, clicking, attempting to exit the page, or being inactive on the page for a certain amount of time.
As we have already mentioned, we created this popup that triggers when visitors exit the page. So, we’re activating On Page Exit Intent here and clicking the ‘Save and Close’ button as we’d not like to use any advanced triggers here. Then, click the
Next tab to continue.
Voila! You’ve created your first popup using Elementor.
Bonus: Create Modal Popup Using Elementor
You must be wondering what’s this modal popup now! Well, there’s a difference between a popup and a modal popup. A modal popup is based on more intentional triggers and is displayed when a particular action is performed by the user.
Moreover, this popup appears as a whole while darkening the background, and eliminating any background noise to avoid distractions. The significance of modal popups lies in their ability to interrupt the user’s flow and draw their attention to
important information or actions.
They are an effective way to communicate with users and guide them toward completing a task or taking a specific action. However, it is important to use them judiciously and not to overuse them, as they can also be seen as intrusive or annoying if used excessively.
It’s great if you’re using a free version of Elementor to create popups as it comes with a wide range of features, tools, and integrations to streamline your design
process. It just doesn’t contain as many options as you would get with the Elementor Pro version or a premium WordPress popup plugin.
Since you’re a beginner, we’d like to recommend you choose a premium plugin over Elementor Pro. The reason is simple. Elementor Pro comes with broad functionality that you’re not getting in a free version which further makes it a heavy plugin that might cause performance or site speed issues.
In contrast, our Modalify stands out as a top-notch premium WordPress plugin designed exclusively for WordPress modal popups. You can rest assured that it won’t disrupt any of your website’s existing features. This efficient and lightweight plugin can be customized to your liking, allowing you to create stunning modal popups that
impress your visitors.
Final Words
In conclusion, we have provided a detailed and easy-to-follow guide on how to create popups using Elementor. By following the above steps, anyone can create stunning and effective popups to boost their website’s conversion rate.
However, if you’re looking for a dedicated WordPress modal popup plugin that provides more customization options and advanced features, we highly recommend checking out Modalify. With Modalify, you can create eye-catching and personalized popups that perfectly match your website’s aesthetics and achieve your goals.
So why wait? Give Modalify a try and take your website’s popups to the next level!