If you’ve ever set up a WooCommerce store, you know the checkout page is where it all comes together. Your branding, your customer’s trust, and, hopefully, that final sale. But let’s be honest the default checkout fields aren’t always enough.
Sometimes you need something extra. Maybe you want customers to leave a gift message, pick a delivery date, or enter a VAT number. The standard WooCommerce checkout just doesn’t cover it all.
That’s why adding custom fields can be a lifesaver. It lets you personalize the checkout, collect the info you actually need, and even make it easier for customers so they’re less likely to bail before buying.
In this guide, I’ll show you two ways to add custom fields to your WooCommerce checkout. First, we’ll take the easy route (using a plugin). Then, for the folks who like to tinker, I’ll walk through the coding method.
Let’s jump in.
Why Add Custom Fields in WooCommerce Checkout?
The checkout page isn’t just a boring form. It’s your last chance to make things clear for your customer before they commit. Every field needs to earn its spot.
Here’s why store owners add additional fields on WooCommerce checkout:
- To collect special delivery notes or gift messages.
- To add a custom checkbox for things like newsletter signups or privacy agreements.
- To include tax or company fields for business orders.
- To rearrange or remove unnecessary default fields.
In short, you make the checkout fit your business,not the other way around. And customers notice.
Method 1: Add Custom Fields in WooCommerce Checkout Using a Plugin

If you’re like most store owners, you want things done fast, safely, and without risking your site’s code. That’s exactly why using a WooCommerce checkout customization plugin is the smarter move.
With a plugin like the Checkout Field Editor for WooCommerce by Jcodex Technologies, you can add, edit, or remove checkout fields in minutes with no coding, no stress, just a simple drag-and-drop interface.
Here’s how to do it:
Step 1: Install and Activate the Plugin
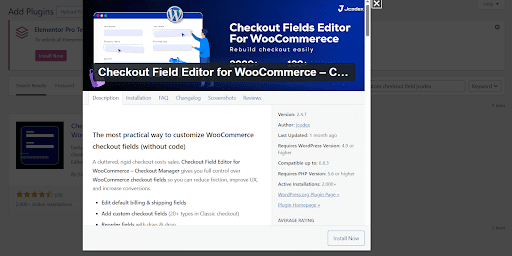
Go to your WordPress dashboard → Plugins → Add New.
Search for Checkout Field Editor for WooCommerce, click Install, and then Activate.
Step 2: Open the Checkout Field Editor Settings
After activation, head to WooCommerce → Checkout Fields.
You’ll see three main tabs:
- Billing Fields
- Shipping Fields
- Additional Fields
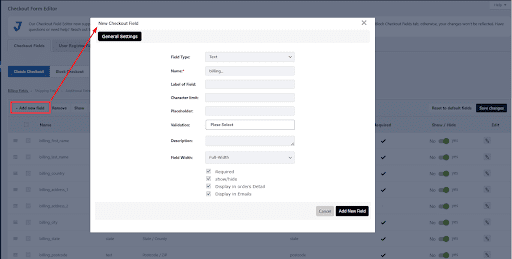
Step 3: Add a New Field
– Click Add Field.
– Pick the field type—text, checkbox, dropdown, radio button, date picker, whatever you need.
– For example, let’s say you want a “Gift Message” box.
– Give it a label and placeholder, and decide where it should show up (Billing, Shipping, or Additional).
Step 4: Customize Field Options
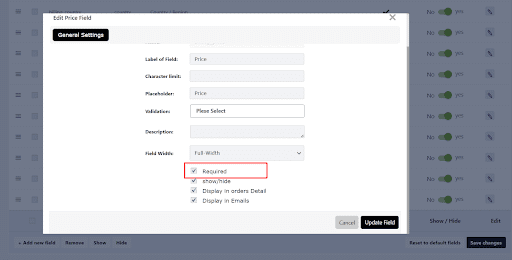
Set whether the field is required or optional, add placeholder text, and adjust its display priority so it appears exactly where you want it on the form.
Step 5: Save and Test
Once you’ve configured everything, hit Save Changes.
Now, go to your checkout page and your new custom field should appear exactly where you placed it.
Why Plugins Beat Manual Coding
Using a plugin doesn’t just save time it saves you from the headaches that come with debugging PHP errors or updating theme files.
With the Checkout Field Editor for WooCommerce, you can:
- Reorder or rename checkout fields.
- Add conditional logic (show or hide fields based on user choices).
- Save all data automatically to the order details.
- Ensure compatibility with both Classic and Block Checkout which is a big deal since many older plugins still struggle with that.
So, while coding gives you control, plugins give you power and peace of mind.
Method 2: Add Custom Fields in WooCommerce Checkout Using Code (For Developers)
Now, if you’re a developer or someone who enjoys customizing things manually, you can add custom checkout fields with a few lines of PHP.
WooCommerce is flexible enough to let you modify its checkout form through hooks and filters. You’ll be editing your theme’s functions.php file (or better yet, using a code snippets plugin).
Here’s an example of how to add a “Delivery Note” text field to your checkout page:
// Add custom field to checkout
add_action( ‘woocommerce_after_order_notes’, ‘custom_checkout_field’ );
function custom_checkout_field( $checkout ) {
echo ‘<div id=”custom_checkout_field”><h2>’ . __(‘Additional Information’) . ‘</h2>’;
woocommerce_form_field( ‘delivery_note’, array(
‘type’ => ‘text’,
‘class’ => array(‘delivery-note-field form-row-wide’),
‘label’ => __(‘Delivery Note’),
‘placeholder’ => __(‘Add any special instructions here’),
), $checkout->get_value( ‘delivery_note’ ));
echo ‘</div>’;
}
// Save custom field value
add_action( ‘woocommerce_checkout_update_order_meta’, ‘save_custom_checkout_field’ );
function save_custom_checkout_field( $order_id ) {
if ( ! empty( $_POST[‘delivery_note’] ) ) {
update_post_meta( $order_id, ‘Delivery Note’, sanitize_text_field( $_POST[‘delivery_note’] ) );
}
}
This code does three things:
- Adds a new “Delivery Note” field to the checkout page.
- Displays it in the Additional Information section.
- Saves the data in the order meta for admin viewing later.
The Pros and Cons of the Coding Method
Pros:
- Full control over the design and logic.
- No reliance on third-party tools.
- Great learning experience if you’re building custom WooCommerce sites.
Cons:
- Mistakes in PHP can break your site (even a missing semicolon).
- It takes more time to test and maintain.
- WooCommerce or theme updates can sometimes conflict with your code.
If you’re running a serious business, these small risks can add up. That’s why many developers and store owners eventually move to a WooCommerce Checkout Field Editor plugin; it does the same thing, only faster and safer.
WooCommerce Checkout Manager vs. Checkout Field Editor

If you’ve been exploring plugins, you’ve probably noticed both WooCommerce Checkout Manager and WooCommerce Checkout Field Editor pop up in search results.
They’re similar, but here’s the quick difference:
- Checkout Manager: Good for simple tasks like renaming or hiding fields.
- Checkout Field Editor: More advanced and flexible supports multiple field types, conditional logic, and full compatibility with block checkout.
For most users, the Checkout Field Editor for WooCommerce by Jcodex Technologies strikes the perfect balance between ease of use and customization power. It’s lightweight, fast, and built to handle real-world stores, not just demos.
Best Practices for Editing Checkout Fields in WooCommerce
No matter how you customize your checkout, keep these best practices in mind:
- Less is more. Don’t overwhelm your customers with too many fields; every extra field can increase checkout friction.
- Ask only for what’s essential. Each question should serve a purpose (delivery, billing, support, etc.).
- Group related fields logically. Keep personal details, shipping info, and notes clearly separated.
- Use clear, friendly labels. Avoid techy jargon, keep it simple.
- Test on mobile. Most users buy on phones now. Make sure your new fields look great on small screens.
- Regularly review performance. If a custom field isn’t adding value, remove it.
A clean, easy checkout process isn’t just good UX it’s good business.
Why Plugins Are the Future of Checkout Customization
Let’s be honest, WooCommerce’s flexibility is both a blessing and a curse. You can customize everything with code, but it takes time, skill, and patience.
Using a WooCommerce checkout editor plugin simplifies the process so you can focus on your business instead of debugging PHP.
A plugin like the Checkout Field Editor for WooCommerce handles all the behind-the-scenes logic, keeps your checkout compatible with new WooCommerce updates, and saves you from potential errors.
Think of it like this:
Hand-coding is like building your own car. Using a plugin is like buying one that’s already tuned, tested, and ready to drive.
Final Thoughts
Customizing your WooCommerce checkout is one of the best ways to improve your store’s customer experience. Whether you’re adding custom checkout fields, editing existing ones, or simply rearranging them, doing it right makes a real difference.
If you enjoy coding, by all means, play around with hooks and filters. It’s great for learning. But if you want something reliable, faster, and safe for non-developers, a Checkout Field Editor for WooCommerce plugin (like the one by Jcodex Technologies) is the best option.
At the end of the day, it’s not about how fancy your checkout form looks, it’s about making it clear, personal, and effortless for your customers.
Make checkout simple, and sales will follow.