Old photographs carry special memories, but with time, they may fade away or get damaged. Photo restoration helps to bring back the lost charm of old pictures and preserve them for future generations. In this article, we will explore the process of old photo restoration and the techniques used to bring back the life in faded and damaged photographs.
Key Takeaways
- Old photo restoration is the process of bringing back the lost charm of faded or damaged photographs.
- The restoration process involves various techniques and tools used to restore vintage photographs.
Steps for Photo Restoration
Restoring old photos involves several steps, each playing a crucial role in bringing the image back to life. Here are some of the most common steps involved in photo restoration:
Step 1: Scanning the Original Image
The first step in photo restoration is scanning the original image using a high-quality scanner. This ensures that you have a digital copy of the photo that can be edited and restored without causing any damage to the original.
Step 2: Assessing the Damage and Planning the Restoration
The next step is assessing the damage to the photo and planning the restoration process accordingly. This involves identifying the areas that require restoration, such as torn or faded sections, and deciding on the best techniques and tools to use for the restoration process.
Step 3: Removing Dust and Scratches
Before proceeding with the restoration process, it’s essential to remove any dust or scratches from the scanned image. This can be done using a variety of tools such as the spot healing brush, clone stamp tool, or dust and scratch filter.
Step 4: Repairing Tears and Cracks
If the scanned image has tears or cracks, repairing them is the next step in the restoration process. This can be done by using various techniques such as patching, cloning, or even rebuilding parts of the image.
Step 5: Restoring Color and Contrast
Restoring color and contrast is an essential step in photo restoration, particularly for faded or discolored photos. This process involves adjusting the color balance, saturation levels, and brightness and contrast to bring the image back to life.
Step 6: Adding Sharpness and Detail
Adding sharpness and detail to the restored image is the final step in the photo restoration process. This can be done by using sharpening tools, adjusting the tone and texture, and even using specialized plugins and software.
By following these steps and using the right tools and techniques, it’s possible to restore old photos and bring back the memories of a bygone era.
Restoring Faded Photos
Faded photos are a common problem with old pictures, and the process of restoring them can be challenging but rewarding. There are various techniques and tools you can use to restore and enhance the quality of faded photographs, making them look as good as new.
One method of restoring faded photos is through digital techniques. Using specialized software, you can adjust the levels of brightness, contrast, and color saturation to bring back the original look of the photo. Cropping, resizing, and rotating can also be done to improve the composition and remove any unwanted elements.
Another method of restoring faded photos is through manual techniques. This requires a careful touch and some artistic skills, but it can produce excellent results. For example, you can use a soft brush to remove dust and scratches or apply a layer of color to simulate the missing details.
It is essential to keep in mind that restoring faded photos is a delicate process and requires a lot of patience and attention to detail. However, the final outcome can be truly remarkable, bringing back the memories and emotions of the past.
Digital Restoration of Old Pictures
Digital restoration has revolutionized the process of restoring old photographs. It allows for greater precision and control in the restoration process, resulting in more accurate and realistic outcomes. The digital restoration process involves scanning the original photograph and using specialized software to repair, retouch, and enhance the image.
The first step in the digital restoration process is to scan the original photograph using high-quality equipment. The resulting digital file serves as the basis for the restoration process. The next step is to use specialized software to repair the image, removing any scratches, stains, or other damage. This process requires a high level of skill and attention to detail, as the restorer must carefully analyze the image and determine the best techniques to use.
Once the restoration is complete, the restorer can then enhance the image further, adjusting the color, contrast, and other factors to improve the overall quality of the photograph. Digital restoration also makes it possible to create high-quality reproductions of the original photograph, which can be printed and displayed with pride.
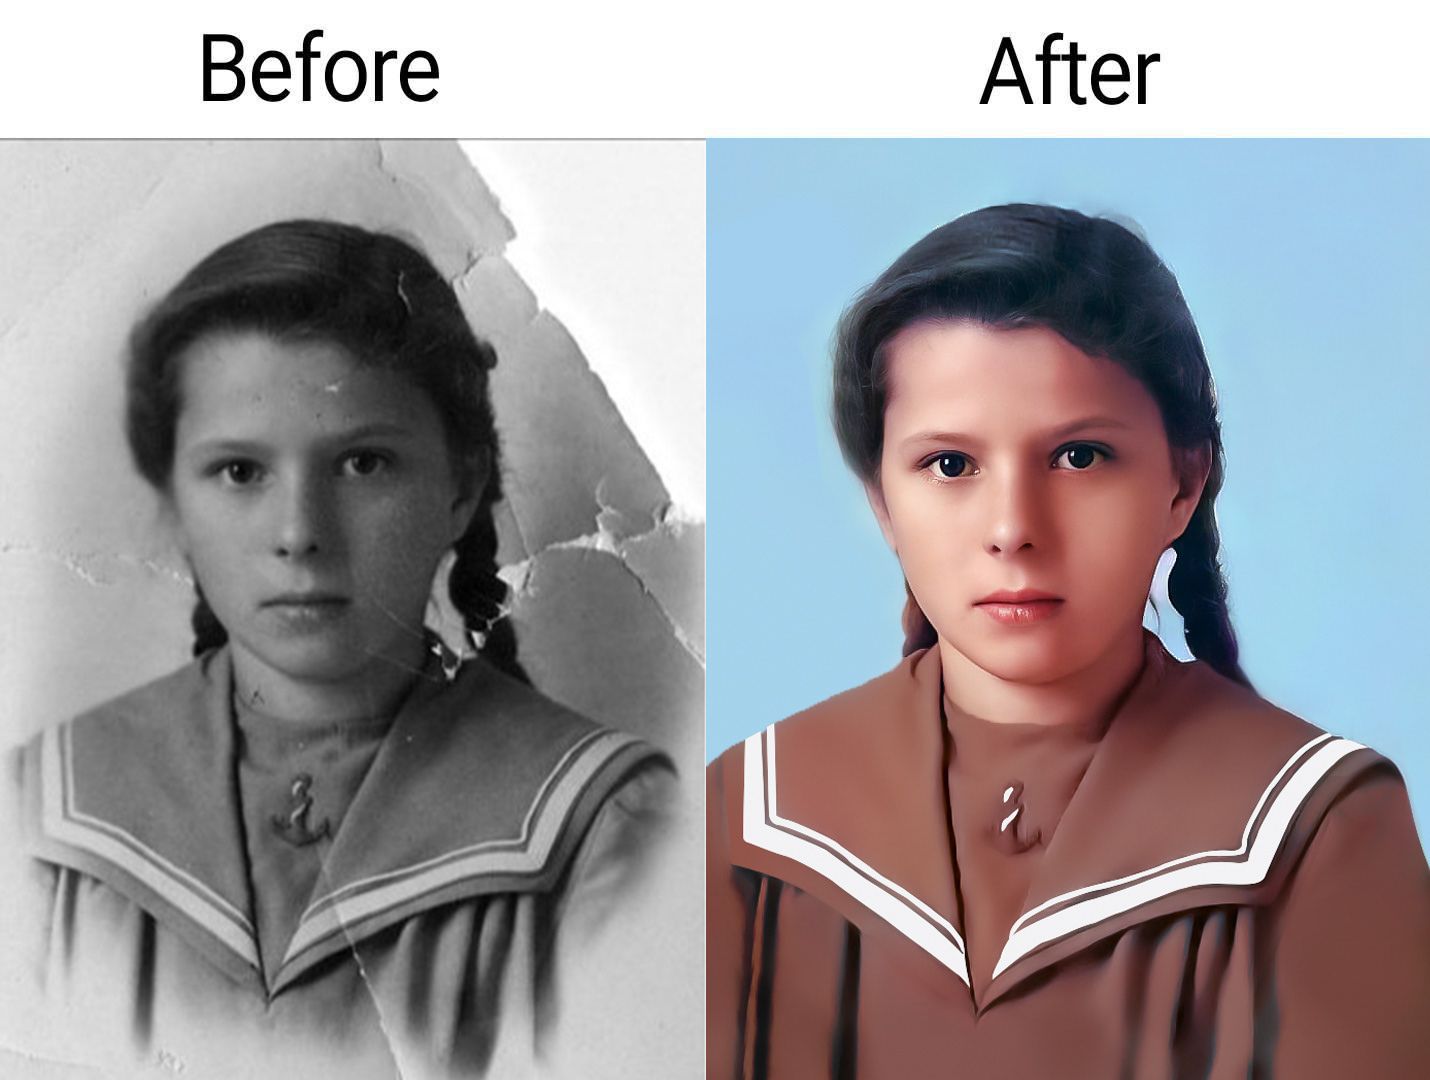
Photo Restoration Before and After
Photo restoration has the power to breathe new life into old and damaged photographs, as demonstrated by these incredible before-and-after examples.
“I had given up on ever seeing my great-grandparents’ wedding photo in good condition. But after restoring it, I can hardly believe my eyes. It’s like stepping back in time.”
Whether your old photos have suffered from fading, discoloration, scratches, tears, or other damage, photo restoration can help bring them back to their former glory. With the help of digital tools and expert techniques, you can preserve and enhance your priceless memories for generations to come.
Old Photo Repair Techniques
Old photos may have physical damage like tears, scratches, and cracks. These imperfections can be distracting and take away from the beauty of the image. However, there are various techniques and tools available for repairing and restoring old photos.
The first step is to scan the damaged photo and create a digital copy. This allows for easier manipulation of the image without further damaging the original. Once you have a digital copy, you can begin repairing the damage using software tools such as the clone stamp tool or healing brush tool. These tools allow you to sample a nearby undamaged area and replace the damaged section with a matching pattern.
If the damage is extensive or in a crucial part of the photo, it may require more advanced restoration techniques such as layer masking or content-aware filling. Layer masking involves creating layers and masking sections of the image to isolate the damaged area from the rest. Content-aware filling involves selecting an area around the damage and using advanced algorithms to fill in the damaged section with matching patterns.
For physical damage such as tears or scratches on the original photo, there are also physical repair techniques available. These include using adhesive tape or specialized repair tissue to cover up the damage and prevent further tearing. However, it is important to note that these techniques can also damage the photo and should be done carefully or by a professional.
In conclusion, restoring old photos with physical damage may seem like a daunting task, but with the right techniques and tools, it is possible to repair and restore them to their original beauty. Whether you choose to do it yourself or seek professional help, restoring old photos is a worthwhile project that can bring back cherished memories for generations to come.
Professional Photo Restoration
While restoring old photos can be a rewarding DIY project, sometimes it’s best to leave it to the professionals. Expert photo restoration services have the knowledge, skills, and equipment to handle even the most challenging restoration projects.
Professional photo restoration involves a detailed assessment of the old photo to determine the best method of restoration. They have access to advanced software and equipment that can restore faded colors, remove stains and scratches, and repair damaged photos. These experts use their skills and expertise to bring your photos back to life.
One of the main benefits of hiring a professional photo restoration service is the quality of the results. They can often achieve more natural and seamless restoration than an inexperienced individual. Professional photo restoration also ensures that your photos are not further damaged or deteriorated during the process.
Some restoration projects may require specialized techniques or equipment, which may not be available to the average person. Professional photo restoration services have access to these tools, making it possible to restore even severely damaged photos.
Overall, professional photo restoration is an excellent option for those who want to ensure their cherished memories are restored to their former glory.
Enhancing the Details
When restoring old photos, it’s important to bring out the details to enhance their overall quality. Here are some techniques to help you achieve this:
- Cropping: Removing unnecessary parts of the photo can help to focus on the subject and make it stand out.
- Sharpening: Using sharpening tools can bring back the crispness of the image, making details more visible.
- Brightness and Contrast: Adjusting the brightness and contrast can help to bring out details that were previously hidden in shadows or overexposed areas.
“By enhancing the details in old photographs, you can create a more complete and vivid picture of the past.”
It’s important to note that enhancing details should be done with care. Overdoing it can lead to the loss of the photo’s original character and charm. Striking a balance between restoration and preservation is key.
Preserving Original Grain and Texture
In some cases, preserving the original grain and texture of the photo can add to its overall authenticity and charm. One way to do this is by using scanning techniques that preserve the photo’s original grain. You can also use software that mimics the texture and appearance of old photo paper to restore the vintage look and feel of the photo.
| Tip: | When enhancing the details of old photos, it’s a good idea to make a backup copy of the original photo. This way, you can always go back to the original and start again if needed. |
Restoring Color in Old Photos
Restoring color in old photos can be challenging but rewarding. It is common for old photographs to have lost their original colors, leaving behind only a faded or yellowish image. Here are some techniques used to bring back the original colors or add color to black and white photos:
- Manual colorization: This technique involves manually adding colors to a black and white photo using various tools and techniques. It can be time-consuming but provides more control over the final result.
- Automatic colorization: This technique uses AI and machine learning algorithms to automatically add color to a black and white photo. While it is fast and convenient, the results may not always be accurate or satisfactory.
- Color correction: This technique involves adjusting the color balance and saturation of a photo to bring back the original colors. It is a less intrusive method that can often produce impressive results.
When restoring color in old photos, it is important to use high-quality software and tools, and to work on a high-resolution image to achieve the best possible results.
Expert Tip:
When adding color to a black and white photo, take the time to research the colors of the era the photo was taken in. This can help you create a more accurate and realistic final result.
Preserving and Storing Restored Photos
Once you have restored your old photos, it is important to take proper care of them so that they can be enjoyed for years to come. Here are some tips for preserving and storing your restored photographs:
- Handle with care: Always handle your restored photos with clean, dry hands to avoid getting oils and dirt on the surface. This will help prevent further damage or deterioration.
- Store in a cool, dry place: Keep your restored photos away from direct sunlight, moisture, and extreme temperatures. A cool, dry place like a photo album, acid-free box, or sleeve will help protect your photos from damage or fading.
- Use acid-free materials: Acidic materials like regular paper, cardboard, and glue can cause your photos to age and deteriorate faster. Use acid-free paper, pens, and adhesives when mounting or framing your photos.
- Make copies: Consider making digital copies of your restored photos to ensure that you always have a backup in case of damage or loss. You can store these copies on your computer, a USB drive, or in the cloud.
By following these simple tips, you can help ensure that your restored photos stay in great condition for many years to come. With proper care and storage, you can enjoy your cherished memories and share them with future generations.
Conclusion
Old photo restoration is a process that allows you to breathe new life into your cherished memories. Whether you have faded, damaged, or old black and white photographs, restoring them can be a rewarding experience.
By following the steps outlined in this article, you can learn how to restore and enhance your vintage photos using various tools and techniques. Whether you choose to restore your photos yourself or seek professional help, the results can be truly remarkable, allowing you to cherish and share your memories for years to come.
Remember to preserve and store your restored photos properly to ensure they last a lifetime. With the right care and attention, your restored photos can become a family heirloom for future generations to treasure.
FAQ
Q: How does old photo restoration work?
A: Old photo restoration involves a process where damaged, faded, or deteriorated photographs are repaired and enhanced to restore them to their original quality. Various techniques and tools, both digital and physical, are used to repair tears, remove scratches, enhance details, and restore colors.
Q: What are the steps for photo restoration?
A: The steps for photo restoration typically involve assessing the condition of the photo, making necessary repairs such as fixing tears and scratches, enhancing details and colors, and finally preserving and storing the restored photo. Different techniques and tools are used at each step to achieve the desired results.
Q: How can faded photos be restored?
A: Faded photos can be restored and enhanced through digital techniques such as adjusting brightness, contrast, and saturation, as well as using other methods like chemical treatments or specialized software. These techniques help bring back the lost colors and details, making the photos look vibrant again.
Q: What is digital restoration of old pictures?
A: Digital restoration of old pictures is a process where damaged or deteriorated photographs are repaired and enhanced using digital software and tools. This method allows for precise adjustments, such as removing blemishes, repairing tears, and enhancing details and colors, resulting in high-quality restored images.
Q: Can I see examples of photo restoration before and after?
A: Yes, we have a collection of before and after examples of photo restoration projects that showcase the transformative power of this process. These examples highlight how damaged and faded photos can be brought back to life, rejuvenating the memories they hold.
Q: How can I repair old photos with physical damage?
A: Old photos with physical damage like tears or scratches can be repaired using various techniques and tools. These may include delicately mending tears with specialized adhesive, carefully removing scratches using retouching tools, or even digitally reconstructing missing parts of the photo.
Q: Why should I consider professional photo restoration?
A: Professional photo restoration services offer expertise and experience in restoring old photos. They have access to specialized tools and techniques, ensuring the highest quality results. Hiring professionals saves time and effort, while also providing peace of mind knowing that your precious photos are in capable hands.
Q: How can I enhance the details in old photographs?
A: Enhancing the details in old photographs can be done through various techniques. These may include adjusting contrast and sharpness, carefully removing noise or grain, and selectively enhancing specific areas to bring out hidden elements and add clarity to the restored images.
Q: Can color be restored in old photos?
A: Restoring color in old photos can be challenging but rewarding. There are techniques to bring back the original colors or even add color to black and white photos. These methods involve careful color correction, digital painting, or specialized software to breathe new life into the images.
Q: How should I preserve and store restored photos?
A: After restoring your old photos, it is important to preserve and store them properly. This includes using acid-free archival materials, avoiding direct sunlight or extreme temperatures, and storing them in protective sleeves or albums. These measures help ensure the longevity and enjoyment of your restored photographs.