
You might have experienced lag or slow down while performing activities on the Internet. Before you blame your service provider or a website, you need to find out if the problem is at your end. Let’s find out how to do this.
Routers act as intermediate gateways between the network from the ISP and the devices consuming the bandwidth. In 90% of the times, any issue of a network outage is actually resolved at the router’s level while only a few are escalated to the ISPs.
Henceforth, every user, whether in a commercial setup or home setup, must learn basic troubleshooting to login to the router and make configuration changes. In fact, there could be events wherein you need to address critical network issues such as in an office. This could include performing certain technical tasking such as setting-up forward rules, configuring firmware updates, make changes to the router username or password, modify bandwidths or ultimately reset the device to default settings.
This is just a glimpse of the variety of networking operations that require complete control over the routers and for the same; the related IP address should be handy.
Since you may not often use the router or remember the IP it is connected with, here’s a quick run through the steps that must be followed diligently.
Step 1
Using default private IP – 192.168.1.1
To login to the admin panel of routers, manufacturers across brands have provided a default private IP. 192.168.1.1, as pre-specified provides the default gateway to the router to perform a number of operations such as changing settings, modify Wi-Fi username & password, troubleshooting or upscaling the network.
This default private IP ranges between 192.168.0.0 and 192.168.1.254. Thus, depending g upon the brand, a few modems or routers may use different IPs such as 192.168.01, 192.168.11.1 etc.
Accessing Router using 192.168.1.1
This is simple!
- Open any web browser
- Enter http://192.168.1.1 in the URL address bar.
- If your router is using this as the IP, its login page would launch.
- Give the login credentials and seek access to the configuration page.
After a successful connection with the router’s admin panel, you should be able to make changes to PPOE, LAN, WAN, WLAN, DNS settings. Furthermore, you should be able to access the Proxy settings, security options, MAC entries, WPS, DHCP client details and the router’s default IP address.
Just in case you are unable to connect with the mode, verify the wires being connected successfully. Elsewise, 192.168.1.1 isn’t the default IP address for your router and you may have to try other combinations within the range specified as earlier.
If that doesn’t work either, go for the alternative ways to track the IP Address of your router.
Go to Step 2
Step 2
Finding the default IP Address of your Router
In case, the default private IP doesn’t work, you will have to track the set IP using either the mobile or the desktop.
For mobile
On a mobile, you can simply,
- Go to Settings -> Wi-Fi
- Connect to the specific Wi-Fi connection
- Go to more information
- In IPV4 Address section -> Router
- Get the Ip ahead of the Router
On the desktop,
- Open Command Prompt (cmd)
- Type Ipconfig
- Press Enter
- Find the Ip ahead of the default gateway
After retrieving the IPs, use the web browser to access the router configuration page, same as for default private IP.
If still, you aren’t able to connect, there must be a connection issue. Go to Step No 3.
Step 3
Check connection
What Do You Need To Do When Your Router Is Unresponsive?
If you are unable to access your modem or wireless router, despite the IP address of admin panel being correct, then you should:
Despite the Ip being correct, if you couldn’t make a connection, perform the following checks –
Cross-examine the cable – Unplug and plug again. You should also try an alternative cable to ensure there isn’t an issue with the cable.
- Set a static IP address
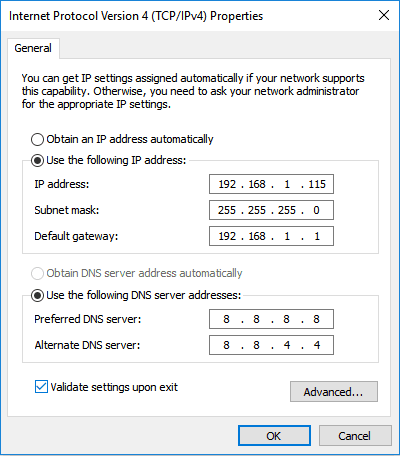 Set a static IP address for your router.
Go to the network settings and Give a static IP address as shown. This will connect your router to the given static address.
- Reset your modem or wireless router
If the above methods didn’t work, you surely need to reset your router. Post this operation, all the settings shall be reset to default factory settings.
Although in most cases, the issue must be resolved within the given information. In case it isn’t, there could be physical damage to the modem. Consult the service provider immediately and ask for assistance.
Consult the service provider or experts like Enable-IT immediately and ask for assistance.