Creating a gaming Computer may seem challenging at first, but with careful planning and patience, it’s an achievable and highly rewarding task. By following this complete guide, beginners can navigate the complexities of PC assembly with confidence. Remember, the key to a successful build lies in choosing the right components, ensuring compatibility, and taking your time during the assembly process.
Why Build a Gaming PC?
The first question many beginners ask is, “Why should I build my own gaming PC?” The answer is simple: customization, performance, and value. Pre-built gaming PCs often come with a markup and might include components that don’t fit your specific needs. By building your own, you have complete control over every part, ensuring that each component is chosen for its quality and compatibility. This customization leads to better performance, as you can select parts that work seamlessly together. Moreover, building your own PC can be more cost-effective, allowing you to allocate your budget more efficiently.
Essential Components for a Gaming PC:
Before diving into the assembly process, it’s crucial to understand the essential components you’ll need. Each part plays a vital role in the overall performance of your gaming PC.
Central Processing Unit (CPU):
The CPU is the brain of your computer. For gaming, a multi-core processor with high clock speeds is ideal. Popular choices include the Intel Core i7 and AMD Ryzen 5 series. Ensure your chosen CPU is compatible with your motherboard.
Graphics Processing Unit (GPU):
The GPU is arguably the most critical component for gaming. It handles rendering graphics and ensures smooth gameplay. Nvidia and AMD are the leading brands, with models like the Nvidia GeForce RTX 30 series and AMD Radeon RX 6000 series being top picks.
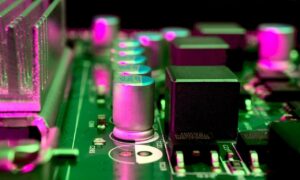
Motherboard:
The motherboard is the backbone of your PC. It connects all the components and allows them to communicate. Choose a motherboard that supports your CPU and has enough slots for your RAM, GPU, and other peripherals.
Memory (RAM):
RAM is essential for multitasking and running games smoothly. Aim for at least 16GB of DDR4 RAM for a gaming PC. If you plan on streaming or using resource-intensive applications, 32GB might be a better option.
Storage:
For storage, you’ll need both speed and capacity. An SSD (Solid State Drive) is crucial for fast boot times and quick game load times. A 500GB or 1TB SSD is a good starting point. For additional storage, consider a 2TB HDD (Hard Disk Drive).
Power Supply Unit (PSU):
The PSU provides power to all your components. It’s essential to choose a reliable PSU with enough wattage to support your build. A modular PSU is a good choice as it allows for better cable management.
Case:
The case houses all your components. Choose a case that fits your motherboard size (ATX, Micro-ATX, Mini-ITX) and has good airflow to keep your components cool. A case with cable management features will make the assembly process easier.
Cooling System:
Proper cooling is vital to maintain optimal performance. Most builds will include air coolers, but liquid cooling is an option for those looking for advanced cooling solutions. Ensure your case supports your chosen cooling system.
Peripherals:
While not part of the actual build, peripherals like a monitor, keyboard, mouse, and headphones are essential for the complete gaming experience. Choose peripherals that match your gaming style and provide comfort during long gaming sessions.
Assembling Your Gaming PC:
With your components ready, it’s time to start assembling your gaming PC. Follow these steps to ensure a smooth build process.
Prepare Your Workspace:
Before you start, make sure you have a clean, static-free workspace. Gather all your tools, including a screwdriver, zip ties, and thermal paste.
Install the CPU:
Begin by installing the CPU onto the motherboard. Carefully lift the CPU socket lever, align the CPU with the socket, and gently place it in. Secure the lever back into place.
Install the RAM:
Next, install your RAM sticks. Open the RAM slots on the motherboard, align the RAM sticks with the slots, and press down firmly until they click into place.
Install the Motherboard:
Place the motherboard into your case, aligning it with the standoff screws. Secure it with screws, ensuring it’s firmly in place.
Install the GPU:
Insert the GPU into the appropriate PCIe slot on the motherboard. Ensure it clicks into place and secure it with screws.
Install Storage Devices:
Install your SSD and HDD in the designated slots within your case. Connect them to the motherboard using SATA cables.
Install the PSU:
Place the PSU in the bottom of the case. Secure it with screws and connect the necessary power cables to the motherboard, GPU, and storage devices.
Connect Case Fans and Cooling System:
Connect your case fans to the motherboard. If you’re using a liquid cooling system, follow the manufacturer’s instructions to install it properly.
Cable Management:
Organize your cables using zip ties and route them through the case’s cable management channels. This helps improve airflow and makes your build look clean.
Power On and Install OS:
With everything connected, it’s time to power on your PC. Ensure all connections are secure, then turn on the power supply and press the power button. If everything is working, proceed to install your operating system and necessary drivers.
Final Thoughts:
Building a gaming PC can be an incredibly rewarding experience. Not only does it allow you to tailor a machine to your specific needs and preferences, but it also provides a deep sense of satisfaction once you see your creation come to life. Whether you’re a seasoned gamer looking to upgrade or a newbie wanting to dip your toes into the world of PC gaming, this guide will walk you through the essential steps of building a gaming PC from scratch.