Introduction:
A P-trap is an essential component of a plumbing system, commonly used beneath sinks, bathtubs, and other fixtures to prevent sewer gases from entering the building. Installing a P-trap might seem daunting, but with the right tools and guidance, it can be a straightforward process. In this guide, we will provide you with step-by-step instructions on how to install a P-trap effectively.
Tools and Materials:
Before you begin, ensure you have the following tools and materials:
- P-trap kit
- Adjustable wrench
- Pipe cutter or hacksaw
- Teflon tape
- Slip-joint pliers
- Bucket or container
- Towel or rag
Step 1: Turn Off the Water Supply
Start by turning off the water supply to the fixture where you’ll be installing the P-trap. You can usually find the shut-off valve beneath the sink or behind the toilet. Turn the valve clockwise until it stops to shut off the water flow.
Step 2: Remove the Old P-Trap
If you’re replacing an existing P-trap, use a wrench to loosen the nuts connecting it to the drainpipe and the tailpiece. Once loosened, carefully detach the old P-trap and set it aside.
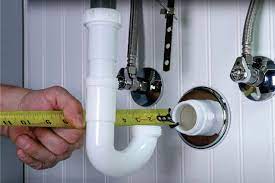
Step 3: Measure and Cut the Pipe
Measure the distance between the drainpipe and the tailpiece to determine the length of pipe needed for the P-trap assembly. Use a pipe cutter or hacksaw to cut the pipe to the appropriate length. Ensure the cuts are straight and clean to facilitate a proper seal.
Step 4: Prepare the Pipes
Before assembling the P-trap, clean the ends of the pipes with a rag to remove any debris or residue. Apply Teflon tape to the threads of the drainpipe and tailpiece to create a watertight seal.
Step 5: Install the P-Trap
Begin by sliding the compression nut and slip washer onto the tailpiece. Next, insert the end of the P-trap assembly onto the tailpiece and slide the compression nut and slip washer onto the other end of the P-trap. Hand tighten the nuts initially.
Step 6: Align and Secure the P-Trap
Ensure the P-trap is aligned properly with the drainpipe and tailpiece. Use adjustable wrenches to tighten the compression nuts securely, but be careful not to overtighten, as this can damage the fittings.
Step 7: Check for Leaks
Once the P-trap is securely installed, slowly turn on the water supply and check for leaks around the connections. If you notice any leaks, tighten the nuts further until the leaks stop.
Step 8: Test the Drain
After confirming there are no leaks, test the drain by running water through the fixture. Check for proper drainage and listen for any unusual noises that may indicate a problem with the installation.
Step 9: Clean Up
Dispose of any excess materials and wipe down the area around the P-trap to remove any dirt or debris. Keep a bucket handy to catch any water that may spill during the installation process.
Conclusion:
Installing a P-trap is a manageable task that can be accomplished with basic plumbing knowledge and the right tools. By following these step-by-step instructions, you can ensure a proper installation that effectively prevents sewer gases from entering your home while maintaining proper drainage. If you encounter any difficulties during the installation process, don’t hesitate to seek assistance from a professional plumber.


