Have you heard of diamond painting? It’s a new trend sweeping the world. The idea is quite simple: paint beautiful images with thousands of tiny beads on a canvas. Since the trends started, numerous companies have created different styles of this form of art to make it suitable for anyone to give it a try. Painting a diamond painting is a wonderfully creative experience. The end result has hundreds of thousands of tiny diamonds that create one mesmerizing work of art.
Becoming a Master Diamond Painter requires time and practice, both for refining your skills to buy the highest quality gemstones and for practicing techniques to apply them on your canvas and create masterpieces. Only through dedication to the art of diamond painting can you achieve this status. The information below will assist you on your journey as you learn by doing, design your own techniques, and build a reputation for excellence in the field of diamond artistry!
What is Diamond Painting?
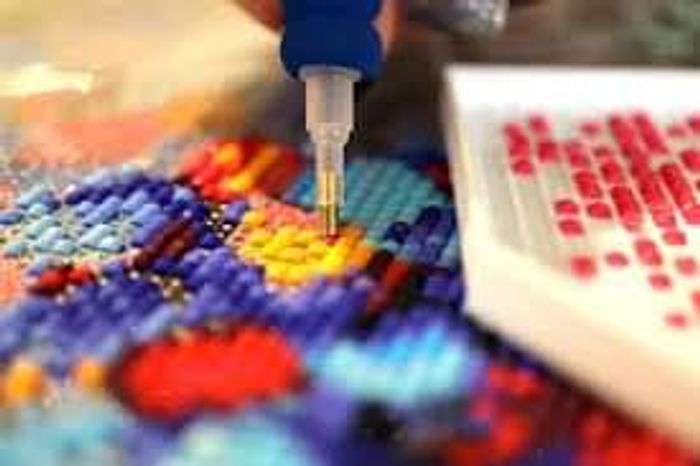
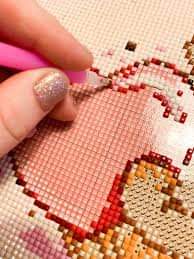
Diamond painting, or paint with diamonds, is a form of art that allows you to create beautiful paintings by placing tiny “diamond”-like facets onto a sticky canvas. You are given a sticky canvas and have to apply color-coded resin “diamonds” to it using a tool such as a tweezer or a stylus pen, depending on your comfort level. Once all the diamonds are applied, you are left with a colorful, sparkly masterpiece that you can display anywhere in your home.
Think of it as coloring in your childhood coloring books but with diamond shapes instead of crayons. Not only is it fun to do and helps reduce anxiety, but the results are also just breathtaking.
It’s perfect for adults and kids who like crafts, painting, cross-stitch, or mosaics. Creating this stunning artwork is relaxing, rewarding, and easier than it looks!
The kits come with everything you need to enjoy this beautiful art form — including the beads, diamond painting pen, canvas, wax pad, and more. They are available on Diamond Painting Nederland and other online retailers.
What are Diamonds and Diamond Painting Tools?
The first step is to understand the tools of the painting. The painting surface is a canvas with color blocks that correspond to the colors of your diamonds. Each diamond also has a number on its back, so you will know exactly which color and where to place it.
You can get pre-printed canvases or paint them yourself. The canvas is divided into hundreds of small squares, each marked with a corresponding symbol.
Each set contains two or three wax pens (one for each hand), which are used to pick up the diamonds from their bag and place them on the canvas.
The wax pen helps you hold the diamond securely without damaging it. The stylus is used to press on the side of the diamond to make it stick to the canvas. It allows you to use less pressure than if you had pressed on it directly with your fingers.
The tray is used to mix different colors together and easily access them without having to search in the bag.
The wax pen allows you to grab and place diamonds more easily. You only need one stylus per person, so if you work in pairs or groups you don’t need more than one per team.
How to Find The Diamonds?
The printed canvas has a grid with symbols, colors, and numbers. These correspond to the diamonds you use to fill in the picture. A key is provided which has a list of all the colors of diamonds used in the project and their corresponding symbols and numbers.
Diamonds are sorted by color and symbol/number and placed in zip lock bags. Some diamond painters prefer to sort them into boxes or containers instead of using zip locks.
When you first open up your painting kit, the diamonds are going to be stuck in a plastic bag. The first thing that you need to do is open up the bag and separate the diamonds into different containers.
This is important because it will make it 10 times easier for you to finish your diamond painting. Additionally, you should sort the colors by shades.
You can use small containers or even small plastic bags for the safe storage of drills in diamond painting. Just make sure they are large enough so that you can easily grab the diamonds when you need them.
How to Apply the Diamonds?
The first step of applying the diamonds is to prepare the tools that you will need. We recommend using a tray to hold your diamonds while you work so they don’t get lost or scattered as you’re working.
The next step is to prepare your diamond painting canvas. You will want to place a piece of tape on the edge of your canvas (if it is not already attached) to prevent the diamonds from falling off while you are working. You will then want to clear off an area around where you will be working and have a clean surface area to work on.
This will help you avoid losing any diamonds as well as keep extra dust from getting into your diamonds as you’re working.
Finishing Touches & Tips
Once you have completed your diamond painting kit and are happy with the results, there are some final steps to take in order to ensure that your diamond painting is preserved and protected.
Once you have finished assembling all the diamonds, it is important to press them down. This will help make sure that they do not fall out over time. You can use a hard book to do this but be careful not to squish the resin diamonds too much as they may break. The easiest way to press down the diamonds is by using a roller or brayer which can be bought online or at an art store. Simply roll over the canvas gently until all of the diamonds are pressed down.
Once all of the diamonds are securely in place, you may notice that some of them are hanging off of the edges of the canvas slightly. This is to be expected and it can easily be fixed by trimming off any excess canvas around the edges. Make sure to be very careful when trimming away any excess as you do not want to cut into your design.
Once you have completed all three steps, your diamond painting will be ready for display.
You’ve finished your painting and it looks fantastic, but you may be wondering if there is anything else that you can do to make your work look even better. If you have any of the following materials on hand, you might want to try out these finishing touches.
Sealant: This will help lock in the diamonds and keep them from falling off. It also makes the painting look shiny and glossy. You can purchase special diamond painting sealants or use clear nail polish. Be careful not to get any on the diamonds or else they will stick together and be ruined.
Frame: Making your painting into DIY wooden frame, DIY Diamond Painting HOUTEN LIJSTEN (called in Dutch), gives it a more finished look. It also protects it from getting damaged or dirty. You can buy a frame specifically designed for diamond paintings, but you could also make one yourself using cardboard, poster board, or a picture frame from the craft store.
Matting: If you are using a picture frame and mounting your diamond painting onto cardboard, consider adding a mat around it for an extra artistic touch. You can choose a color that complements the design of your painting and makes it pop out more.
Training to be a Master Diamond Painter
There are so many ways to train to be a Master Diamond Painter and it is important that you get started as soon as possible. Not only will this help you but it will also keep you on track for the rest of your career.
The following are some tips for training to become a Master Diamond Painter:
- Be patient and be open to learning new things. It is important that you are willing to learn new things because there are so many different techniques that you can use when working with diamonds. You should always be willing to try something new, even if it doesn’t work out exactly how you wanted it to. If it doesn’t work out then try something else until you find the right technique for you.
- Do not get discouraged if your first attempts do not go well. There are so many different techniques that are used in diamond painting and some of them take time to master. You should never give up just because your first attempts do not go as planned or if they don’t turn out the way that you hoped for them to be. This is why it is important that you take the time and effort needed to learn these techniques before giving up on them completely.
- Practice makes perfect! The more practice that you get at doing something, the more insight you will get into the task.
It is up to each one of us to live a healthy and happy life. Everyone has the power to make their dreams come true. Follow your heart and passion and try something new. You never know how much happiness you can bring to others or yourself. Remember that whatever you do always strive to be the best at whatever it is you love doing within your own free time.