Changing guitar strings might seem daunting at first, but it’s one of the most essential skills every guitarist should master. Fresh strings can dramatically transform your instrument’s tone, bringing back that bright, crisp sound you’ve been missing. Whether you’re a beginner picking up your first acoustic or an experienced player maintaining your electric, learning to change strings quickly and efficiently saves both time and money. Old, worn strings don’t just sound dull—they can actually hinder your playing technique and make it harder to stay in tune. The good news is that with the right approach and a little practice, you can complete a full string change in under twenty minutes. This guide walks you through everything you need to know, from selecting the right strings for your guitar to the actual step-by-step process of removal and installation. We’ll also cover essential maintenance tips to keep your guitar sounding its best between string changes. By the end, you’ll have the confidence to handle this routine task whenever your guitar needs it.
Understanding the Basics
Before you dive into how to change guitar strings, understanding a few fundamental concepts will make the entire process smoother and more effective. Guitar strings come in different gauges, which refer to their thickness, and this measurement directly impacts playability and tone. Lighter gauge strings are easier to press down and bend, making them ideal for beginners or players who prefer a softer touch, while heavier gauges produce fuller, louder tones but require more finger strength. The type of guitar you own—acoustic or electric—also determines which strings you’ll need, as they’re designed differently to work with their respective pickup systems and body constructions. Acoustic guitars typically use bronze or phosphor bronze strings, while electric guitars use nickel or steel strings that respond to magnetic pickups. Understanding string tension is equally important, as it affects both the feel under your fingers and the stress placed on your guitar’s neck. Too much tension can cause neck bowing, while too little results in fret buzz and poor intonation. Taking time to learn these basics ensures you’ll select appropriate strings and handle them correctly during installation, ultimately protecting your instrument while achieving the sound you’re after.
Choosing the Right Guitar Strings
Selecting the proper strings for your playing style and guitar type makes a significant difference in your overall experience. For acoustic guitars, light gauge strings work well for fingerpicking and softer playing, while medium gauge strings suit strumming and produce more volume. Electric guitar players often start with super light or light gauges for easier bending and faster playing, though jazz and blues players might prefer heavier gauges for their warmer tone. Consider your skill level honestly—beginners benefit from lighter strings that are gentler on developing fingers, while experienced players can handle heavier gauges that match their technique and musical goals.
Importance of String Material
The material composition of your strings profoundly affects tone quality and longevity. Phosphor bronze strings on acoustics deliver warm, balanced tones with extended lifespan due to their corrosion resistance, while 80/20 bronze offers brighter, crisper sound but oxidizes faster. For electric guitars, pure nickel strings produce vintage, warm tones perfect for blues and classic rock, whereas nickel-plated steel provides brighter attack and sustain favored in modern genres. Coated strings, available for both acoustic and electric guitars, last significantly longer by resisting corrosion from finger oils and sweat, though some players find they sacrifice a bit of tonal brightness for that durability.
Preparing to Change the Strings
Proper preparation sets the foundation for a smooth, efficient string change that protects both you and your instrument. Start by finding a clean, well-lit workspace where you can comfortably position your guitar—a table with a soft towel or dedicated guitar mat works perfectly to prevent scratches and dings. Clear the area of clutter so you have room to work and won’t lose small parts like bridge pins or tuning pegs. Having all your tools within arm’s reach before you begin eliminates frustrating interruptions mid-process. Consider the timing of your string change as well; doing it right before a performance isn’t ideal since new strings need time to stretch and settle into stable tuning. If possible, change strings a day or two before you need them to sound their best. Check your guitar’s condition before starting—look for any existing issues like loose tuning pegs, cracks in the body, or fret wear that might need attention. This is also the perfect opportunity to plan for cleaning, as you’ll have unprecedented access to the fretboard and other hard-to-reach areas once the old strings are off. Taking these preparatory steps ensures you won’t encounter surprises halfway through and can complete the job efficiently in one sitting.
Gather Necessary Tools
Having the right tools ready makes string changing significantly faster and prevents potential damage to your guitar. At minimum, you’ll need a string winder to speed up the tedious tuning peg rotation, wire cutters for trimming excess string cleanly, and a tuner for bringing your new strings to pitch. Keep a soft cloth and fretboard cleaner handy since you’ll want to wipe down the exposed wood while the strings are off. A bridge pin puller proves invaluable for acoustic guitars, though a spoon handle can work in a pinch. Some players also keep a ruler or string action gauge to check measurements, though this isn’t essential for basic string changes. For those exploring modern practice tools, companies like AeroBand offer digital solutions that can complement your guitar maintenance routine by providing accurate tuning references and practice aids.
Safety First
String changing involves sharp metal ends and significant tension, so taking safety precautions protects you from injury. Always wear safety glasses or turn your face away when cutting strings under tension, as they can snap unpredictably and whip toward your eyes. Cut strings near the soundhole or pickups rather than at the headstock to minimize dangerous recoil. When winding new strings, keep your face and hands clear of the string path in case one breaks during tensioning. Point the sharp cut ends away from your hands while threading strings through bridge holes and tuning posts. Work slowly and deliberately rather than rushing, as hasty movements increase the risk of strings slipping and causing cuts or the guitar falling from your workspace.
The Actual Process
Now that you’re prepared, it’s time to actually change those strings. The process follows a logical sequence that minimizes stress on your guitar’s neck and keeps everything organized. Many players debate whether to remove all strings at once or change them one at a time. For routine maintenance, removing all strings simultaneously is perfectly safe and gives you complete access to clean the fretboard thoroughly. However, if your guitar has a floating bridge or tremolo system, changing strings one at a time maintains tension and keeps the bridge in position. Start by loosening each string several turns to reduce tension gradually rather than cutting them while still tight, which can shock the neck. Once slack, you can either unwind them completely or cut them in the middle for faster removal. As you remove each string, note how it was threaded through the bridge and wrapped around the tuning post—taking a quick photo with your phone can serve as a helpful reference. Work methodically from one side of the guitar to the other rather than jumping around randomly. This systematic approach prevents confusion and ensures you don’t miss a string or install one incorrectly. Keep the old strings together and dispose of them properly, as loose string ends can be hazardous. With the old strings off, take a moment to inspect the nut, bridge, and fretboard for any issues before proceeding to installation. This brief pause also lets you clean areas that are normally inaccessible, setting the stage for optimal performance from your fresh strings.
Removing Old Strings
Begin by turning each tuning peg to loosen the string tension completely—about ten full rotations should leave them slack enough to handle safely. For acoustic guitars, gently pull out the bridge pins using your pin puller or carefully work them loose with your fingers while applying slight upward pressure on the string from the soundhole. Electric guitar strings typically feed through the back of the body or anchor at a tailpiece, so simply pull them free once unwound from the tuning posts. Unwind the string from the tuning post by hand, guiding it carefully to avoid scratching the headstock. If strings are heavily corroded or you’re in a hurry, cut them at the midpoint with wire cutters after loosening, but never cut strings under full tension. Collect all the old strings and coil them together before discarding to prevent injury from loose, sharp ends.
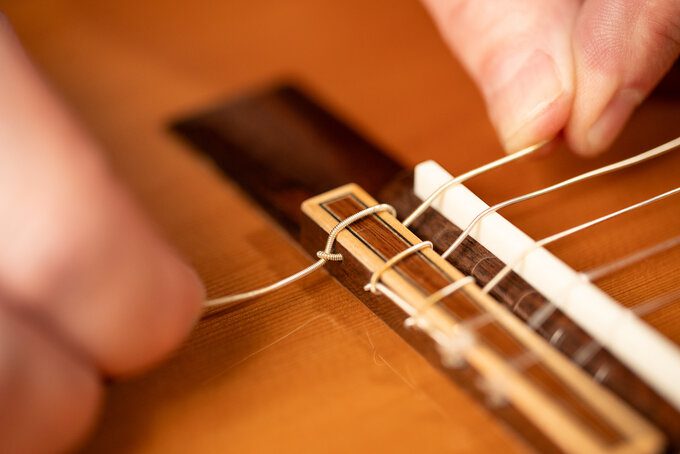
Installing New Strings
Take strings from the package in order and install them one at a time to avoid confusion. For acoustic guitars, insert the ball end into the bridge hole, then push the bridge pin firmly in place while pulling gently on the string to seat the ball against the bridge plate inside. Thread the string through the appropriate tuning post hole, leaving enough slack to wind several wraps around the post—roughly three inches past the next tuning peg works well. Bend the string sharply at a right angle where it exits the post, then begin winding downward toward the headstock, keeping tension with your other hand to ensure tight, neat wraps. For electric guitars, feed the string through the bridge or tailpiece, then up to the tuning post using the same measuring and winding technique. Use your string winder to speed up the process, but hand-tighten the final turns for better control. Tune each string to pitch gradually, stretching it gently by pulling upward at the twelfth fret, then retuning until it stabilizes.
Maintaining Your Guitar
Once you’ve installed fresh strings, maintaining your guitar properly extends their lifespan and keeps your instrument in optimal playing condition. Regular maintenance doesn’t require extensive time or expertise—just consistent attention to a few key practices. Wipe down your strings after each playing session with a clean, dry cloth to remove oils, sweat, and dirt that accumulate from your fingers. This simple habit can double or even triple string life by preventing corrosion before it starts. Pay attention to how your guitar sounds and feels over time, as changes often signal maintenance needs. Strings that sound dull, feel rough under your fingers, or won’t hold tune reliably have reached the end of their useful life and should be replaced. Beyond strings, your guitar’s overall health depends on environmental factors like humidity and temperature, which affect the wood and can cause warping, cracking, or neck problems. Keep your instrument away from direct sunlight, heating vents, and air conditioners that create extreme or rapidly changing conditions. A stable environment between 45-55% humidity protects the wood and keeps everything functioning smoothly. Investing a few minutes in regular care preserves your guitar’s playability and tone while preventing costly repairs down the road.
Regular Inspections
Develop a habit of visually inspecting your guitar every time you play or change strings. Look closely at the frets for wear patterns, grooves, or sharp edges that might need professional attention. Check the bridge for lifting or cracks, especially on acoustic guitars where the string tension creates significant stress. Examine the neck for straightness by sighting down from the headstock—excessive bow or back-bow affects playability and requires truss rod adjustment. Inspect tuning machines for smooth operation and tighten any loose screws on tuners, strap buttons, or pickguards. These quick checks catch small problems before they become major issues requiring expensive repairs.
Proper Storage
How you store your guitar between playing sessions significantly impacts its condition and longevity. Always keep your guitar in its case or on a proper stand rather than leaning it against walls or furniture where it can fall. Cases provide protection from dust, humidity fluctuations, and accidental impacts that can cause serious damage. If you use a stand, choose one with padded contact points and place it away from high-traffic areas. Loosen string tension slightly if storing your guitar for extended periods to reduce stress on the neck, though this isn’t necessary for daily storage. Store cases flat or upright, never on their side, to prevent neck warping from uneven weight distribution over time.
Keep Your Guitar Performance Ready
Mastering the art of changing guitar strings transforms from an intimidating chore into a quick, routine task that keeps your instrument sounding its best. With the knowledge you’ve gained about string selection, proper technique, and maintenance practices, you’re now equipped to handle this essential skill confidently. Remember that speed comes with practice—your first few string changes might take longer, but you’ll naturally become faster and more efficient with repetition. The investment of twenty minutes every few weeks or months pays dividends in improved tone, better playability, and extended guitar life. Fresh strings breathe new life into your playing, making practice sessions more enjoyable and performances more impressive. Beyond the practical benefits, there’s genuine satisfaction in maintaining your own instrument and understanding how it works. Don’t hesitate to experiment with different string types and gauges as you develop your preferences and playing style. Keep your workspace organized, work methodically, and never rush through the process. With these fundamentals in place, you’ll always have a great-sounding guitar ready whenever inspiration strikes. Now grab those new strings and give your guitar the refresh it deserves.