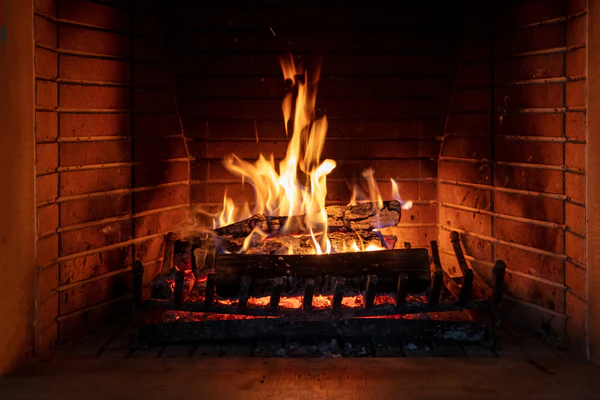
There’s something deeply satisfying about a perfectly lit fire—the gentle crackle of wood, the warm glow filling the room, and the knowledge that you’ve mastered one of humanity’s oldest skills. Yet for many wood burner owners, starting a fire can be frustrating: smoky rooms, multiple failed attempts, and wasted matches are all too common.
The truth is, starting a perfect fire isn’t about luck or mysterious technique—it’s about understanding a few fundamental principles and following a proven method. Whether you’re new to wood burning or simply tired of inconsistent results, this guide will transform you into a fire-starting expert.
Why Most Fires Fail Before They Begin
Before we dive into the method, let’s address the most common mistake that dooms fires from the start: poor fuel quality. You can have perfect technique, premium kindling, and an expensive fire starter, but if your logs are damp or poorly seasoned, you’re fighting a losing battle.
Wood with high moisture content (above 20%) requires enormous energy just to evaporate the water before it can burn properly. This creates excessive smoke, produces minimal heat, and often results in fires that smolder and die rather than catch properly. The solution is simple but crucial: always use properly dried firewood.
This is where kiln-dried logs make all the difference. With moisture content typically below 20%, they ignite easily, burn cleanly, and produce consistent heat from the moment they catch. While you can successfully start fires with seasoned wood if it’s been properly stored, kiln-dried logs eliminate the guesswork and dramatically improve your success rate—especially important when you’re learning.
The Essential Components of a Perfect Fire
Every successful fire requires three elements in the right proportions: oxygen, heat, and fuel. Understanding how these interact is the key to consistent results.
Oxygen feeds combustion. Without adequate airflow, even the driest wood will smolder and smoke. Your fire needs breathing room, which is why how you arrange your fuel matters as much as what fuel you use.
Heat must build gradually. Attempting to light large logs directly is like trying to boil a swimming pool with a candle—there’s insufficient energy to reach ignition temperature. You must build heat incrementally, starting small and increasing log size as temperatures rise.
Fuel must be appropriate for each stage. Paper and kindling catch easily but burn quickly. Small sticks sustain the flame longer. Medium logs build lasting heat. Large logs maintain the fire once it’s established. Using the right fuel at the right time is essential.
The Top-Down Fire Method: Your Foolproof Approach
After years of experimenting with various techniques—teepee, log cabin, upside-down, and traditional bottom-up methods—the top-down approach consistently delivers the best results for most wood burners and fireplaces. Here’s why it works and how to do it perfectly.
Why Top-Down Works
Traditional bottom-up fires place kindling underneath logs, which seems logical but creates problems. As the kindling burns, it must heat the logs above while smoke tries to escape through those same logs, often resulting in a smoky room. The fire also tends to burn unevenly, with gaps forming as kindling collapses.
The top-down method reverses this logic. Large logs go on the bottom, with progressively smaller material layered above, and kindling on top. When you light the fire, it burns downward through increasingly larger fuel, allowing each layer to dry and preheat the layer beneath before flames reach it. The result is cleaner burning, less smoke, and a fire that establishes itself more reliably.
Step-by-Step Instructions
Step 1: Prepare Your Firebox
Before starting, ensure your wood burner or fireplace is clean. Remove excess ash, leaving only a thin layer (about 1-2cm) on the bottom—this bed of ash actually improves airflow and insulation. Open your air vents fully to maximize oxygen supply during lighting.
Check that your flue or chimney is open. This sounds obvious, but closed dampers are responsible for countless smoke-filled rooms. If your chimney is cold, you may need to “prime” it by briefly holding a lit newspaper near the flue opening to start the draft moving upward.
Step 2: Build Your Base Layer
Place your largest logs on the firebox floor, parallel to each other with about 2-3cm gaps between them. These gaps are crucial—they allow air to flow under and between logs. For a standard wood burner, two or three large logs typically form the ideal base.
The quality of these base logs significantly impacts your fire’s performance throughout the evening. Dense hardwood logs, particularly when kiln-dried, provide long, steady burns once the fire is established. This foundation determines whether you’ll enjoy hours of maintenance-free warmth or find yourself constantly adding wood.
Step 3: Add Your Middle Layer
Position medium-sized logs perpendicular to your base layer, again maintaining those vital gaps. You want to create a grid structure that allows air to circulate freely. Use three to four pieces at this level, depending on their thickness.
This layer is your fire’s “engine room”—once it catches, it generates the sustained heat needed to keep your fire burning strongly for hours. Avoid the temptation to pack logs tightly together; generous spacing seems wasteful but actually improves efficiency by ensuring complete combustion.
Step 4: Create Your Kindling Layer
Now add smaller sticks and kindling across the middle layer. Use wood roughly the thickness of your finger or slightly larger. Arrange these in a loose crisscross pattern, creating multiple contact points while maintaining airflow. You’ll need a generous handful—about 8-12 pieces.
Dry kindling is non-negotiable. Even if your main logs are perfectly dried, damp kindling will struggle to catch and maintain flame. Store kindling in a dry place, ideally indoors, so it’s always ready when you need it.
Step 5: Add Fire Starters and Fine Kindling
On top of your kindling layer, place your fire starters. Natural firelighters, wax-soaked wood wool, or even tightly twisted newspaper work well. Arrange them in two or three spots rather than concentrating them in one location—this helps ensure even ignition.
Add a final layer of very thin kindling (pencil-thin twigs or small split softwood) arranged loosely over the fire starters. This bridge between the fire starter and larger kindling helps the flame spread reliably.
Step 6: Light Your Fire
Light your fire starters in multiple locations. Don’t immediately close the door—leave it slightly ajar for the first minute or two if your appliance allows, giving the fire extra oxygen as it establishes. Watch as flames catch the fine kindling, then spread to the larger kindling below.
You should see flames growing steadily downward through the layers. The top layers will burn relatively quickly—this is expected and correct. As they burn down, they’re preheating the layers beneath and creating hot coals that will eventually drop down to the main logs.
Step 7: Close and Adjust
Once your kindling is burning vigorously (usually after 5-10 minutes), close the door fully. Keep air vents fully open for at least 15-20 minutes to allow the fire to establish properly. Resist the urge to restrict airflow too early—this is the leading cause of smoldering, smoky fires.
As flames begin to engulf the middle layer of logs, you can start gradually reducing air intake to your desired level. Your wood burner’s manual will provide specific guidance, but generally, you’re looking for active flames that dance across the wood rather than lazy, smoldering combustion.
Troubleshooting Common Problems
Fire Won’t Catch: This almost always indicates inadequate airflow, damp fuel, or both. Check that vents are fully open and kindling is truly dry. If your chimney is cold, prime it with a heat source before attempting to light your fire.
Excessive Smoke in the Room: Usually caused by poor draft or closing the door too soon. Ensure your flue is fully open, consider priming a cold chimney, and wait longer before closing the door. Smoke can also indicate wet wood—another reason quality fuel matters.
Fire Burns Too Quickly: You may be using too much kindling or softwood. Once established, add larger hardwood logs to slow the burn rate. Also, reduce air intake slightly once the fire is burning well.
Fire Dies After Kindling Burns: The middle layer of logs likely didn’t catch properly. This suggests either the logs are too damp, they’re too large for the heat available, or they’re packed too tightly. Use drier, smaller medium logs with better spacing.
The Critical Role of Fuel Quality
Throughout this guide, we’ve emphasized fuel quality because it’s genuinely the difference between success and frustration. Poor quality wood doesn’t just make lighting harder—it produces less heat, creates more creosote (potentially causing dangerous chimney fires), generates excessive smoke and pollutants, and requires more frequent refueling.
Investing in premium kiln-dried logs transforms your entire wood-burning experience. Beyond the easier lighting we’ve discussed, these logs deliver significantly more heat per log, burn cleaner with minimal smoke, produce less ash requiring less frequent cleaning, and create a more pleasant aromatic experience with none of the acrid smoke of damp wood.
When you calculate the real cost—factoring in how many logs you actually need for an evening’s warmth, the reduced maintenance, and the elimination of wasted fuel from failed fires—quality kiln-dried logs prove economical as well as practical.
Advanced Tips for Fire Masters
Once you’ve mastered the basic top-down method, these refinements will take your fires to the next level:
Mix Your Wood Species Strategically: Use softwood or faster-burning hardwood in your middle layers for quicker fire establishment, then add dense hardwoods like oak or ash once the fire is roaring. This combines easy lighting with long burn times.
Control Your Burn Rate with Log Sizing: Larger logs burn slower and produce steady, long-lasting heat—perfect for overnight burns. Smaller split logs ignite faster and burn hotter, ideal when you want rapid warmth.
Create an “Overnight Fire” Configuration: Before bed, build a deep bed of hot coals, add large logs with minimal spacing, and reduce air intake to the minimum that maintains slow combustion. A properly configured overnight fire can still have glowing coals 8-10 hours later.
Learn Your Appliance’s Sweet Spot: Every wood burner has an optimal air setting that maximizes efficiency while maintaining clean combustion. This usually involves visible flames dancing across the wood without roaring. Experiment to find your stove’s perfect balance.
Keep a Fire Diary: For the first few weeks, note what works—how much kindling you used, which logs burned best, how long fires lasted. You’ll quickly identify your optimal approach and spot patterns in any problems.
The Satisfaction of Mastery
Starting a perfect fire is one of those skills that rewards practice with genuine satisfaction. Unlike many modern conveniences that require no input from you, a wood fire responds to your choices and improves with your growing expertise.
The first few times you follow this method, you may feel it requires more attention and preparation than you’re used to. But within a week or two, the process becomes second nature. You’ll find yourself automatically arranging logs optimally, judging the right amount of kindling by feel, and knowing exactly when to adjust airflow.
More importantly, you’ll enjoy consistently excellent fires—the kind that light on the first match, produce immediate warmth without filling your room with smoke, and burn steadily for hours with minimal attention. This isn’t just about avoiding frustration; it’s about reclaiming one of life’s simple pleasures: sitting back to enjoy a crackling fire that you built with skill and confidence.
Whether you’re warming your home on a freezing February evening, creating ambiance for a special dinner, or simply enjoying the meditative quality of watching flames dance across wood, the perfect fire enhances every experience. And now you know exactly how to create one, every single time.