Checkout is often the deciding moment between a sale and an abandoned cart. Even when your products and pricing are perfect, a slow or complicated checkout can push customers away. That’s why many store owners now focus on making the final step faster and simpler. But how to set up WooCommerce quick checkout to achieve that smooth buying experience?
You can set up WooCommerce Quick Checkout right from your WordPress dashboard. Go to Plugins, Add New, search for One Page Quick Checkout for WooCommerce, install it, and click Activate. Once it’s active, head to your WooCommerce Settings, then the Checkout tab to enable the one-page layout, remove unnecessary fields, and test your checkout flow.
If you’re ready to have a smooth checkout for your store, this guide will walk you through each step. Follow along to learn how to prepare, configure, troubleshoot, and maintain a checkout system that truly delivers a faster, smoother experience for every shopper.
How to Set Up WooCommerce Quick Checkout?
Once your WooCommerce store is ready, you can easily install, configure, and test it to create a faster and smoother buying experience. That’s how quick checkout for WooCommerce set up is simple and straight forward. Follow these steps to make your checkout process quick, efficient, and customer-friendly.
Step 1: Install the Plugin
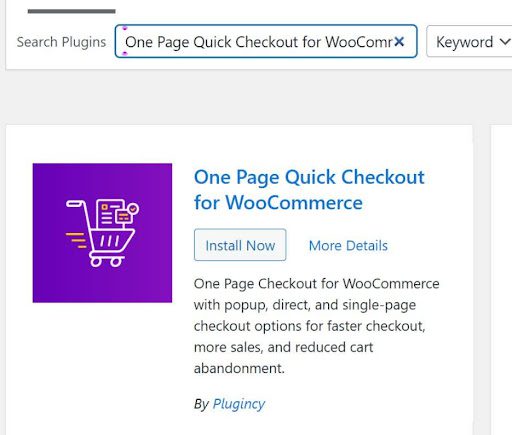
If you’re using the free version, log in to your WordPress dashboard and go to Plugins → Add New.
In the search bar, type “One Page Quick Checkout for WooCommerce”, then click Install Now and Activate once it’s finished.
For the paid (Pro) version, download the plugin ZIP file after purchase from the official website.
Go back to your WordPress dashboard, open Plugins → Add New, and click the Upload Plugin button.
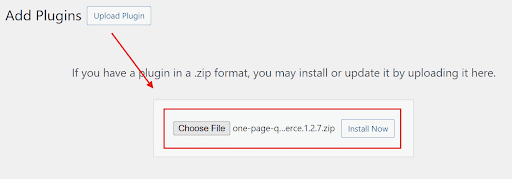
Select the ZIP file, install it, and then click Activate. After activation, open the plugin’s settings area and enter your license key to unlock the Pro features.
Step 2: Manual or FTP Installation (Alternative Option)
If you prefer to install manually, download the plugin ZIP file and extract it on your computer. Then use your hosting file manager or an FTP client to upload the extracted folder to the /wp-content/plugins/ directory.
When done, go to your WordPress dashboard and activate the plugin.

Step 3: Enable Quick Checkout in Settings
Once activated, go to your Dashboard→ One Page Checkout. Look for the option to enable One Page or Quick Checkout and turn it on.
Save your changes. This replaces your store’s default multi-step checkout with a single-page layout that loads faster.
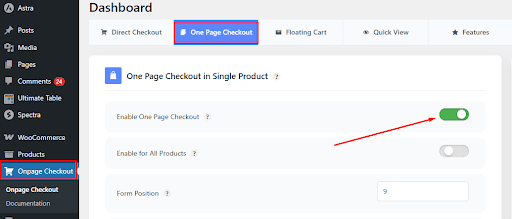
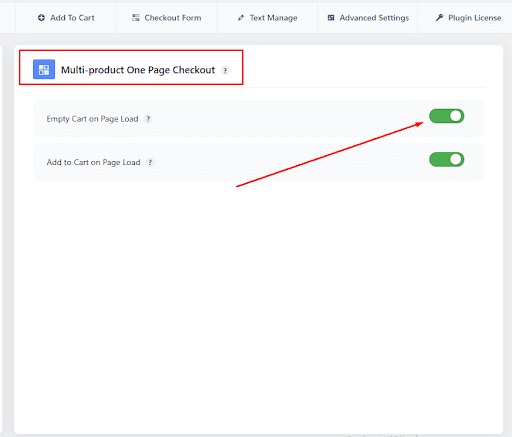
If your store has multiple categories and you want the checkout for multiple products, toggle the multiple product checkout option from the right for now.
Enable For Single Product
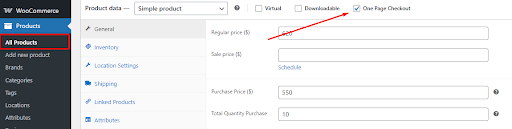
Open the product you want to edit from Products → Edit. Inside its editing screen, look for the “One Page Checkout” setting and toggle it on for that product.
After saving, that product page will allow customers to complete checkout right there without navigating to a separate cart page.
To enable One Page Checkout for all products, simply head to the Onpage Checkout section in your WordPress dashboard.
From there, click on One Page Checkout and switch the “Enable for All Products” option to the On position.
Enable For Multiple Products
You can create a full one-page checkout layout that handles multiple products using blocks or Elementor. Below are two approaches you can use, depending on your editor preference.
Using Blocks
- Open the page in the WordPress block editor.
- Search for “Multiple Product One Page Checkout” blocks and insert them.
- Select which items to include (by category, tag, product ID, or attributes).
- Pick a layout template (list, table, slider, etc.).
- Style the block: adjust colors, margins, fonts, and optionally add custom CSS.


Using Elementor
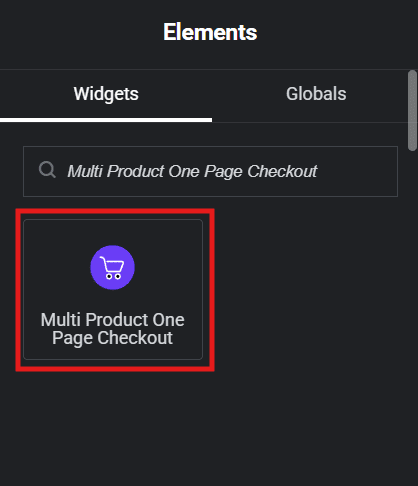
- In Elementor, drag in the “Multi Product One Page Checkout” widget or module.
- Choose the product sources you want to display in the checkout.
- Configure the layout: product list, grid, or tab style.
- Style the section within Elementor (padding, colors, typography).
- Preview and adjust for mobile responsiveness before publishing.

Step 4: Configure Checkout Fields and Layout
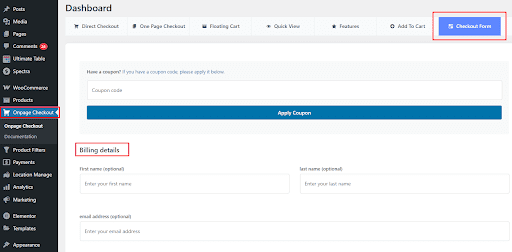
Go to Onpage Checkout → Checkout Form Manage in your dashboard. From there, you can choose which fields to show or hide, things like first name, address, phone, company, or order notes.
With everything working as expected, your store is now ready to offer customers a faster, one-page checkout experience that saves time and boosts conversions. Next, let’s look at how to troubleshoot common setup issues to keep your checkout running perfectly.
Fixing Common Issues During WooCommerce Quick Checkout Set Up
Even after a successful setup, a few small issues can sometimes appear. Most are easy to handle if you know what to check. Here’s how to fix common WooCommerce Quick Checkout problems and keep your checkout process running smoothly.
Checkout Page Not Displaying Properly
If your checkout page appears blank or broken, it’s usually because of a theme or caching issue. Try clearing your browser and site cache first. If that doesn’t help, temporarily switch to a default WordPress theme like Storefront. This helps identify whether your theme is causing layout conflicts.
Payment Gateway Not Working
When payment options fail to appear, head to WooCommerce → Payments and confirm that your gateways are enabled and correctly configured. Run a test order in sandbox mode to make sure transactions go through. Keeping gateways updated and synced helps avoid most payment-related issues.
Checkout Fields Not Updating Instantly
If changes you make to checkout fields aren’t showing up, go back to your Quick Checkout settings and click Save Changes again. Refresh the checkout page and make sure AJAX is enabled for automatic updates. This ensures the form reacts instantly when customers change shipping or payment details.
Plugin Conflicts
Sometimes, too many plugins trying to control the same checkout area can create conflicts. Deactivate all non-essential plugins, then reactivate them one by one to find the cause. Keeping only essential extensions reduces errors and ensures your Quick Checkout works consistently across your WooCommerce site.
Styling or Layout Problems
In case the checkout design looks misaligned or sections overlap, open the page editor and review your layout spacing. Adjust padding, margins, and any custom CSS. Preview the page on desktop and mobile views to ensure the checkout looks neat and easy to navigate on every device.
SSL or Security Warnings
If customers see a security warning during checkout, it usually means your SSL certificate isn’t active. Check your hosting control panel or WordPress settings to verify SSL status. Secure checkout pages are vital for protecting sensitive data and building trust with your shoppers.
Slow Checkout Loading
Slow checkout loading can frustrate shoppers and cause them to leave. Simplify the page by removing unused fields or plugins. Enabling caching and using a content delivery network (CDN) can also improve speed. A faster checkout keeps customers engaged and encourages them to complete their purchases.
How to Maintain and Update the Plugin After Setup?
Once your WooCommerce Quick Checkout is set up and running smoothly, regular maintenance helps keep it fast, secure, and error-free. Here are a few simple ways to make sure your checkout system continues to perform perfectly over time.
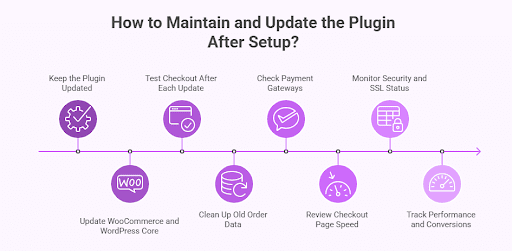
Keep the Plugin Updated
Always use the latest version of the WooCommerce Quick Checkout plugin. Updates often include bug fixes, new features, and better compatibility with WooCommerce. Before updating, create a full backup of your site to ensure you can easily restore it if something goes wrong.
Update WooCommerce and WordPress Core
Your plugin depends on WooCommerce and WordPress to work properly. Keep both platforms up to date to avoid compatibility issues. Running outdated versions can cause checkout errors or slow performance, so it’s best to update regularly once you’ve confirmed all plugins are supported.
Test Checkout After Each Update
After updating the plugin or WooCommerce, perform a quick test order. Make sure all fields, buttons, and payment methods work correctly. Testing helps catch small problems early before they affect real customers and ensures your checkout stays reliable across all devices.
Clean Up Old Order Data
Over time, your WooCommerce database stores unused order details, logs, and revisions. Cleaning this data keeps your site lighter and faster. Regular maintenance prevents your checkout page from slowing down and ensures smooth processing even during high traffic.
Check Payment Gateways
Payment gateways rely on secure connections that can expire or break after updates. Verify that each payment option — such as Stripe, PayPal, or manual transfer — is still connected and processing payments correctly. Reconnect or update credentials if needed to maintain seamless transactions.
Review Checkout Page Speed
A slow checkout frustrates buyers and can lead to cart abandonment. Test your checkout speed occasionally using tools like Google PageSpeed Insights. Optimize by enabling caching, using a CDN, or disabling heavy scripts that may slow down page loading.
Monitor Security and SSL Status
Make sure your SSL certificate is active and your checkout page shows the secure “https” padlock. Run security scans occasionally to protect customer data. A secure checkout page builds trust and helps prevent payment errors or warning messages during transactions.
Track Performance and Conversions
Use WooCommerce Analytics or Google Analytics to monitor checkout conversions, bounce rates, and load times. Tracking performance helps you spot new issues quickly. If you notice unusual behavior — like rising abandonment rates — recheck your setup and settings to fix it early.
Tips for Getting the Best Out of WooCommerce Quick Checkout
A few simple adjustments can make your WooCommerce Quick Checkout faster, cleaner, and more effective. Here are some helpful tips to improve performance and create a smoother experience for your customers:
- Keep the Checkout Page Minimal: Remove unnecessary fields or sections that don’t help customers complete their purchase. A simple layout reduces confusion and improves checkout speed.
- Enable Guest Checkout: Allow customers to buy without creating an account. This saves time and increases conversions, especially for first-time shoppers.
- Use Clear and Simple CTAs: Write short, direct button labels like “Place Order” or “Complete Purchase.” Clear CTAs guide customers and make the checkout process feel straightforward.
- Highlight Trust Indicators: Add SSL badges, payment security icons, or short reassurance notes near the payment area to build trust and reduce hesitation.
- Test Your Checkout on All Devices: Preview and test your checkout on mobile, tablet, and desktop to ensure it looks clean, loads quickly, and functions perfectly across all screens.
- Offer Multiple Payment Options: Include widely used payment methods such as PayPal, Stripe, and wallet payments. More options mean fewer drop-offs at the final step.
- Monitor Analytics Regularly: Track checkout data in WooCommerce or Google Analytics to find drop-off points. Use the insights to make small, continuous improvements.
- Keep a Consistent Design: Match colors, fonts, and button styles with your brand identity. A consistent look builds confidence and creates a smooth buying experience.
Conclusion
Learning how to set up WooCommerce Quick Checkout is one of the simplest ways to improve your store’s performance. A fast, one-page checkout keeps customers focused and reduces the steps that often cause them to abandon their carts. It turns the final stage of shopping into a quick, seamless experience.
When you take time to set it up correctly, from installation to testing and maintenance, you create a checkout flow that feels smooth, secure, and effortless. Regular updates and small design tweaks keep it performing perfectly as your store grows.
In the end, Quick Checkout isn’t just a feature; it’s an upgrade that helps your WooCommerce store convert more visitors into happy, returning customers while delivering a checkout experience that truly stands out.