My laptop keeps displaying an ‘automatic repair, your PC did not start correctly, tried restarting the system multiple times but to no avail. The next day, I hoped it would start normally, but I am still stuck in a loop. I urgently need my laptop for next week and really need all my files. Please, someone help me out.” ——A Question from Reddit
A ‘Your PC did not start correctly’ error suggests an interruption during the boot process. There are many reasons for this, which we will discuss in this article, and we will also share 11 ways to fix this issue. So, stay tuned till the end!
Your PC Did Not Start Correctly: Full Guide 2024
Part 1: Why Does the Error Message ‘Your PC Did Not Start Correctly’ Appear?
You may see the ‘Your PC did not start correctly’ message when booting your Windows computer. Several factors could disturb the startup and trigger this error, such as:
- Erased or corrupted essential OS files on the hard drive.
- Glitchy system updates.
- Failing to shut down the OS correctly before turning off the PC.
- Abrupt electricity cuts during startup.
- Faulty RAM, storage drives, motherboards, and other hardware.
- The master boot record or boot configuration data is damaged.
- Damaged or incompatible device drivers.
Part 2: Using a Reliable Tool to Fix ‘Your PC Did Not Start Correctly’
Seeing the ‘automatic repair, your PC did not start correctly’ message may worry you about potential data loss, or you may assume it has already happened. If you want an automatic way to fix this startup error and back up your data, consider using a reliable tool like 4DDiG Windows Boot Genius.
It can identify and repair 30,000+ Windows issues, including incorrect startups, black/blue screen errors, stuck restarts, and automatic repair loops. Moreover, it can do much more besides performing Windows system repair:
- Back up and restore crashed systems, formatted drives and lost partitions.
- Retrieve data from unbootable hard drives.
- Reset local and domain passwords in Windows.
- Clone hard drives for emergency and OS upgrade.
- Create, manage, and format partitions.
- Burn a bootable system to CD/USB.
- Help wipe sensitive data.
Check out the detailed steps below to use this tool to fix the Windows startup issue:
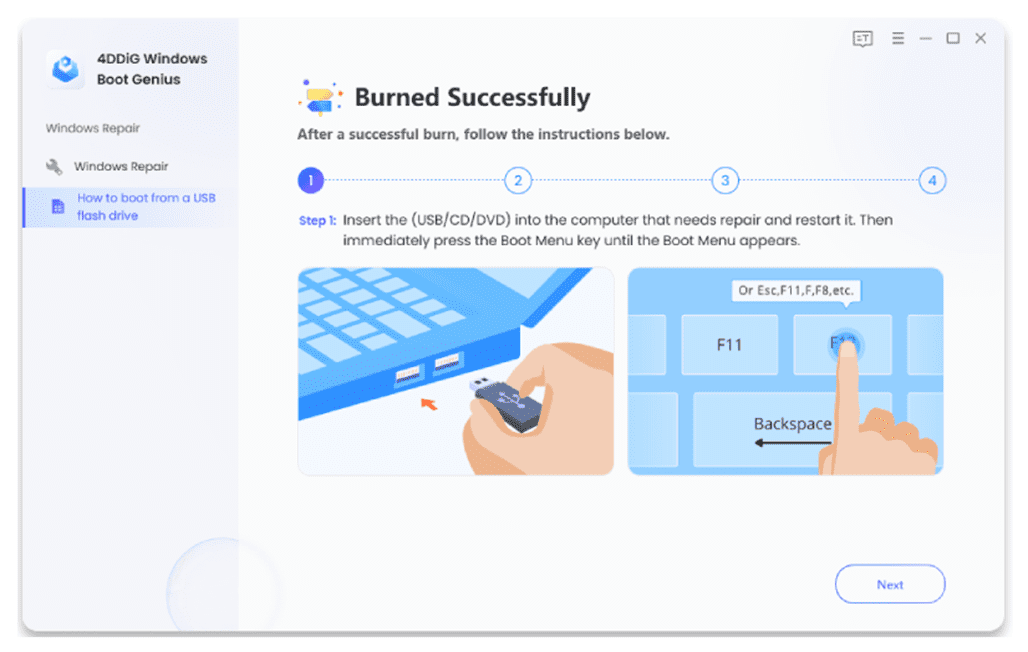
Step 1: Open the tool on a functional computer and put a blank CD/DVD or USB drive into the computer. Hit “Create Now” to create a bootable media for the problematic PC.

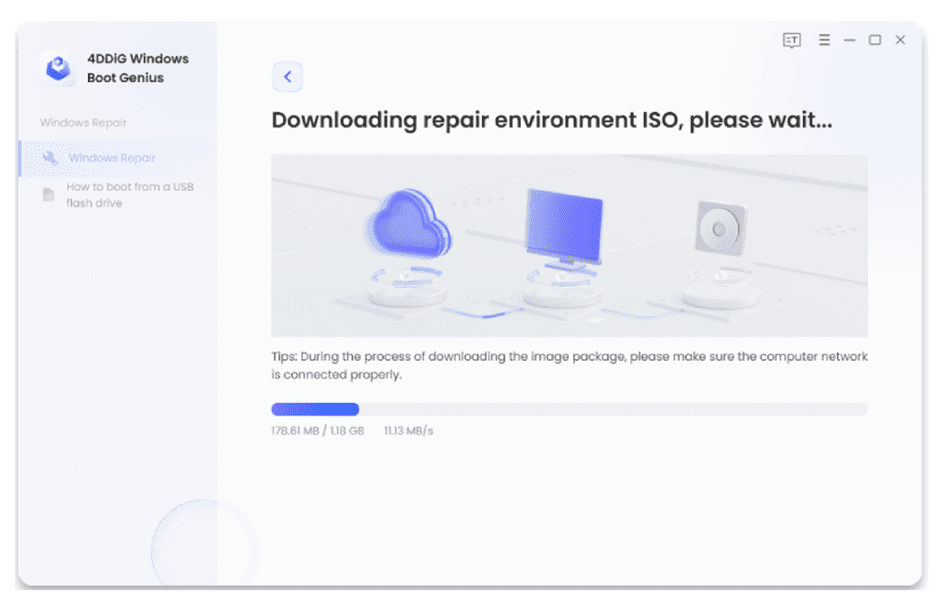
Step 2: Wait for the tool to automatically fetch the repair files necessary to diagnose and resolve OS startup problems.
Step 3: Once the recovery disk is prepared, use it and follow the on-screen instructions to reboot your problematic PC in the 4DDiG recovery environment.
Part 3: Alternative Ways to ‘Fix Your PC Did Not Start Correctly on Windows 10/11’
Apart from using 4DDiG Windows Boot Genius, there are numerous free manual methods to resolve the ‘Your PC did not start correctly Windows 11/10’ error. If you’re okay with hands-on approaches, here are ten alternative ways:
Fix 1: Reboot Your Computer
Start rebooting your computer if you see the ‘Your PC did not start correctly Windows 11/10’ error. This often resolves temporary issues, and you can select “Restart” from the “Automatic Screen” error to get Windows running normally again.
Fix 2: Use Automatic Repair
If your PC keeps showing the ‘automatic repair, your PC did not start correctly’ message after restart, use the Startup Repair tool. It’s a built-in Windows feature to identify and fix issues preventing your computer from booting correctly. Here’s how to use it:
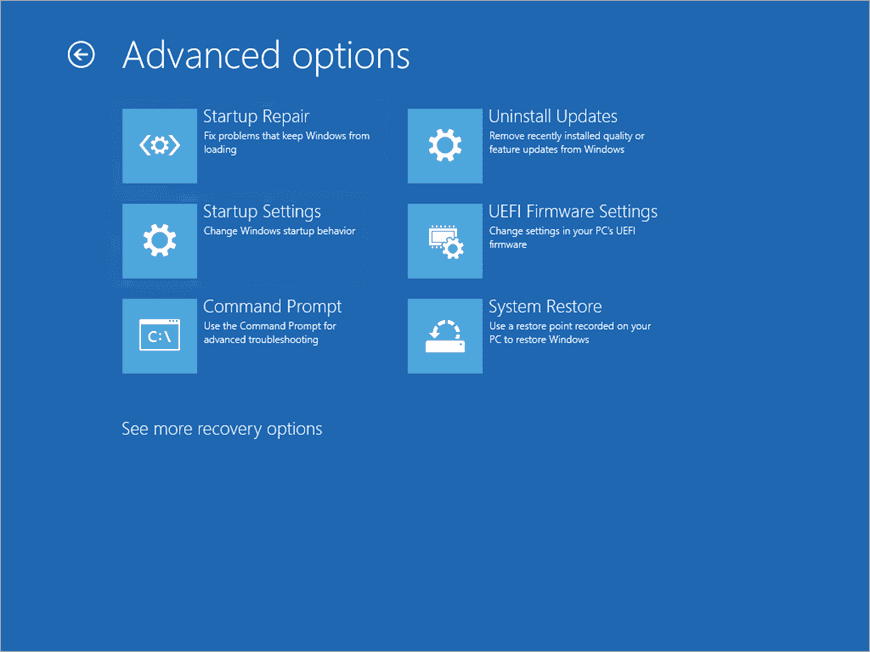
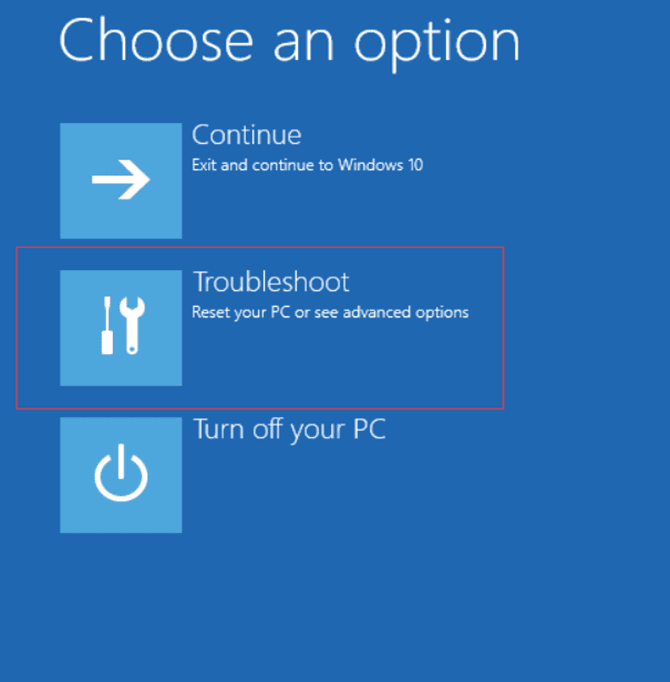
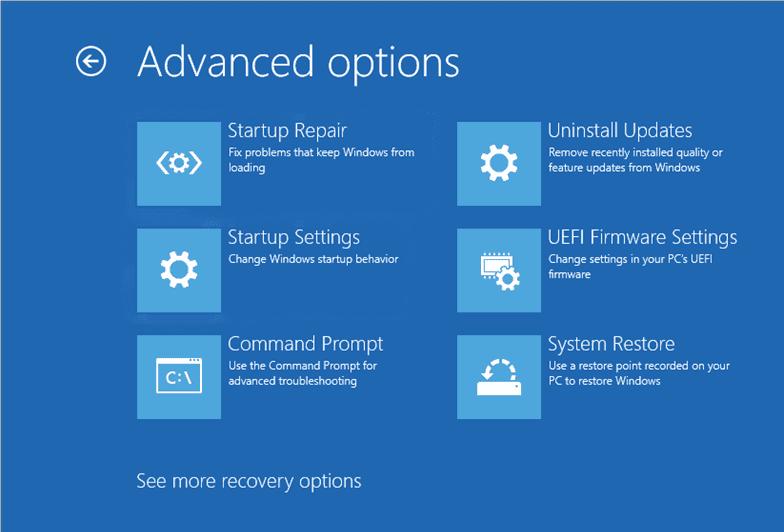
Step 1: From the error screen, choose “Advanced options.”
Step 2: Choose “Troubleshoot,” click “Advanced Options,” and select the “Startup Repair” tool.
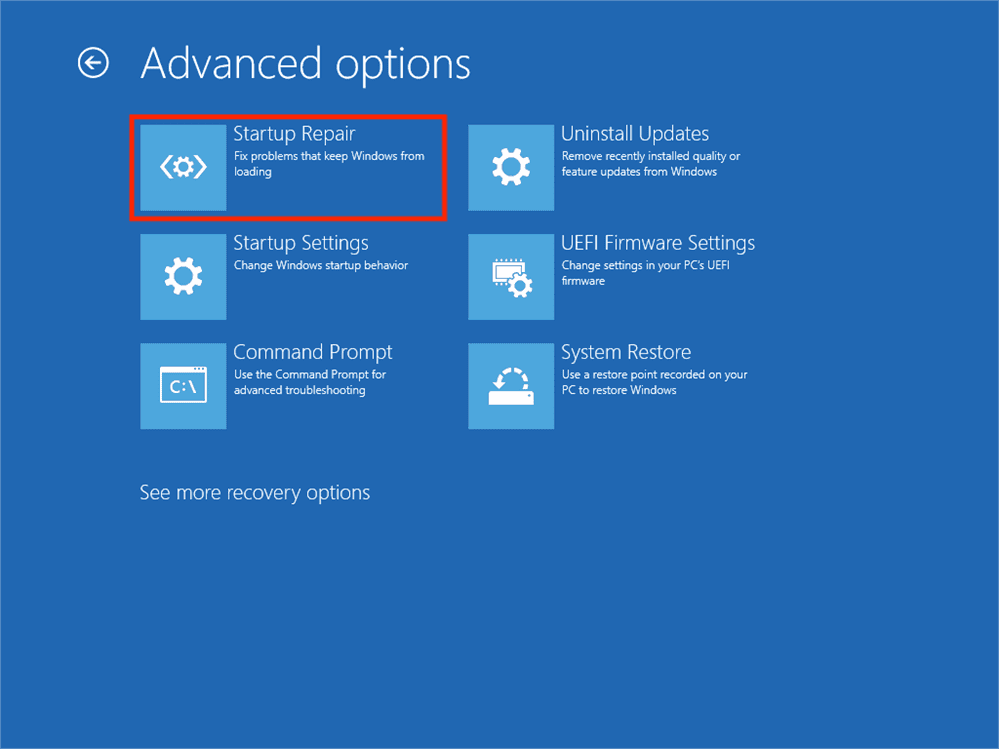
Step 3: The tool will fix the issue, and after it’s done, restart and check if you can boot into Windows.
Fix 3: Boot into Safe Mode
Try booting into Safe Mode to troubleshoot. Safe Mode loads only the essential components needed for Windows to run. This fixes any driver or software conflicts causing the ‘Your PC did not start correctly Windows 10/11’ error. Check out the steps below to load your computer into Safe Mode:
Step 1: On the error screen, choose “Advanced Options.”
Step 2: Click “Troubleshoot,” select “Advanced Options,” then “Startup Settings.”
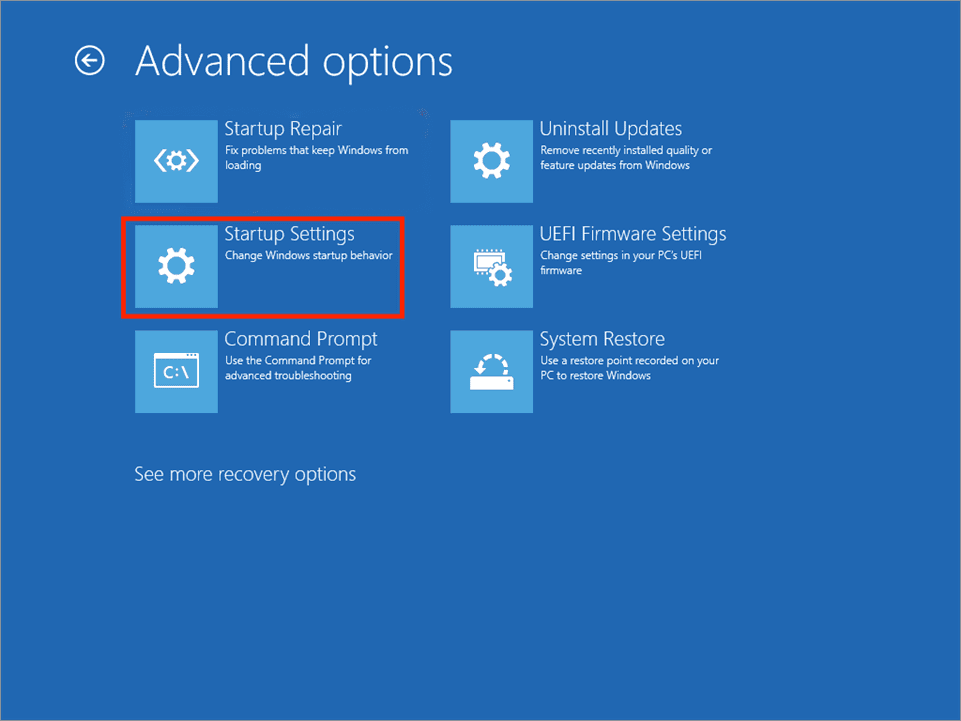
Step 3: Click “Restart.” When your PC reboots, press F4 to “Enable Safe Mode” from the “Startup Settings.”

Before returning to your standard Windows, consider backing up important data in case of potential issues.
Fix 4: Repair Disk Errors
Structural problems and inconsistencies in the file system and directory can also trigger the Your PC did not start correctly Windows 11/10’ error. To fix it, you can use CHKDSK, a built-in Windows tool that identifies and repairs disk errors. Here’s how:
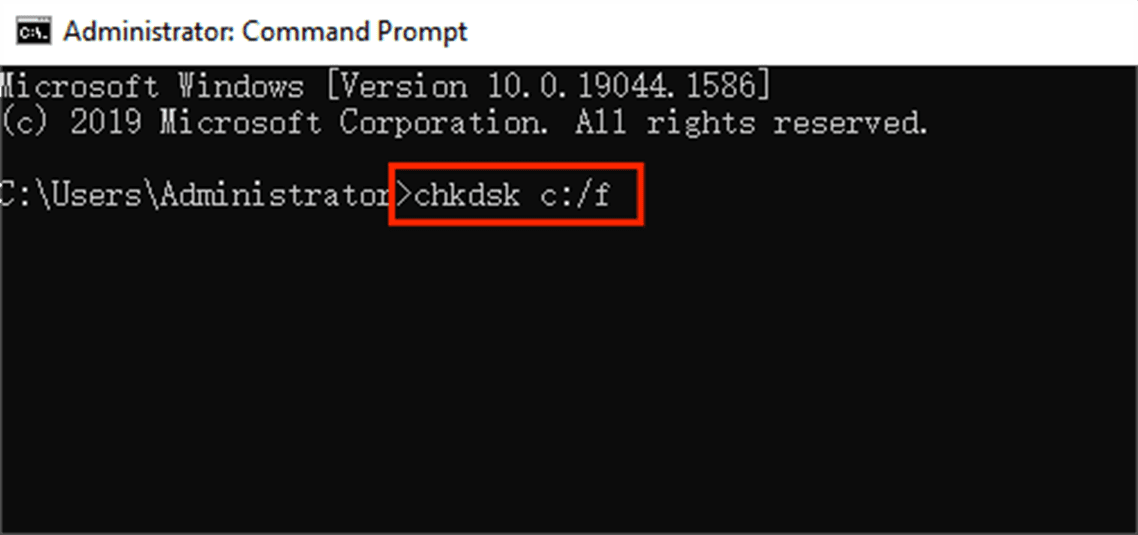
Step 1: Choose “Advanced Options” from the ‘Your PC did not start correctly’ error screen and press “Command Prompt.” Open it in the administrator mode.

Step 2: Type “chkdsk c: /f” and replace “c” with the drive letter of your hard disk. Hit “Enter.”
The “f” command checks the entire disk and updates the folder directory to match the actual content on the drive, thus fixing the error.
Fix 5: Run SFC Scan
The ‘Your PC did not start correctly Windows 11/10’ error could happen due to corrupt Windows system and installation files. In such a case, use SFC scan to check for errors and replace faulty copies hindering proper Windows booting. Follow the instructions below to run the SFC scan:
Step 1: Access the “Command Prompt” through “Advanced Options” on the ‘Your PC did not start correctly’ error screen.
Step 2: Enter the “DISM.exe /Online /Cleanup-image /Restorehealth” command and hit the “ Enter” key to execute.
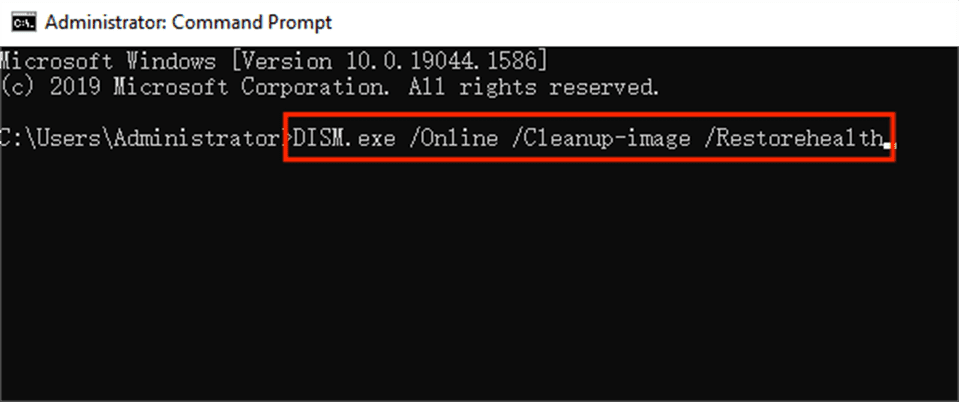
Step 3: Then, type in “sfc /scannow” and press “Enter” to launch the “System File Checker.”

Step 4: Finally, input the “shutdown /r” command and press “Enter” to complete.
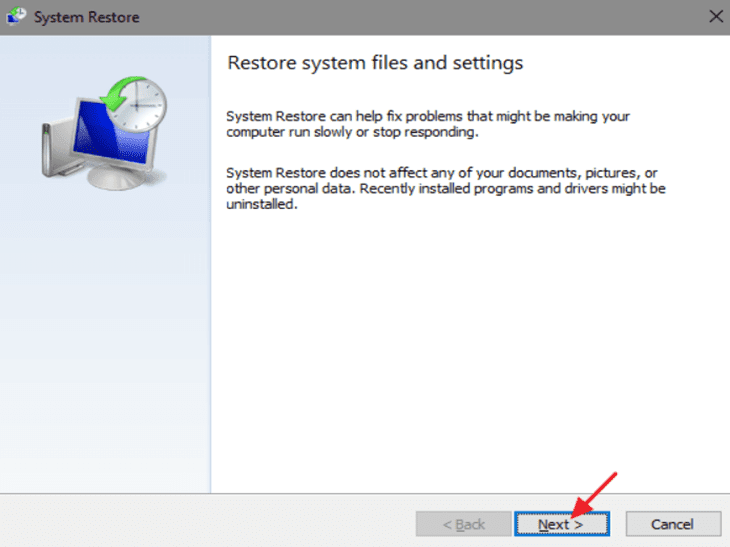
Fix 6: Perform a System Restore
Still stuck in the ‘Your PC did not start correctly’ loop? Perform a system restore. Restoring system files and settings lets you return to a previously stable state. Here’s how to utilize it:
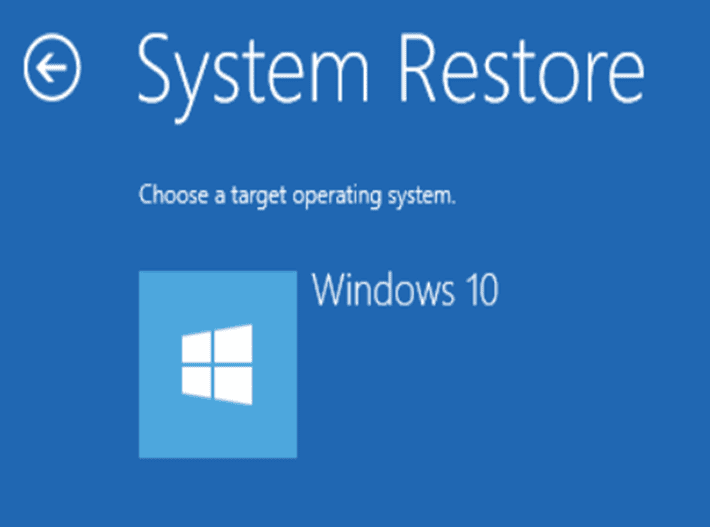
Step 1: Open “Advanced options” from the error screen and click “System Restore” to revert system files, drivers, and registry keys.
Step 2: Choose your Windows OS version when prompted. Follow the on-screen instructions to complete the “System Restore.” After restarting, check if rolling back system changes fixes the startup error.
Fix 7: Fix MBR
The Master Boot Record (MBR) is a unique boot sector that stores boot settings and disk content. If the MBR is corrupt or incomplete, it can lead to the ‘Your PC did not start correctly’ loop. Fortunately, you can resolve this by following the steps below:
Step 1: Open “Advanced options” from the ‘Your PC did not start correctly Windows 10/11.’ error screen and choose “Command Prompt.” Run it in the administrator mode.
Step 2: Enter “chkdsk/r” and wait for repairs to finish. If the problem persists, input the following commands and press “Enter” after each one:
- bootrec /fixMbr
- bootrec /fixboot
- bootrec /RebuildBcd

Step 6: Reboot your computer and check whether the MBR is repaired.
Fix 8: Check for Recent Software/Hardware Changes
BIOS/UEFI is a pre-boot environment housing hardware settings for your computer. It’s valuable for recovery since it operates even when Windows fails. A wrongly configured BIOS/UEFI could cause the ‘Your PC did not start correctly Windows 10/11’ error, hindering your PC from booting up. You need to start your computer in BIOS mode to tweak the following settings:
Fix 9: Disable Antivirus
Sometimes, an antivirus can disrupt your operating system, leading to the ‘Your PC did not start correctly’ error. To address this, disable any installed antivirus or anti-malware programs by following the steps below:
Step 1: Open “Advanced options” from the error screen and choose “Troubleshoot.
Step 2: Select “Startup Settings” and hit “Restart.”
Step 3: Press F8 to “Disable early-launch anti-malware protection after your PC reboots.”
Fix 10: Reset PC
Consider resetting your PC as a last resort if none of the previous solutions work. This gives your Windows 10/11 a clean slate, resolving whatever is causing the ‘Your PC did not start correctly’ problem. Here’s how:
Step 1: Open “Advanced options” from the error screen and choose “Troubleshoot.

Step 2: Select “Reset this PC” and choose either “Keep my files,” “Remove everything,” or “Restore factory settings.”

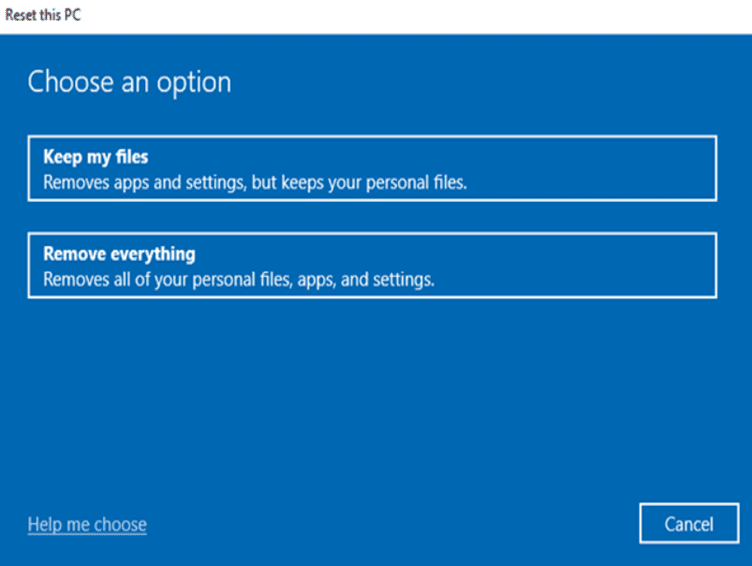
Step 3: Before proceeding, make sure to back up your data. Follow the on-screen instructions to complete the reset; this might take a while.
Step 4: After your PC restarts, go through the Windows first-time setup prompts again and log in as prompted.
Wrap Up
Software, hardware, or power cut issues often cause the ‘Your PC did not start correctly’ error. But we’ve covered 11 methods to address it for your convenience. If you prefer skipping the manual fixes, consider a time-saving solution like 4DDiG Windows Boot Genius. It can repair 30,000+ Windows problems and backup, manage partitions, and recover unbootable systems.