In today’s digital age, printing photos for documents may seem like a thing of the past. However, there are still times when it is necessary to have physical copies of photos for official documents, identification cards, or legal purposes.
In this blog post, we will give you a step-by-step guide on how to print passport photos at home in accordance with the official requirements, including tips on choosing photo paper and a home printer. So, whether you plan to print a headshot for a job application or a passport-sized photo for travel documents, you’ll know how to make photos quickly and effectively.
1. Choose the Right Printer
When it comes to printing photos for documents, having a high-quality printer is crucial. Look for a printer that offers good resolution and color accuracy. Inkjet printers are generally recommended for photo printing due to their ability to produce vibrant colors and sharp details. Check out the article about the best photo printers to find the perfect one for home printing.
2. Use High-Quality Photo Paper
Wondering how to choose photo paper? For the best results, invest in high-quality photo paper designed specifically for your type of printer. Glossy or satin finishes are often used for document photos because they provide a professional look.
3. Prepare Your Photo
Before printing, be sure to adjust the size and resolution of the photo according to the document requirements. You can resize and crop images in most photo editing software. However, you should follow the specific guidelines provided by the document issuer regarding photo dimensions, image background, paper type, etc.
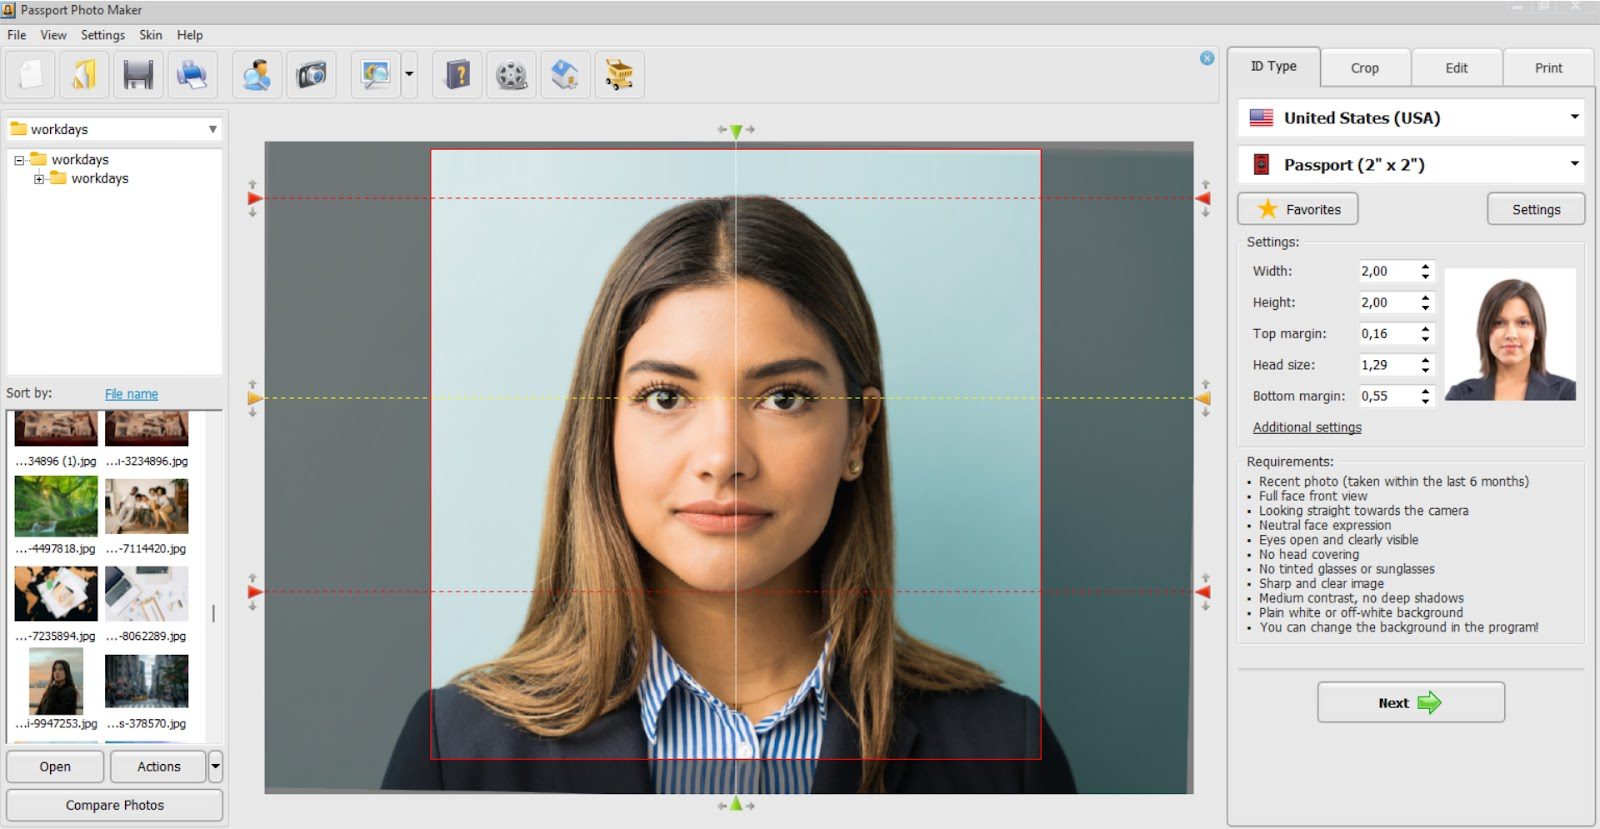
If you don’t want to mess it up, invest in some passport photo software that comes with a built-in database, automatic photo cropping, and paper-saving print layouts, letting you easily create ID photos in a few clicks. In our case, it’s Passport Photo Maker. Here are the steps:
Step 1. Upload your photo into the program.
Step 2. Select a country from over 130 database options and an ID type (passport, visa, green card, driver’s license, firearms license, etc.).
Step 3. Crop your photo with the smart face detection feature.
Step 4. Change the picture background or your clothes in a few clicks.
Step 5. Print your passport photo at home by setting the number of copies and picking the paper size.
Conclusion
It may seem like a daunting task at first, but with the right tools and techniques, you can get professional-looking prints that meet the requirements from the comfort of your own home. By following this step-by-step guide on how to print passport-size photos and practical tips on choosing photo paper and printers, you’ll be able to create photos for documents with ease. So, the next time you need any official document photos, skip the long lines and expensive photo studios and enjoy the convenience of home printing.