Metal is a great material to laser engrave. It can be engraved with text, logos, and other designs. The results can be stunning and look great on a range of products. If you want to know how to laser engrave metal, read on for our five-step guide!
5 Steps!
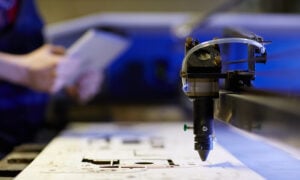
Laser engraving for metal is easy with the right laser engraver. When you have the right machine, it’s simply a matter of choosing your design and engraving it onto the metal. It is important to choose the right laser engraver for metal though, as not all machines are equal.
Some laser engravers are better than others when it comes to engraving metal. Here are five steps to help you get the best results:
1. Choose the Material You Want to Work With
The first step is to choose the metal you want to laser engrave. There is a range of metals available, each with its benefits and drawbacks. Do some research to find the metal that is right for your project. In general, laser engraving works best on metals that are not too thick and have a smooth surface.
For thicker metals, you may need to use a laser cutting machine. The type of laser engraver you have will also impact the type of metal you can engrave. On some machines, only certain metals can be used. So, it’s important to check what types of metal your laser engraver can handle.
2. Select the Applications You Want to Use Laser Engraving For
Once you have chosen the metal you want to laser engrave, the next step is to select the applications you want to use it for. There are several ways you can use laser engraving on metal. For example, you can engrave text, logos, or other designs onto metal products.
You can also use laser engraving to create patterns or textures on metal surfaces. If you’re not sure what you want to use laser engraving for, take a look at some examples online or in magazines. At this stage, it’s also a good idea to start thinking about the design you want to engrave.
When laser engraving, the design needs to be created in a vector format. This is a type of file that can be read by laser engraving machines. Vector files can be created in several ways, including using vector drawing software like Adobe Illustrator.
3. Determine If You Need to Engrave the Part Radially
In some cases, you may need to engrave the metal part radially. This means that the laser beam will need to follow a circular path around the metal part. Radial engraving is often used to create textured or patterned designs on metal surfaces.
If you’re not sure if you need to engrave the part radially, ask your laser engraving service provider for advice. Also, check the user manual for your laser engraving machine to see if it has this feature. Some laser engravers cannot engrave radially.
With these machines, you’ll need to engrave the metal part in a straight line.
4. Program the System To Perform The Engraving
After you have chosen the metal, application, and design, the next step is to program the laser engraving machine. This will involve setting up the machine and entering the necessary information, such as the engraving depth and speed.
If you’re not sure how to program the laser engraver, ask your laser engraving service provider for help. They will be able to show you how to set up the machine and enter the necessary information. In some cases, they may even be able to program the laser engraver for you.
When programming the laser engraver, it’s important to select the correct settings. If the settings are not correct, the engraving quality will suffer.
5. Utilize Proper Safety Procedures and Begin Engraving
Now it’s time to start laser engraving metal! But before you begin, it’s important to follow all the safety procedures for your laser engraver. These procedures will vary depending on the make and model of your laser engraver. On some laser engravers, you’ll need to wear safety glasses.
With other laser engravers, you may need to use a ventilation system. Be sure to read the user manual for your laser engraver and follow all the safety procedures. Once you’re ready, begin laser engraving metal! Start with a small area and engrave slowly to get a feel for the process.
If you’re not happy with the results, you can always adjust the settings on the laser engraver and try again. A laser engraver is a great tool for creating personalized metal products. With a laser engraver, you can add text, logos, or other designs to metal products. You can also use laser engraving to create textures and patterns on metal surfaces.
If you’re thinking about laser engraving metal, follow these five steps to get started.
Conclusion
Laser engraving is a process that etches an image or text into the surface of a metal item. It can be used to create unique and personalized gifts, add decoration to household items, or mark important belongings with identification information.
If you’re looking for a way to create custom gifts or personalize your belongings, laser engraving may be the perfect solution for you. In this article, we’ve outlined five steps for how to laser engrave metal so that you can get started with your projects.