
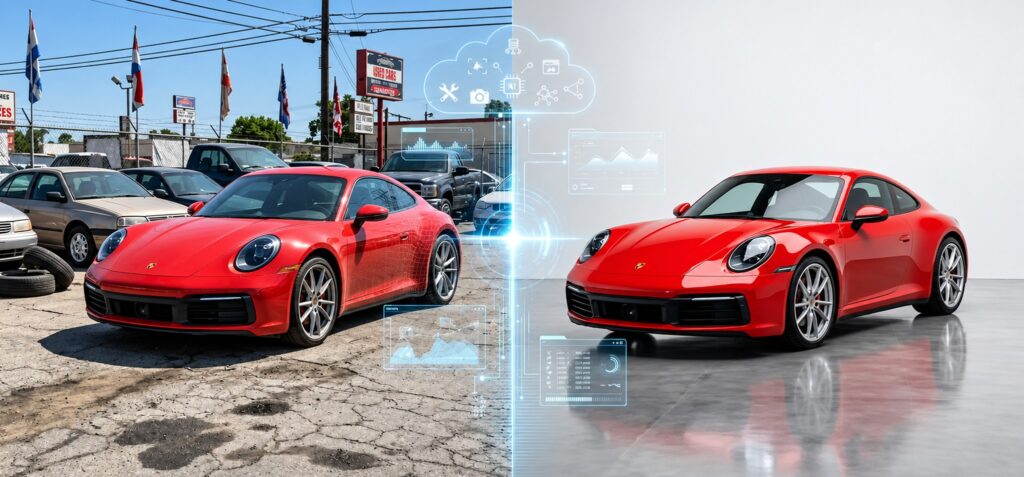
Picture a dealership on a busy Monday morning. Three cars have just arrived, two are parked beside a fence, one is squeezed between other vehicles, and somebody needs all of them photographed before lunch.
There is no studio. The weather is not helping. Moving every car to the perfect location would take longer than taking the photos themselves.
This is how most vehicle photography actually happens.
The good news is that a professional-looking listing does not always require a dedicated photo bay, expensive lighting, or hours inside Photoshop. What matters more is having a repeatable process, a clean starting photo, and the right editing help.
Here is a practical way to do it.
Start With a Better Source Photo
Editing can fix a lot, but it should not have to rescue everything.
Before worrying about backgrounds, logos, or filters, give yourself a clean starting point. Move obvious rubbish away from the car, close the doors, straighten the wheels, and check the number plates.
Camera height matters more than people think. Shooting too high can make the car look small, while an extremely low angle can distort the proportions. A position roughly around head height, with the car centred in the frame, works for most vehicles.
Then keep your angles consistent. If one vehicle is photographed from six completely different positions and the next has four random shots, the dealership page quickly starts to look uneven.
A simple sequence works well:
- Front three-quarter view
- Rear three-quarter view
- Straight front
- Straight rear
- Driver and passenger sides
- Wheels and important details
- Dashboard and interior
- Cargo area or trunk
For larger vehicles, the same approach needs a little more attention to interior coverage. For example, businesses selling used RVs should include photographs of the living area, sleeping space, kitchen, and bathroom, along with the exterior shots above.
These additional views help prospective buyers understand how the space is arranged and what the vehicle offers beyond its appearance. A consistent photography sequence makes it easier to compare vehicles and helps the inventory page feel organised.
You are not trying to make every car look dramatic. You are trying to make every listing easy to understand.
Fix the Background Without Making the Car Look Fake
This is where things get interesting.
On a dealership lot, everything might be perfectly fine in real life, but it does not always photograph well. Other cars appear behind the subject. Signs cut across the roofline. Poles and fences enter the frame. The car itself might be fine, but the surroundings distract from it.
Removing those distractions can immediately make the listing feel more polished.
What matters is making sure the replacement still looks believable.
Poor background editing usually fails around the details: windows still show the old parking lot, mirrors have rough edges, antennas disappear, tires look like they are floating, or the shadow sits in the wrong place.
A tool built specifically for car background replacement can handle this differently from a general background remover. Car Background AI, for example, is designed around vehicle dimensions and works with a wide range of angles and vehicle types.
What really matters is that last part.
Your objective is not to turn a real vehicle into something that looks computer-generated. It is to remove the visual noise around it.
Choose One Background Style and Stick With It
Once you can change the background, the temptation is to use a different one for every vehicle.
Try not to.
Consistency usually looks more professional than variety when you are dealing with inventory photography. If one sedan is inside a luxury showroom, another is on a city street, and a third is in a field, the page starts to feel scattered.
Pick a visual direction that suits the brand.
A neutral studio background works well because it keeps attention on the vehicle. A simple showroom can feel more premium. An outdoor setting can work too, especially when it matches the type of vehicle being sold.
Which background you choose matters less than using it consistently.
Custom scenes can also be useful if you want the images to feel specific to your dealership. A branded showroom-style environment can give listings a recognizable look without requiring a physical photo space.
Lighting Still Needs Attention
Changing the background does not automatically make the photo good.
A dark vehicle photographed on an overcast afternoon can still look dull after the background disappears. A white car photographed in harsh sunlight can lose details along the body lines.
Before publishing, check the basics:
Is the vehicle bright enough to see clearly?
Do the paint colors look realistic?
Can you still see detail in the dark areas?
Are the highlights too strong?
Does the car look noticeably brighter or darker than the new background?
Here, light and color correction can help. Small adjustments to exposure, contrast, white balance, and brightness can make the vehicle sit much more naturally inside the finished scene.
Avoid pushing the edit too far. Buyers should still recognize the exact car when they arrive at the dealership.
Usually, the best edit is the one they barely notice.
Do Not Forget the Shadow
Take a perfectly cut-out car and place it onto a clean showroom floor without a shadow.
Something immediately feels wrong.
You may not even know why at first. The car simply looks like it has been pasted onto the image.
A believable ground shadow gives the vehicle weight. It tells your eye where the tires meet the surface and helps connect the original photograph with the new background.
Your shadow does not need to be dramatic. In fact, it probably should not be.
It just needs to make sense with the floor and lighting around it.
Often, this small detail is the difference between a background replacement that looks natural and one that screams “edited.”
Keep Branding Subtle
Vehicle photos can also reinforce dealership branding, but there is a fine line between branding the image and covering it.
A small logo, consistent frame, or simple branded element is usually enough. Your vehicle should remain the thing people notice first.
If every photo needs the same logo placement, doing it manually becomes repetitive very quickly. That is especially true for dealerships adding dozens of vehicles each week.
Templates and automated branding become useful here. Set the visual rules once and apply them across the inventory rather than rebuilding the layout for every photo.
Consistency saves time, but it also makes the dealership look more organized.
Build a Workflow for More Than One Car
Editing one car is easy.
Editing 20 cars is where the workflow gets tested.
Imagine each vehicle has 15 photos. Twenty new vehicles now means 300 images. If every background needs to be removed manually, every logo needs to be positioned separately, and every setting needs checking, the process quickly becomes unsustainable.
Bulk editing changes the equation.
Instead of treating each image as a separate design project, apply the same background, branding, and basic settings across the batch. Review the finished images afterward and make small corrections where needed.
That is a much better use of human time.
Software handles repetition. A person handles exceptions.
Review the Listing as a Set, Not Individual Photos
Before publishing, stop looking at each photo by itself.
Open the entire listing.
Do the angles flow logically?
Does the background stay consistent?
Are some images much darker than others?
Is the logo always in the same place?
Does one image suddenly look heavily edited compared with the rest?
Then open the dealership inventory page and look at several vehicles together.
That view often reveals problems you miss when editing one photo at a time. A single image can look great while still feeling completely out of place beside the rest of the inventory.
You are not aiming for just one good photograph.
You are building a professional-looking catalog.
Final Thoughts
You do not need to build a physical studio to make vehicle listings look polished.
A decent source photo, consistent angles, clean backgrounds, believable shadows, balanced lighting, and restrained branding can do most of the work. AI editing simply makes that process faster and more consistent.
What matters is not making every vehicle photo look spectacular on its own. It is creating a workflow where the tenth car photographed on Friday afternoon looks just as clean and consistent as the first car photographed on Monday morning.
That is what turns ordinary lot photography into professional inventory.